
Windows Subsystem for Linux 2 (WSL2) is Microsoft’s powerful virtualization layer that lets you run a full Linux environment directly on Windows 11 without dealing with dual-boot headaches or clunky virtual machines. Need to install WSL2 for Docker development, run Linux CLI tools, or manage servers? WSL2 on Windows 11 delivers near-native performance while keeping everything integrated in 2026.
WSL 2 is a massive leap forward from the original version. You get full Linux kernel compatibility, faster file-system performance, and Docker container support right out of the box. Linux applications can tap into Windows files and the other way around, making cross-platform development surprisingly smooth.
This guide covers everything you need to install WSL2 on Windows 11 in 2026, step by step. We’ll check system requirements, enable the right features, help you pick a Linux distribution like Ubuntu or Debian, optimize performance, and fix common problems. Works whether you’re running Windows 11 Home or Pro.
What Is WSL2 and Why Use It on Windows 11?
WSL2 (Windows Subsystem for Linux 2) is a compatibility layer baked into Windows that runs an actual Linux kernel inside a lightweight virtual machine. The original WSL 1 translated Linux system calls, but WSL 2 ships a real kernel. That means full system-call compatibility, dramatically faster file I/O, and native support for tools like Docker.
For developers, IT professionals, and Linux enthusiasts on Windows 11, WSL2 kills the need for dual-boot setups or resource-hungry virtual machines. You get a complete Linux environment sitting right next to your Windows desktop. Run bash scripts, develop in VS Code with remote containers, manage servers, and use all your favorite Linux tools without ever leaving Windows.
WSL2 System Requirements and Preparation
Before you install WSL2 on Windows 11, your machine needs to meet these specs:
- Windows 11 (Home, Pro, or Enterprise) with all updates installed
- A 64-bit processor with virtualization support (Intel VT-x / AMD-V)
- At least 4 GB of RAM (8 GB works better)
- Minimum 5 GB of free disk space
Pro Tip
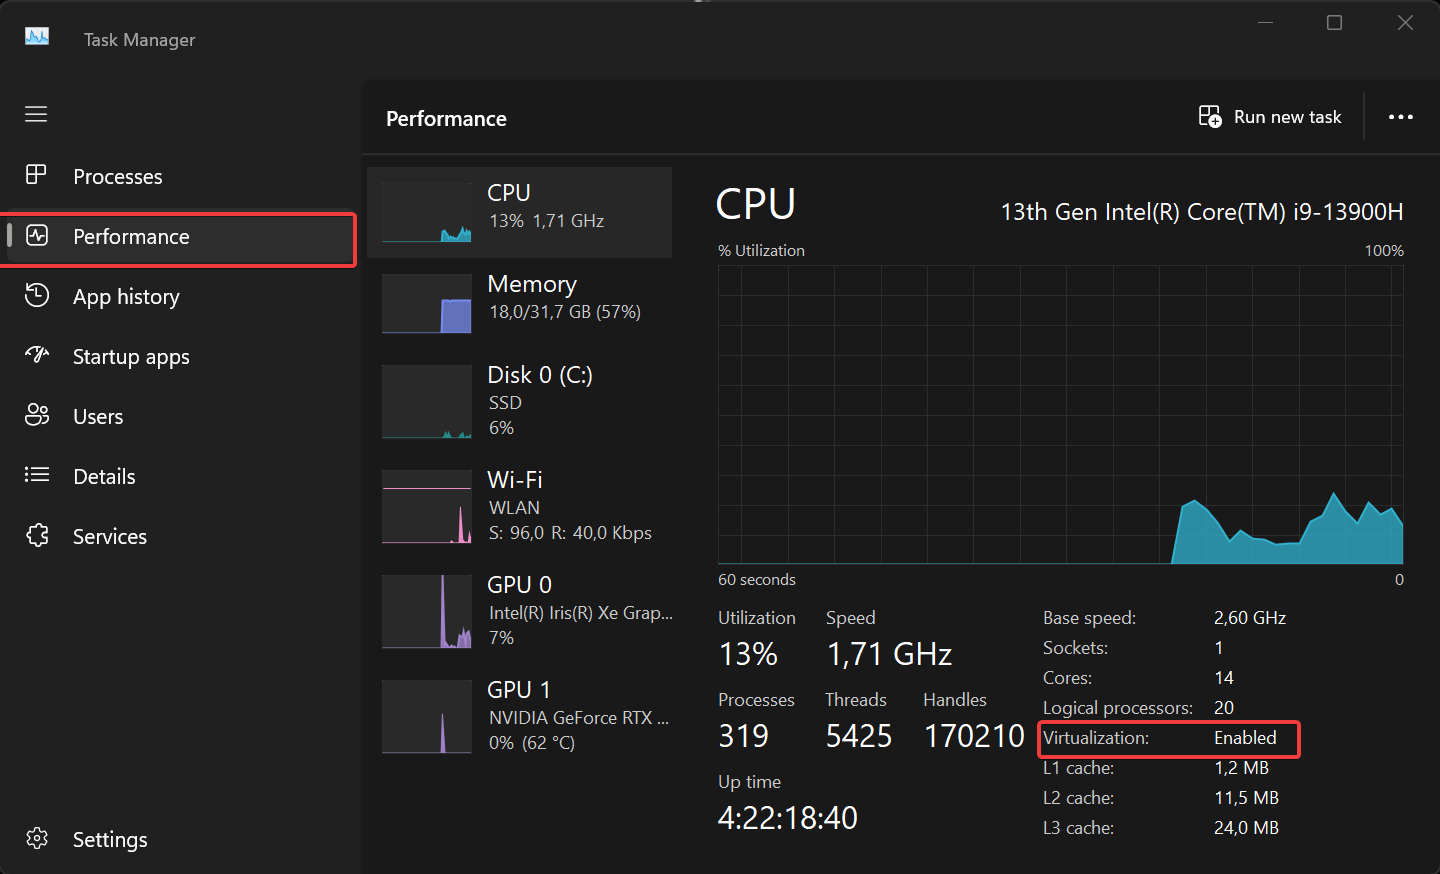
To verify virtualization is enabled: Open Task Manager (Ctrl + Shift + Esc), click the Performance tab, and look at the ‘Virtualization’ status. And yes, WSL2 on Windows 11 Home is fully supported. You don’t need the Pro edition.
How to Install WSL2 on Windows 11: Quick PowerShell Method
The fastest route to install WSL2 on Windows 11 is one PowerShell command. Here’s the process:
- Open PowerShell as administrator (right-click Start, then choose “Windows Terminal (Admin)” or “PowerShell (Admin)”)
- Run the install wsl2 command:
wsl --installThis install wsl2 command wsl –install automatically handles:
- Enabling required Windows features (Virtual Machine Platform, Windows Subsystem for Linux)
- Downloading the latest WSL2 kernel
- Setting WSL 2 as the default version
- Installing Ubuntu as your default Linux distribution
Important
Once the installation wraps up, restart your computer. The WSL2 setup won’t finish without it.
Choosing Your Linux Distribution for WSL2
The wsl –install command picks Ubuntu by default, but Windows 11 supports plenty of Linux distributions through WSL2. Here are some solid options:
| Distribution | Best For | Command |
| Ubuntu | beginner-friendly default choice | wsl –install -d Ubuntu |
| Debian | lightweight and stable | wsl –install -d Debian |
| Kali Linux | built for penetration testing | wsl –install -d kali-linux |
| Fedora | bleeding-edge packages | wsl –install -d Fedora |
Want to see every available distribution? Run this:
wsl --list --online
Pick your distro and install it with:
wsl --install -d <DistroName>Pro Tip
You can actually run multiple distributions at once on WSL2. Great for testing applications across different Linux environments. Still deciding which distro fits your needs? Our Comprehensive Guide to Operating Systems breaks down the differences.
Key WSL2 Management Commands
These PowerShell commands will help you manage your WSL2 installation on Windows 11:
See What’s Available
Shows every Linux distro you can download and install through WSL2.
wsl --list --online Check if WSL2 is Installed
Lists all installed distributions with their running state and WSL version. Use this to check if WSL2 is installed and confirm which version each distro is using.
wsl --list --verbose Make WSL 2 the Default
Forces all new distributions to use WSL 2 instead of WSL 1.
wsl --set-default-version 2 Update WSL2 Windows 11
Grabs the latest WSL2 kernel update from Microsoft. Run this regularly to update WSL2 Windows 11 and keep current with performance improvements and security patches.
wsl --update Stop Everything
Kills all running WSL2 instances immediately. Handy before making config changes or when troubleshooting problems.
wsl --shutdown WSL2 File System Integration on Windows 11
WSL2’s file system integration between Linux and Windows is genuinely useful. Here’s how it works:
Accessing Windows Files from Linux
Your Windows drives mount automatically under /mnt/ in WSL2. Your C drive lives at:
cd /mnt/c/ Accessing Linux Files from Windows
Type \\wsl$\ into File Explorer to browse your Linux file system straight from Windows.
Pro Tip
Create shortcuts to your most-used Linux directories in Windows File Explorer. Saves a ton of time.
WSL2 Performance Optimization on Windows 11
To squeeze better performance out of WSL2 on Windows 11, create or edit the .wslconfig file at %UserProfile%\.wslconfig with resource limits:
[wsl2]
memory=4GB
processors=2
swap=8GB
localhostForwarding=true
Tweak the memory and processors values based on your hardware. This stops WSL2 from eating too many system resources while keeping Linux operations fast. The localhostForwarding=true setting enables WSL2 mirrored networking Windows 11, which makes accessing services running inside Linux much simpler.
Configure Visual Studio Code with WSL2
Want to use Visual Studio Code directly from the WSL2 terminal for files inside the Linux file system? Install the VS Code WSL extension by running this inside your WSL2 session:
code .
VS Code detects WSL2 automatically and prompts you to install the Remote – WSL extension if it’s missing. Once connected, you edit and debug Linux-side files with the full VS Code experience: IntelliSense, extensions, integrated terminal, everything.
Troubleshooting Common WSL2 Issues on Windows 11
Hit a snag after installing WSL2? Try these fixes:
WSL2 Won’t Install or Enable
If the wsl –install command bombs, run sfc /scannow in elevated PowerShell to fix corrupted system files. Also verify virtualization is turned on in your BIOS/UEFI settings and the Virtual Machine Platform feature is enabled in Windows. The HCSEHYPERVNOTINSTALLED error on Windows 11 usually means virtualization is disabled in firmware. A quick BIOS toggle typically fixes it.
Linux Distribution Won’t Start
When your Linux distribution refuses to start, the WSL service might be stuck. Run wsl –shutdown to kill all instances, wait 30 seconds, then launch your distro again.
Slow WSL2 Performance
Poor performance often comes from over-allocated memory or too many processor cores. Check your .wslconfig settings and start with half your system’s RAM and no more than 75% of available cores. Keep project files inside the Linux file system (not on /mnt/) for the best disk I/O speed.
WSL2 Network Problems
Network issues in WSL2 usually clear up after resetting the network stack. Run wsl –shutdown, wait a minute, then restart your distribution to reinitialize the network configuration.
Advanced Tips for WSL2 Power Users
GUI Application Support in WSL2
WSL2 on Windows 11 supports Linux GUI applications natively through WSLg. Install your favorite graphical apps with apt and launch them directly. They show up as regular Windows windows next to your native apps, zero extra configuration needed.
Docker Desktop Integration with WSL2
Install Docker Desktop and enable the WSL 2 backend to run containers seamlessly alongside your Windows 11 environment. Docker Desktop uses the WSL2 engine by default for way better performance than the old Hyper-V backend.
Development Environment Setup
Build a complete development environment inside WSL2 by installing your language runtimes (Node.js, Python, Go), package managers, and version control tools. Pair this with VS Code’s Remote – WSL extension for a native-feeling development workflow entirely within the Linux file system.
Summary
Installing WSL2 on Windows 11 gives you a powerful, flexible way to run Linux alongside Windows without compromising performance. In this guide we covered system requirements, the quick PowerShell installation method, picking a Linux distribution, essential management commands, file system integration, performance tuning, VS Code integration, and troubleshooting.
Whether you’re a developer, system administrator, or Linux enthusiast, WSL2 on Windows 11 provides the tools you need for efficient cross-platform work. Keep both your Windows system and WSL2 kernel updated for the latest features and security patches. Now get out there and build something in 2026.
WSL2 Frequently Asked Questions
To install WSL2 on Windows 11 you need a 64-bit processor with virtualization support (Intel VT-x or AMD-V), at least 4 GB of RAM (8 GB recommended), 5 GB of free disk space, and a fully updated Windows 11 installation. WSL2 requirements Windows 11 are identical across all editions.
Yes, WSL2 Windows 11 Home support is complete. Unlike certain other virtualization features, WSL2 doesn’t require the Pro or Enterprise edition. The wsl –install command works the same across all Windows 11 editions.
Open PowerShell as administrator and run wsl –install. This install WSL2 Windows 11 PowerShell command handles everything: enabling required Windows features, downloading the WSL2 kernel, and installing Ubuntu. Restart when prompted to finish the setup.
Run wsl –list –verbose in PowerShell. If WSL2 is installed, you’ll see your distributions listed with their version number (1 or 2) and running state. If the command isn’t recognized, WSL is not yet installed on your system.
Start by running sfc /scannow in elevated PowerShell to repair corrupted system files. Then verify hardware virtualization is enabled in your BIOS/UEFI and the Virtual Machine Platform feature is turned on in Windows. If you see HCSEHYPERVNOTINSTALLED, the BIOS setting is almost always the culprit.