
What is Proxmox?
Proxmox or PRoxmoxVE or PVE is a virtualization platform which is based on the Debian Linux distribution. It is available for installation on Dedicated Servers via the Contabo Customer Control Canel (CCP) and also selectable during the ordering process. In this Introduction to Proxmox you will learn the basics on how to start your journey.

Since it is an open source software, no further costs will appear unlike several other solutions like HyperV.
Proxmox comes with a web interface used to manage the hosts and virtual server.
The Web Interface
After a successful installation you can access the web interface via the port 8006. Therefore you type into your web browser https://[YourIP]:8006/ but, of course, replace [YourIP] with the IP address of your server.

Within the login screen you use ‘root’ as user along with the normal Linux root password. Since it is the normal Linux-login, the “Realm” is correctly chosen as “Linux PAM standard authentication”.

The web interface is divided in four main parts:
- The list of servers and pools (sector A) provides a good overview of the installed virtual machines (VM) and pools.
- Within the menu bar (sector B) of the selected object, different menus can be invoked, which show their according information in sector C where you can also adjust respective settings.
- Particular actions and status messages are provided within the log button (sector D).
How to Upload an ISO-file?
It is recommended to first upload an ISO file of the operating system you are going to install your VMs with.
In order to do so you choose the location to store the image. Only one location is available in this example named ‘local’ (1). Within the associated menu bar you choose ‘Content’ (2). After then clicking the ‘Upload’ button (3), a menu pops up which allows you to upload local files.

How to Create Your First VM
Using the button ‘Create VM’ within the upper right corner of the web interface you can easily create virtual machines. Many settings can stay default and still be adjusted afterwards, if necessary. In the following the most important settings will be mentioned.

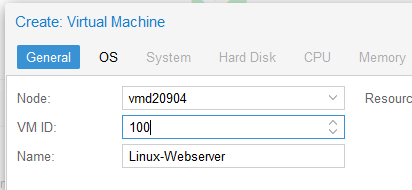
Within the new dialogue the ID of the VM can be chosen under the ‘General’ tab. This number can be selected once per host system and uniquely identifies a VM. A reasonable naming is recommended.
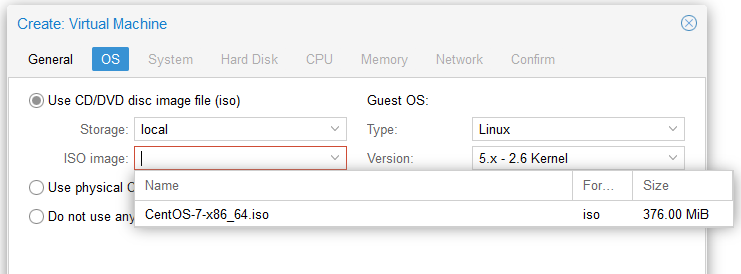
The ‘OS’ tab lets you choose the image previously uploaded. Alternatively you can create the VM without an installation media and perform the installation at a later time.
The tabs ‘Hard Disk’, ‘CPU’ and ‘Memory’ allow you to distribute the respective resources the VM shall have available. The number of ‘Total Cores’ is calculated by mathematically multiplying the number of sockets by the number of cores.
Within the last Tab a summery of the chosen parameters is given. After clicking ‘Finish’ the VM will be created.

How to Start and Install a VM
Once the VM has been created as described above it will be available within the overview of servers and pools. If selected, you can start it using the ‘Start’ button in the upper right of the web interface.

Having turned on the VM, you can change to the menu item ‘Console’. The screen of the VM will be displayed and you will be able to make entries via keyboard and mouse. The installation itself depends on the chosen OS and does not differ from a physical system.

Proxmox Pools
PVE provides the option to manage virtual machines within groups, so called Pools. This increases the clarity in a setup with a huge amount of VMs for different tasks. You can change the Pool of a VM anytime, multiple assignments, however, are not possible.
First you choose ‘Datacenter’ (1). The Menu item ‘Pools’ is located within the menu bar as submenu to ‘Permissions’ (2). With the button ‘Create’ (3) you can add a new Pool.

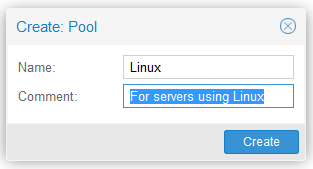
The name of the Pool will later be shown in the overview; the comment describes the idea of the respective Pool.
The created Pools is shown within the server and pool overview on the left side and can be selected. By choosing the menu ‘Members’, the assigned VMs are displayed and can be added or removed via the buttons ‘Add’ and ‘Remove’.

Backup
Regular backups are the best insurance against data loss and are always advisable.
In order to backup one or multiple VMs, you can use Snapshots. Proxmox then writes the current data into an additional file, so that the existing one, which has now become static, can be saved.
An easy option to backup all VMs in one go is the vzdump command:
vzdump -all -dumpdir /mnt/backup -mode -snapshotThe directory /mnt/backup has to be replaced by the backup directory of the according setup. It is, e.g., possible to use the Contabo Backup-Space. Automation via Cronjob is also possible. If you want to learn more about the Cron-Syntax, eheck out this artice.
To explore further Backup Strategies for your systems, check out our Backup Strategies Guide.
Keep Your System Up-to-Date
Besides regular backups you also have to ensure that the system is up-to-date. Since Proxmox is based on Debian, the package manager apt is used. After logging in to the host system via SSH, enter the following command:
apt-get update && apt-get upgradeConclusion & Outlook
The provided point are intended to explain the basics of using ProxmoxVE. In addition, this solution offers many other options. Storage technologies such as Ceph and NFS are already integrated and can be used after appropriate configuration. Furthermore, high availability systems can be realized starting from a cluster of three servers.
Thanks to the clear and easy to use web interface Proxmox offers an easy introduction. Many other options and solutions also allow professional use.
