The following guide will give you an overview on how to configure additional IPv4 addresses on the most popular operating systems. We designed this article to be helpful not only for our Contabo customers, but also for people using any other provider. In addition to learning how to configure IPv4 addresses, you may need to refer to our related article on how to configure IPv6 addresses: https://contabo.com/blog/adding-ipv6-connectivity-to-your-server
Video Guide
Getting Started
As an example, we will use 192.51.100.10 as the primary IP address and we will assume that the additional IP address is 192.51.100.42. As a general rule, we recommend configuring these addresses with a netmask of 255.255.192.0(/18) respectively /128 and without adding a new gateway.
If you’re not sure about your admin rights in Linux, always enter the command sudo -i at the beginning of every session:sudo -i
This command will grant you the rights of a power user, so you don’t have to write the command sudo at the beginning of every command line.
Default IP Configuration for Contabo Customers
Every server comes already pre-configured with one IPv4 and one IPv6 address. Additional IPv4 addresses can be ordered when placing an order for a new server through our homepage or by contacting us at [email protected]. Important: Additional IPv4 addresses will not be added to your system automatically but will have to be configured manually.
Additional IPv4 address is always tied to a specific server by default. In case you want to use your IP on a different server, it is necessary to change the IP assignment within the Contabo Customer Control Panel in the section “IP Management”
Arch Linux: Configuring Additional IP
Arch Linux network configuration file is stored in /etc/systemd/network/eth0_STATIC.network. To open this file, we recommend using the text-editor “nano”. Other editors, such as “vim” will also work. The text-editor “nano” is not pre-installed on Arch Linux. To install it, just execute the following command:pacman -S nano
After installing “nano” open the network configuration file with this command:nano /etc/system/network/eth0_STATIC.network
When opening the file for the first time, it will look like this picture:
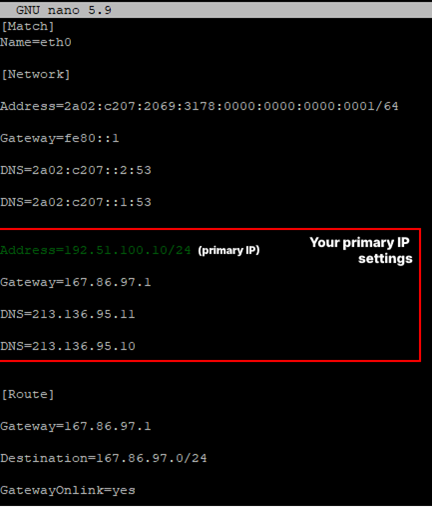
In order to add 192.51.100.42 to your server, you need to add another “Address” entry at the end of the “[Network]” section. If you are a Contabo customer, the exact values can be found in the email Contabo sent you. If you are not a Contabo customer, contact your provider. The edited file should look like this picture:
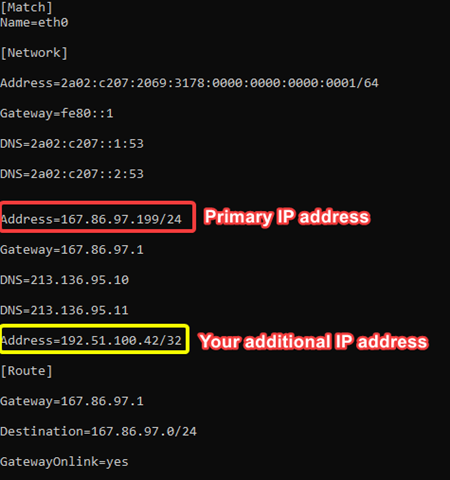
After completing the instructions, save the file and restart your server by typing:reboot
CentOS 7.x: Configuring Additional IP
CentOS has all its network interface configuration files stored in /etc/sysconfig/network-scripts. In order to configure additional IPv4 addresses, one virtual interface for each additional IPv4 address has to be created. The main interface is stored in “ifcfg-eth0”. If the main interface is e.g. ifcfg-eth0, the virtual interfaces would be named ifcfg-eth0:0, ifcfg-eth0:1, ifcfg-eth0:2 and so on. To add additional IP addresses, it’s required to create a new virtual interface. To do so, we are going to install the text-editor “nano” first. It’s also possible to use any other text editor, such as “vim”, if you want to. The “nano” editor is not pre-installed on CentOS 7.x. To install nano, use the following command:yum install nano
Now, navigate to the network interface configuration folder using the following command:cd /etc/sysconfig/network-scripts
Create a new virtual interface with:nano ifcfg-eth0:0
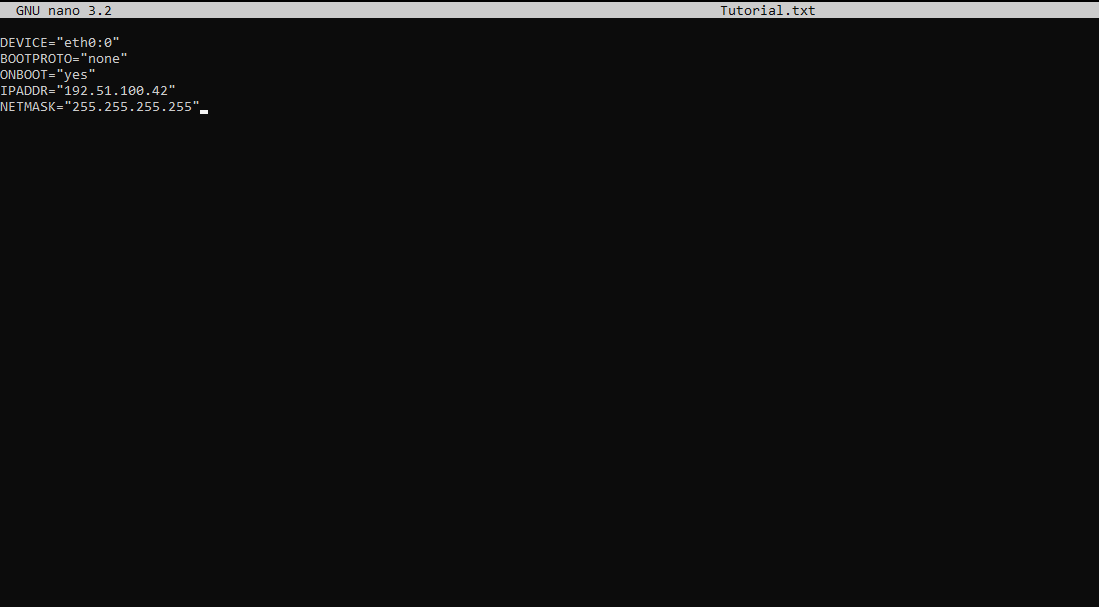
The file will be created and opened with the text-editor “nano”. Now the following paragraphs must be added:DEVICE=”eth0:0”BOOTPROTO=”none”ONBOOT=”yes”IPADDR=”192.51.100.42”NETMASK=”255.255.255.255”
Important: Values used in this article are just an example. The values for “IPADDR” and “NETMASK” can be found in the email Contabo sent you. If you are not a Contabo customer the values should be provided by your provider.
The file should look like this picture:
After completing the instructions, save the file and restart your server by typingreboot
FreeBSD 12.2: Configuring Additional IP
FreeBSDs network interface configuration is stored in /etc/rc.conf. In order to configure additional IPv4 addresses, you need to add aliases. To do so, we are going to install the text-editor “nano” first. Other editors, such as “vim” are possible as well, but for this tutorial we will use “nano”. This editor is not pre-installed on FreeBSD. To install nano use the following command:pkg install nano
Now open the network interface configuration file with:nano /etc/rc.conf
Go to the end of the document and create a new alias by inserting this line: ifconfig_vtnet0_alias1=inet 192.51.100.42 netmask 255.255.255.255
Important: If you are a Contabo customer the values for “inet” and “netmask” can be found in the email Contabo sent you. Otherwise contact you provider regarding the exact values. We used our example-values here.
If you want to add more than one additional IP address, use the same scheme, but carry on with alias2, alias3 and so on. After completing the instructions, save the file and restart your server with the following command:reboot
Rocky Linux 8.4: Configuring Additional IP
To add additional IP addresses in Rocky Linux, you need to use the pre-installed tool nmtui.
Login as root and use the following command to access the nmtui interface:nmtui
It will look like this picture:
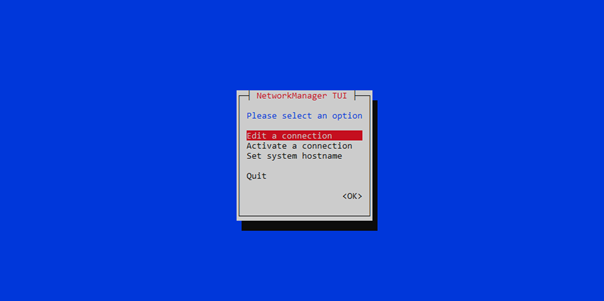
Hit [Enter] to select the menu option “Edit a connection”. You will usually find one connection under “Ethernet” which is “System eth0”. It will look like this picture:
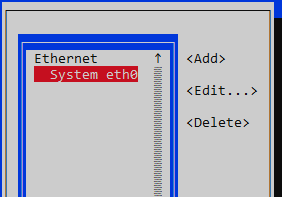
Now hit [Enter] again. The new screen will look like this picture:
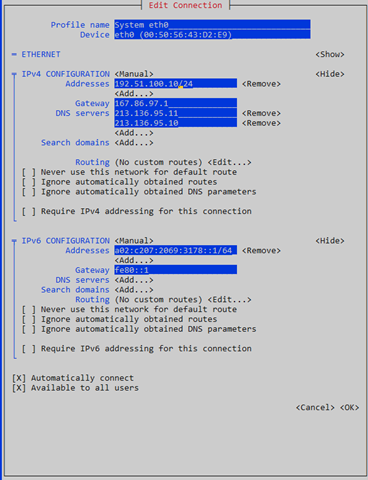
Use the arrow keys and/or the [Tab] key to navigate in this menu. Make sure, that the IPv4 Configuration is set to “Manual”, otherwise change it to “Manual”. Navigate to the “<Add…>” section right below “Addresses” and hit [Enter]. Add your purchased additional IP address and put “/24” as the subnet mask behind it.
Important: All information regarding your additional IP can be found in the email Contabo sent you. We use “192.51.100.42” as our example IP address. After switching the Mode to “Manual” and adding your address, it should look like this picture:
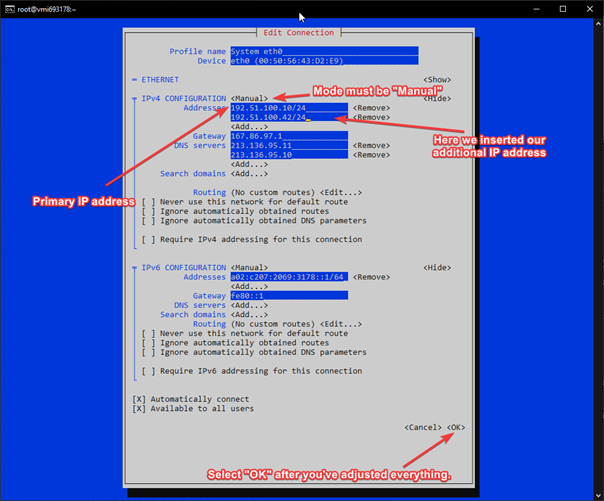
Use the arrow keys or the [Tab] key to navigate to “OK”. Now navigate to “Back”. Use the arrow keys or the [Tab] key to select the second menu option “Activate a connection”. Deactivate the selected connection and activate it again. Important advice: Sometimes it happens that the console freezes and you get disconnected from your server.
If you are a Contabo customer, please login to my.contabo.com and manually restart your server. If you’re using a different provider, login to your provider’s dashboard and try to restart your server there or contact your provider directly.
Debian (10/11) & Ubuntu (until 17.04): Configuring Additional IP
Debian’s and Ubuntu’s network interface configuration is stored in /etc/network/interfaces. Now we will open the network interface configuration with the text editor ”nano”. To do so use this command:nano /etc/network/interfaces
When opening the file for the first time it should look like this picture:
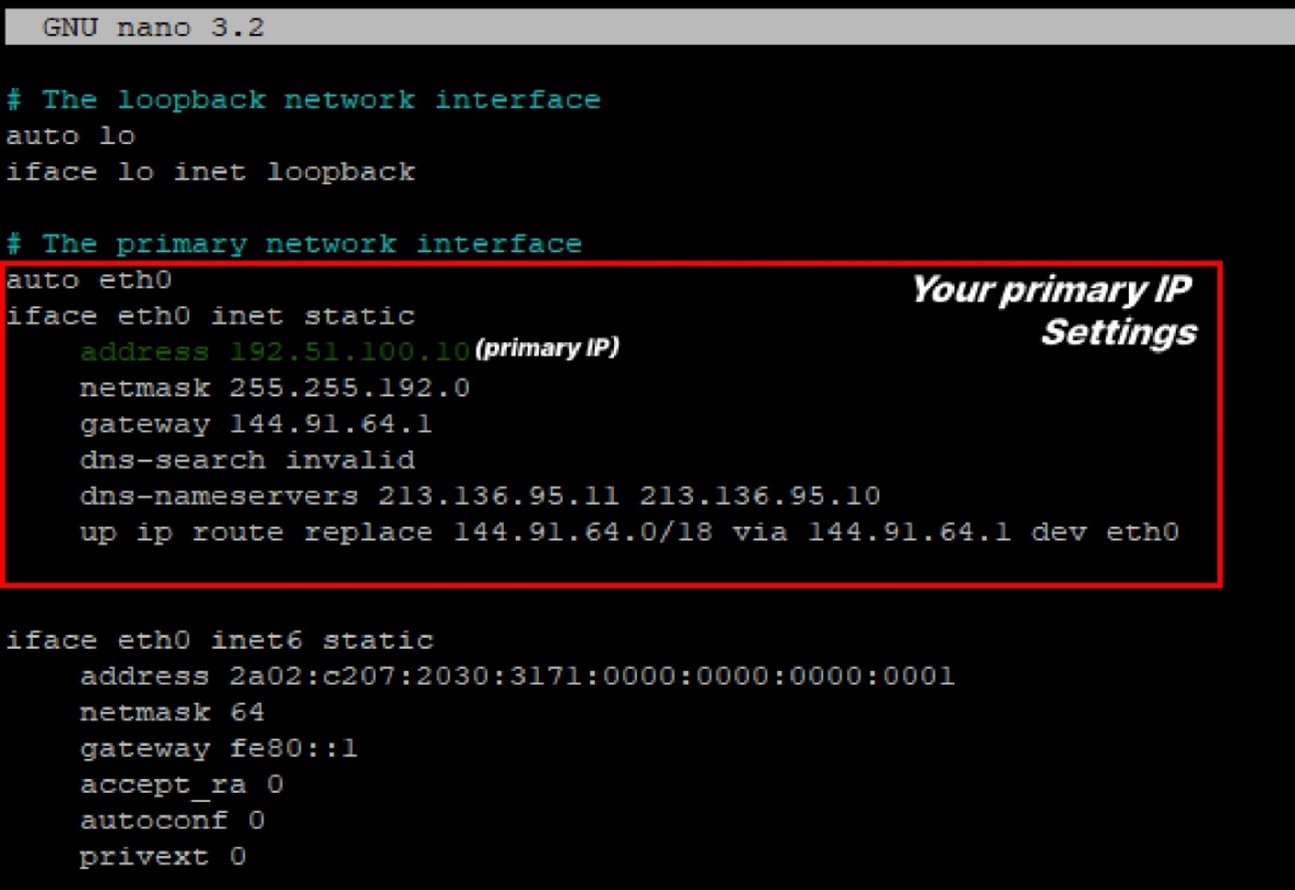
In order to add 192.51.100.42 to your server, you need to copy the first block (framed in red) except the last line (starting at “auto eth0”; ending at “dns-nameservers 231.136.95.11 231.136.95.10”). Then paste the copied block with a little bit of spacing below as shown in the screenshot (The yellow framed block is the pasted one):
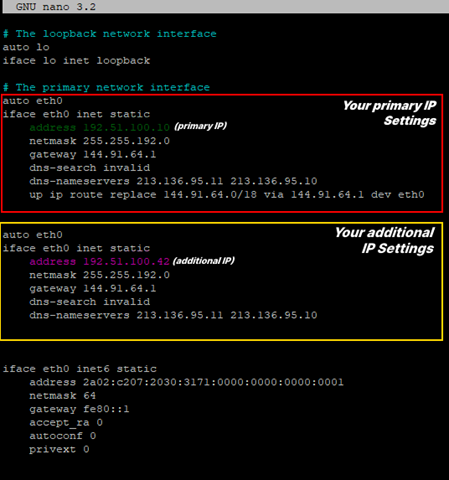
Explaining the Screenshot: The red box contains all primary IP settings and 192.51.100.10 is your primary IP address. The yellow box contains additional IP settings. It’s similar to the first box but the “address” has been changed to the additional IP you’ve bought. Now it’s important to change the values for “address”, “netmask” and “gateway“. If you are a Contabo customer the exact values can be found in the email Contabo sent you. Otherwise contact your provider regarding the exact values.
After completing the instructions, save the file and restart your server using the command:reboot
Ubuntu (17.10 and above): Configuring Additional IP
In Ubuntu beginning with version 17.10, you can find the network configuration in the file /etc/netplan/01-netcfg.yaml. With this method you can assign additional ipv4 addresses to the interface eth0. To do so, open the network configuration file with the following command:nano /etc/netplan/01-netcfg.yaml
It should look like this picture:
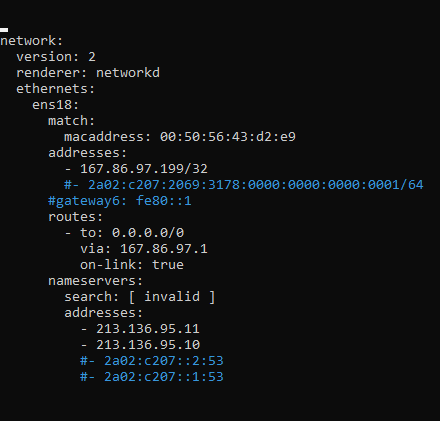
To add additional IP addresses to Ubuntu, just add a new line to the “addresses:” section. It’s important to keep the correct format!
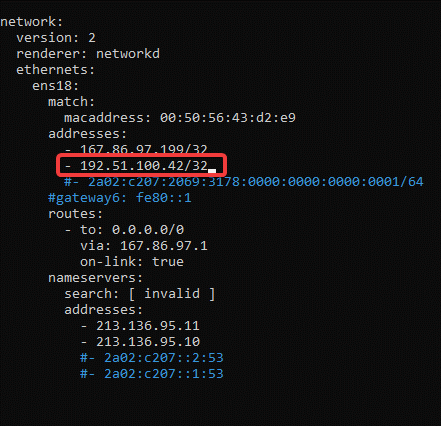
The red framed IP address is the added one. To apply the changes, please enter the following commands:netplan applyreboot
If you are a Contabo customer, you will find all the necessary values in the email Contabo sent you. Otherwise, contact your provider regarding your additional IP address.
OpenSUSE Leap 15.2: Configuring Additional IP
To add additional IP addresses to OpenSUSE, you need to use the pre-installed tool YaST. Login as root and use the following command to access the YaST interface:yast2 lan
It will look like this picture:
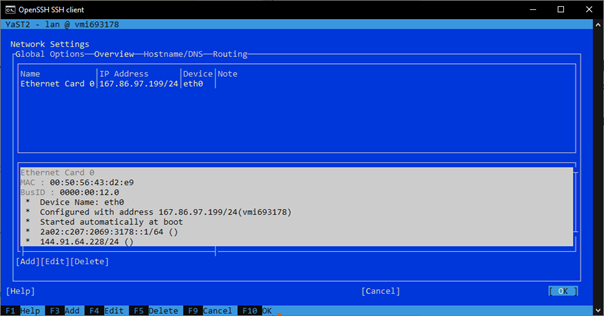
Now, use the [Tab] key to select you interface. Press [Alt+I] to edit the interface. You should see this menu now:
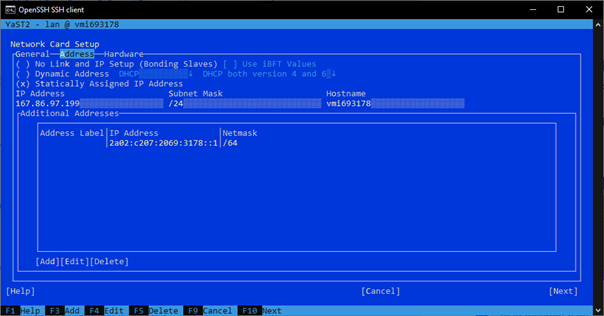
Use the [Tab] key to navigate to the [Add] button. This menu will pop up:
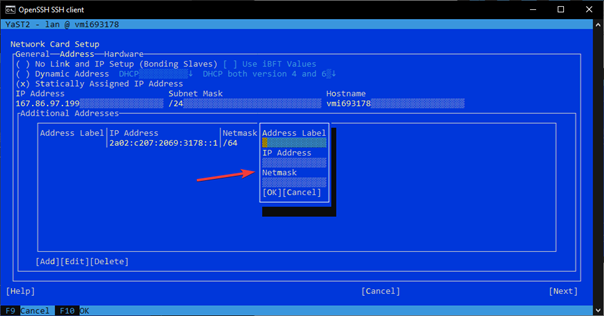
Ignore the “Address Label” field and use the [Tab] key to navigate to “IP Address”. Fill in the additional IP you purchased at Contabo. All information needed can be found in the email Contabo sent you. For the Netmask, fill in number 24
It should look like this picture:
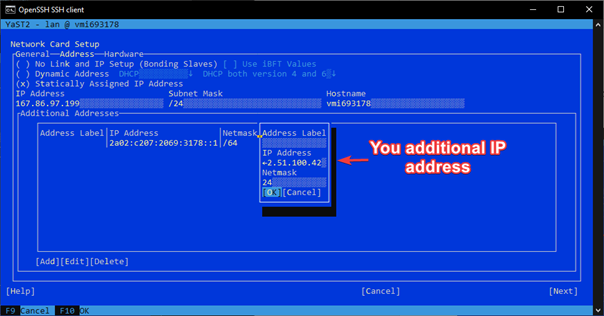
Now, use the [Tab] key again and select “OK“. Use the [Tab] key to navigate to “Next”.
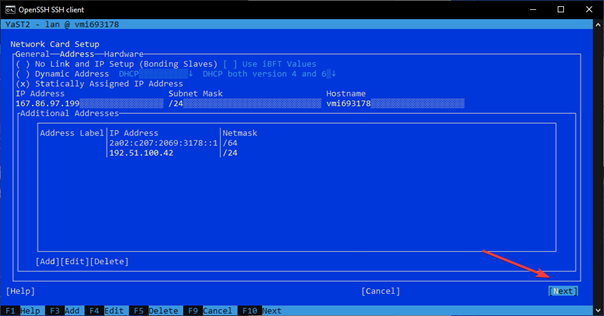
Select “OK” on the next page as well. Your changes will be saved and YaST will automatically close. After completing the instructions use this command to reboot your server:reboot
Windows Server 2012R2, 2016, 2019, 2022: Configuring Additional IP
Adding additional IP addresses on a Windows server is very easy compared to Linux operating systems. To get started, search for “Control Panel” in the Windows search bar.
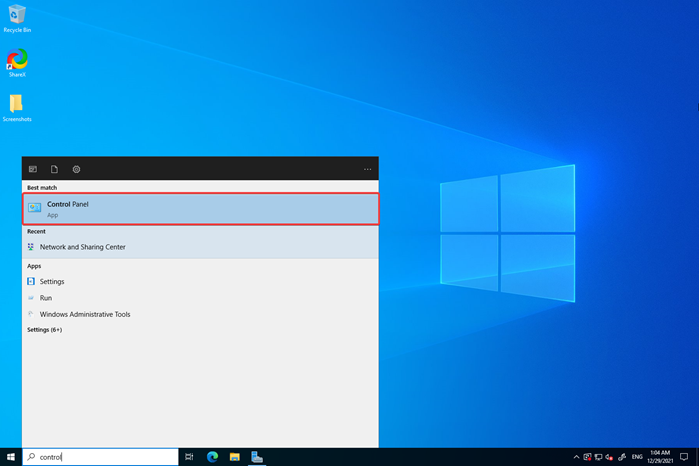
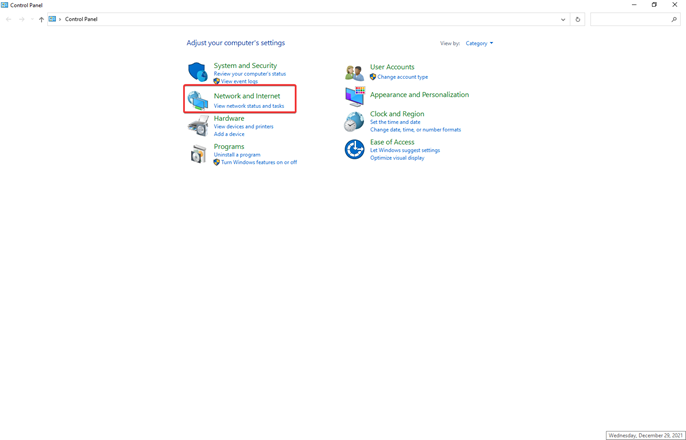
After opening the Control Panel select “Network and Internet”.
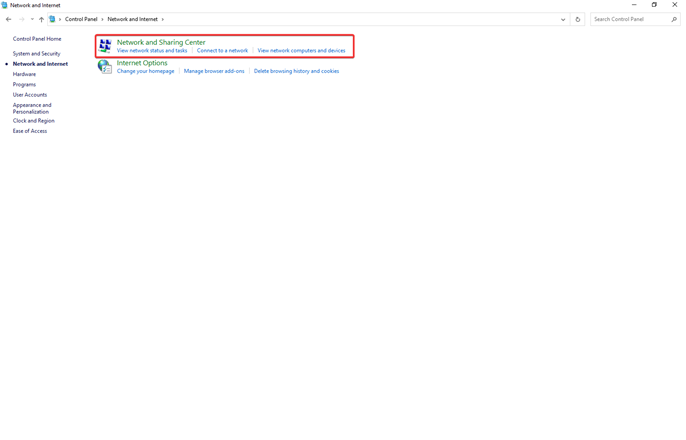
Now navigate to the “Network and Sharing Center”.
Select the connection type which is “Ethernet” in this case.
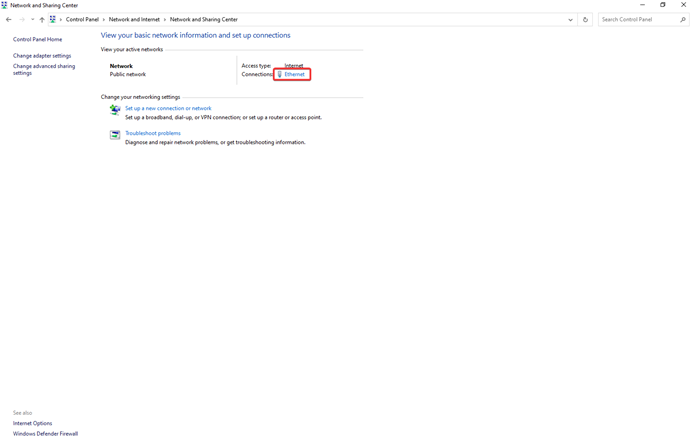
A window with your Ethernet Status will pop up. Here you can see the general status of your server’s connection. Continue by clicking on “Properties”:
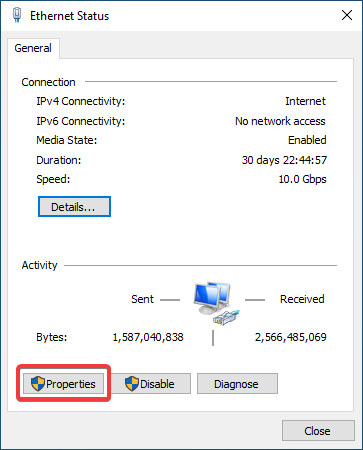
Another window will pop up. Double-Click on “Internet Protocol Version 4 (TCP/IPv4)”.
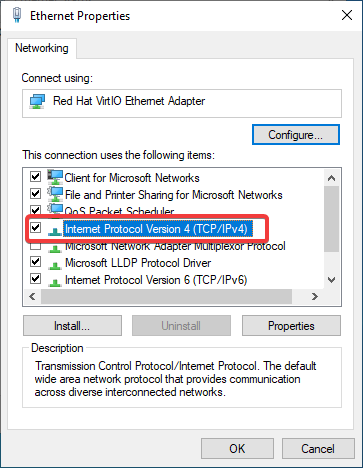
Again, another window with your server’s IPv4 properties will open. Here you can see your main IP address, as well as your subnet mask, the default gateway etc. Click on “Advanced“:
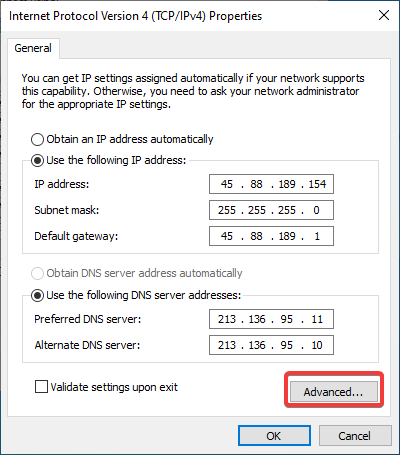
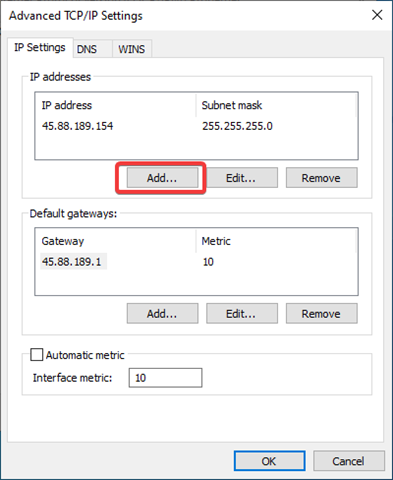
Another window with the “Advanced TCP/IP settings” will open. This is the menu where you can add your additional IP address by clicking on “Add” under the “IP addresses” section:
A little window will open. Here you can finally enter your additional IP address as well as your subnet mask/gateway:
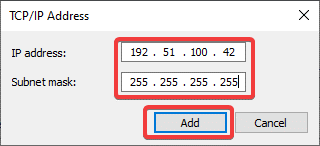
If you are a Contabo customer, you will find all necessary values in the email Contabo sent you. If you are not a Contabo customer, contact your provider regarding your additional IP settings. After filling everything in, click on “Add”. The new IP address is now active!
cPanel: Configuring Additional IP
Adding additional IP addresses in cPanel is very easy. There is no need to deal with configuration files. Log in to WHM (Web Host Manager) by entering your IP address and the Port of cPanel which is usually 2087. Example: http://YourIPAddress:2087. If you are a Contabo customer, you will get an email with your login data and a direct link to your control panel:

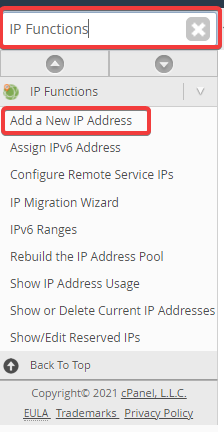
After logging yourself in into the cPanel/WHM Dashboard, use the search bar on the left to search for “IP Functions” and select “Add a New IP Address”.
A menu will appear, where you can add your additional IP address and select the subnet mask. If you are a Contabo customer, you will find all necessary values in the email Contabo sent you. Otherwise contact your provider regarding your additional IP address.
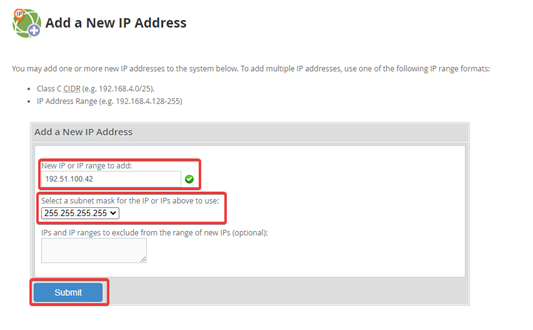
After you’ve entered your values, hit “Submit”. The new IP address is now active!
