
In 2021 Microsoft introduced Windows Subsystem for Linux (short: WSL). With that you can run a Linux environment directly on your Windows machine without the need for tools like VirtualBox or dual-boot setups. You can just start a Linux session of your choice directly with the push of a button and without the need to restart your PC or workstation. All this works because of the built-in virtualization software called “Hyper-V”. If you want to learn more about virtualization and how it’s done at Contabo, check out our Cloud Explained Series here.
In this beginner-friendly tutorial we will guide you through the process of installing and enabling WSL on your local machine and installing Ubuntu 22.04 LTS. But don’t worry: Other distributions of Linux are also available. We will give you a full overview of all available distros later in the article.
But for now, let’s start with the prerequisites.
Prerequisites
To follow this guide, make sure that your PC has Windows 10 Version 1903 (or later) with Build 18362 (or later).
Enabling WSL on Your Machine
By default, WSL is deactivated on your PC or workstation. In this first step we are going to activate it using the command line.
Open the Start menu by pressing the Windows-Key and search for “PowerShell”. Now right click on Windows PowerShell and click on “Run as administrator”.

You may need to confirm this in a popup menu by clicking on “Yes”
Now enable WSL by pasting in the following command:
dism.exe /online /enable-feature /featurename:Microsoft-Windows-Subsystem-Linux /all /norestart If everything worked, this will be the output:

Enabling Virtual Machine Platform and WSL 2 on Windows
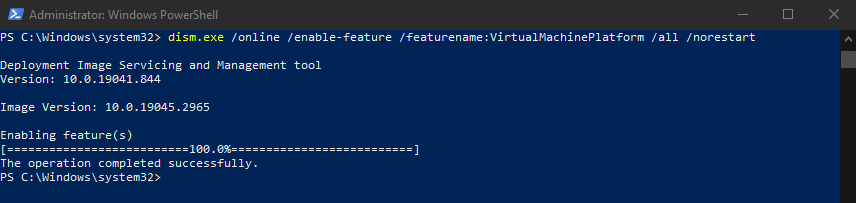
In order to run the latest version of WSL, which is WSL 2, you need to enable “Windows Virtual Machine Platform”.
To do so use this command:
dism.exe /online /enable-feature /featurename:VirtualMachinePlatform /all /norestartThe output will be similar to this:
For all the new changes and enabled features to take effect you need to restart your PC.
Download the Linux Kernel Update Package
Now it is time to download and install the Linux kernel update package.
If you for whatever reason want to click on the download link on the official Microsoft website, the download link can be found here.
Otherwise, the direct download can be found when clicking here.
After you’ve downloaded the package, execute the file to start the installation and follow the instructions given in the Installation Wizard.

Set WSL 2 as default
Now it’s time to set the newest version of WSL, namely WSL 2, as the default. This can be archived by opening another PowerShell terminal as administrator (as shown earlier) and executing the following command:
wsl --set-default-version 2The output will be like this:

Installing a Linux Distribution of Your Choice Using WSL
Now that we have fully prepared our system and installed all the requirements, we can finally continue with the actual installation of a Linux subsystem on our local PC.
Now it’s your choice which distribution of Linux you want to install. Here is an overview of all Linux-distros that are supported by WSL 2 (and the way of installation)
| Linux Distribution | Installation via MS Store | Installation via CLI |
| Ubuntu 16.04 | No | Yes |
| Ubuntu 18.04 | No | Yes |
| Ubuntu 18.04 ARM | No | Yes |
| Ubuntu 18.04 LTS | Yes | No |
| Ubuntu 20.04 | No | Yes |
| Ubuntu 20.04 ARM | No | Yes |
| Ubuntu 20.04 LTS | Yes | No |
| Ubuntu 22.04 LTS | Yes | Yes |
| Debian GNU/Linux | Yes | Yes |
| openSUSE Leap 15.1 | Yes | No |
| OpenSUSE Leap 15.2 | No | Yes |
| OpenSUSE Leap 15.3 | No | Yes |
| OpenSUSE Tumbleweed | No | Yes |
| SUSE Linux Enterprise Server 12 | No | Yes |
| SUSE Linux Enterprise Server 12 SP5 | Yes | No |
| SUSE Linux Enterprise Server 15 SP1 | Yes | No |
| SUSE Linux Enterprise Server 15 SP2 | No | Yes |
| SUSE Linux Enterprise Server 15 SP3 | No | Yes |
| Kali Linux | Yes | Yes |
| Fedora Remix for WSL | Yes | Yes |
| Pengwin | Yes | No |
| Pengwin Enterprise | Yes | No |
| Alpine WSL | Yes | No |
| Raft (Free Trial) | Yes | No |
| Oracle Linux 7.9 | No | Yes |
| Oracle Linux 8.5 | No | Yes |
Once you’ve chosen which Linux distribution you want to use, we can continue with the installation.
Installation via the Microsoft Store
One of the two ways to install the most popular distributions is through the Microsoft Store.
An overview of all the links which will lead to the corresponding Microsoft Store page can be found here: https://learn.microsoft.com/en-us/windows/wsl/install-manual#step-6—install-your-linux-distribution-of-choice
Once you find the fitting Distro for you, just click on the link and the MS Store page will open.

To install Ubuntu 22.04.02 LTS just click on “Get” and wait until the installation has finished.
Now click on “Open”.
After a few seconds of installation, you will be prompted to create an account for your Ubuntu instance:

After choosing a username you will be prompted to create a password for this account.
Congrats! Now your Ubuntu instance is set up and fully configured.
Installation via Command Line Interface (CLI)
If the distribution you want to install isn’t available via the Microsoft Store, you can install it using the command line.
To do so, start another PowerShell as administrator. To get the link of the Linux distribution you want to install, check out Microsoft’s official Documentation here. Make a right click on the Distro you want to install and click on “Copy link address”.
The link for Debian would look like this:
https://aka.ms/wsl-debian-gnulinux
Now go back into the terminal and use the following command to download the Linux distribution you just chose:
curl.exe -L -o ubuntu-2004.appx [link_to_your_linux_distro] For our example, the command to download Debian would look like this:
curl.exe -L -o ubuntu-2204.appx https://aka.ms/wsl-debian-gnulinux After the download has finished, add the Appx-Package with the following command:
Add-AppxPackage .\app_name.appx For our example the command would look like this:
Add-AppxPackage .\debian.appxNow go the the folder where you downloaded this Distro to and double-click on it to install it.
Now click on “Install”

After the installation hit “Launch”
After a short installation phase, you will be prompted to create an account for your Debian instance:

After choosing a username you will be prompted to create a password for this account.
Congrats! Now your Debian instance is set up and fully configured.
For more Linux- & Windows-related tutorials check out our other articles here.
