Windows Server operating systems offer powerful capabilities for various business and IT functions, but sometimes, it’s essential to tailor them to meet specific regional or language preferences. Whether you’re managing Windows Server 2016, 2019, or the latest 2022 edition, the ability to change the display language can enhance user accessibility and overall productivity. In this article, we will guide you through the process of changing the display language on Windows Server 2016, 2019, and 2022.
Changing the Display Language on Windows Server 2016
Starting with an older, but still used, version of Windows Server: Windows Server 2016.
Login via RDP
To change the display language of your Windows Server you need to login via RDP to it first. On your local PC, search for “Remote Desktop Connection”, open it, enter your IP address together with your credentials and click on “Connect”. For detailed instructions on how to connect to your Windows Server via RDP, check out our guide called “How do I connect to my Windows server via RDP?”.
Adding a New Language via Control Panel
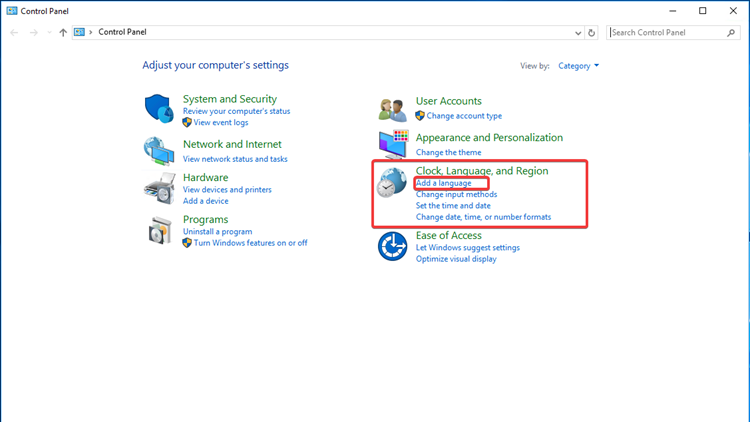
After you’ve successfully connected to your Windows server, press the [Windows]-key and search for “Control Panel” followed by pushing [Enter].
Now click on “Add a language” under “Clock, Language and Region”

An overview of all currently installed languages is listed:

To add a language simply click on “Add a language”:

You will be greeted by a list of all the languages that can be installed on your Windows server:

Choose the language you want to install from the list and click on “Add”. For demonstration purposes, I will install “German”.

In this specific case it says “Open” rather than “Add” because an additional menu will open up once you clicked on “Open” where you can select a specific version of the language you are trying to install:
I will
Select ”German (Germany)” followed by clicking on ”Add”.
You will now see that the German language will appear in the list of currently available languages:

The language at the top is always the primary one. If you want to set German as the primary language, use the “Move up” button. You can reverse this change later by selecting German again followed by clicking on “Move down”.
As you can see, currently German is just available as the keyboard layout, not as the Windows display language. It is, however,available for download.
To download the language pack, click on “Options” and on “Download and Install language pack”

The following window will pop up showing you the progress of the download:

Once the installation is complete, click on “Close”:

In order to apply the new language changes system-wide for new users, your welcome screen etc., click on “Advanced Settings”:

Now click on “Apply language settings to the welcome screen, system accounts, and new user accounts.”

Select “Copy settings” in the newly popped up window:


Tick the two boxes “Welcome screen and system accounts” and “New user accounts” and click “Ok”.
For all these changes to take effect, reboot your server.
Changing the Display Language on Windows Server 2019 & 2022
For the two newer versions of Windows server, the methods of changing the display language are identical.
Login via RDP
Just like for Windows Server 2016, you need to login via RDP to it first. On your local PC, search for “Remote Desktop Connection”, open it, enter your IP address together with your credentials and click on “Connect”. For detailed instructions on how to connect to your Windows Server via RDP, check out our guide called “How do I connect to my Windows server via RDP?”.
Installation of a New Language via Settings
Unlike for Windows server 2016, the language cannot be changed via the Control Panel, but via the settings menu. To open the settings, you can either press the [Windows]-key and search for “Settings” followed by pressing [Enter] or you can press [Windows] + [I] at the same time.
Now select “Time & Language”:

And select “Language” again in the menu on the left:

In the next window you will be able to see all currently installed and therefor available languages:

To add a language simply click on “Add a language”.
Now search for the language you want to install – in our case German again.
Then select the language you want to install by clicking on it.
Framed in blue you can see for which parts each language is available, e.g., German is available for “Display language”, “Text-to-speech”, “Speech recognition” and “Handwriting”.

To install the selected language, click on “Next”.
In the next menu you can select the just mentioned features that you want to install in that language (e.g., Speech, Handwriting etc.)

After you’ve decided, click on “Install”.
Now the language will be installed:

After the installation has finished, restart your server for the changes to take effect.
