
In this guide, we will walk you through the necessary steps to use your Contabo server. From accessing your Customer Control Panel for the first time to hardening your security, we’ll show you all the essentials to run a server.
After you read this article, we recommend you dig deeper by following links to more detailed tutorials and documentation placed in each section.
Basics: Opening my account, Customer Control Panel
Check Your Email for Credentials
Once you place the order and we receive the payment, your instance will be provisioned automatically. We will create a new Contabo account automatically in case this is your first order, as well as credentials necessary to log in to Customer Control Panel for the first time.
The servers are usually provisioned within minutes, but if you are still waiting for the login credentials, you can monitor order status here. When ready, you’ll receive a login email from us with the subject “Your login data!”.
In case that it is your first order, the email will include your Customer ID, as well as login and password for the Customer Control Panel. Besides login data for your Customer Control Panel and your server, the email may also contain various information specific to your order. Always save information from this email, as it contains important credentials, for example:
- IP addresses
- Server username
- Credentials for Webspace packages
- Login to additional services – web management panels, FTP Space, Full-Monitoring, Firewalls or Additional IPs
- VNC login
We recommend saving all information from the “Your login data!” email into a password manager, such as Bitwarden. After you store your information, delete this email. Storing your credentials in an email can represent a security risk.
Get Familiar with the Customer Control Panel
Now go to https://my.contabo.com and log in. Contabo Customer Control Panel is your interface for managing servers and ordering new ones. For security reasons, we advise you to change your password immediately after your first login. You can do it on the Customer details page. To better protect your account, don’t forget to set-up 2-factor authentication on the same page.
After setting-up basic credentials on the Customer details page, take your time to get yourself familiar with the Control Panel. Start by opening the VDS control, VPS control or Server control depending on the product you purchased. These pages allow you to perform important actions to control your instance, such as starting, stopping, reinstalling, or creating snapshots:

Next, browse through the Billing page. This section allows you to check your payment history and current balance. The invoices are also listed at the bottom of the Billing page:

The third page in the Customer Control Panel that should be mentioned is the Payment Method page. Here, you can manage your payment method or recharge your account:

Remember that our billing works on pre-payment basis. Please bear in mind that it is important to pay for your instances on time. For that reason, we recommend setting-up automatic payments if you haven’t done that already. Scroll to chapter 7.1 for more information.
Set up Your System
Now it’s time to connect your new server from your local computer. There are different instructions how to do that for each combination of the operating system on your local computer and on your server at Contabo. Please review all the instructions in the relevant section before executing them.
Before we start, find the username and IP address for your server. The easiest way how to do that is to access the Customer Control Panel, section VPS, VDS or Server control – depending on what type of server you’ve ordered:

You will use this username when connecting from your local computer to your new server. Remember that this default user may have restricted rights to perform some system-related actions, such as setting up a new password, changing port or other operations described later. For instance, Linux users can easily elevate their rights by typing the “sudo” command at the beginning of each session, as described in the following chapters.
Please make sure not to confuse credentials to Customer Control Panel with the credentials to your server. You will now use different credentials than in the previous chapter when accessing my.Contabo.com.
I Ordered a Windows Server
Your Windows Server most likely comes with the username Administrator, unless you are using professional features, such as custom OS images, which are out of scope of this guide. The password is the one you provided during the ordering process.
Now, continue with one of the 3 following sections based on your operating system you’re currently using:
A) I’m also using Windows on My Local Computer
First, you have to open the Remote Desktop Connection app:
on Windows 7: Navigate to the “Start icon” of the taskbar and search for “Remote Desktop Connection”
on Windows 8/10: Navigate to the “Windows icon” of the taskbar and search for “Remote Desktop Connection”
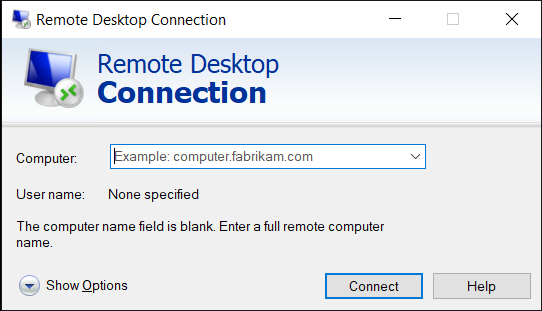
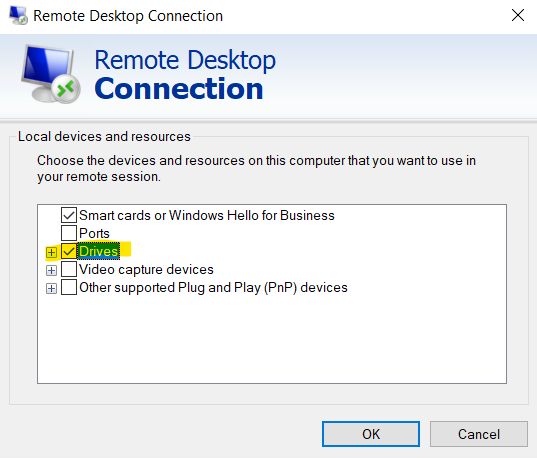
When the Remote Desktop Connections opens, click on “Show Options” and then on “Local Resources”. You’ll notice “Local devices and resources” on the bottom. Click on “More” and don’t forget to check your “Drives”.
You should be now able to connect to the IP address (e.g., “173.xxx.xxx.xxx“). Check your Customer Control Panel or the “Your Login Data!” email for the IP address. For more information on how to set-up additional options for the Remote Desktop Connection, visit our detailed Windows Walkthrough.
On Windows 11 first check if your Remote Desktop is allowed. To do that, access settings by pressing Windows+i.
Then Click on System button placed on the left bar. Finally, allow the Remote Desktop:
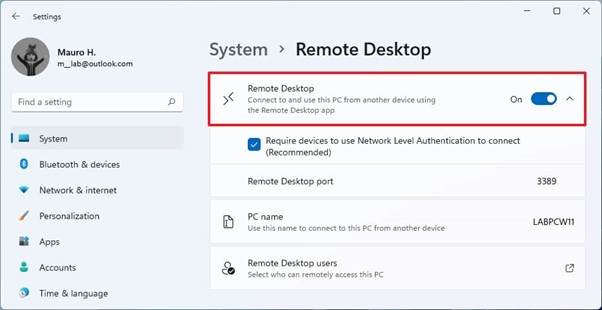
source: https://pureinfotech.com/enable-remote-desktop-windows-11/
Once completed, you can start the Remote Desktop app.
B) I’m Using Linux on My Local Computer
To be able to connect from your Linux server to Windows Remote Desktop, you have to install an RDP client first. The command line-based rdesktop is available for most Linux distributions and can therefore either be installed via package manager or via Terminal.
Installation (example if you run Ubuntu on your local computer):sudo apt-get install rdesktop
The program itself can then be started via GUI or also via terminal:rdesktop <YOUR_IP>
In order to be able to establish a RDP connection, your local Linux system must have an X11 server available. It should be installed by default if you already use a GUI (graphical desktop environment – e.g. “Gnome” or “KDE”).
C) I’m using Mac with MacOS
Remote Desktop Connection client is required to connect to your server. Please download the latest version from:
https://apps.apple.com/de/app/microsoft-remote-desktop/id1295203466
Afterwards, you can start the RDP client following by entering the Windows login credentials (at the “Domain:” field, you can either use the server’s IP address or the hostname).
For troubleshooting, read our walkthrough for Mac:
https://contabo.com/blog/connect-server-rdp/
Configuring Internet Explorer
Skip this part if you’re using Windows Server 2022
Some users may experience issues with Internet Explorer preventing to access certain sites not listed as ‘trusted websites’. This setting is enabled by default due to security reasons. If you want to disable this option, you have to turn off the Enhanced Security Configuration (ESC).
Go to the Windows “Start” menu and type “Server Manager”. In the Server Manager tool, change ESC to “off”:

For a detailed walkthrough, please visit:
https://docs.microsoft.com/en-us/troubleshoot/browsers/enhanced-security-configuration-faq
Adding Additional Remote Desktop Connections (Optional)
By default, Windows Remote Desktop Connection allows two active user sessions at the same time. In case there will be more than two users simultaneously accessing your Remote Desktop, you need additional client access licenses (CALs). For understanding how this license model exactly works, please review Microsoft documentation. Contact our support for a quote to obtain additional RDP CALs. The price depends on the number of CALs required.
I ordered a Linux Server
Your Linux Server most likely comes with the username root, unless you are using professional features, such as custom OS images, which are out of scope of this guide. The password is the one you provided during the ordering process.
Now, continue with one of the three following sections based on the operating system or a package you’re currently using:
A) I’m Also Using Linux on My Local Computer
Start the terminal on your Linux and type in the following command to connect as root via SSH:ssh -l<YOUR_USERNAME> -p22 <IP_ADDRESS>
for instance:ssh -lroot -p22 12.345.657.89
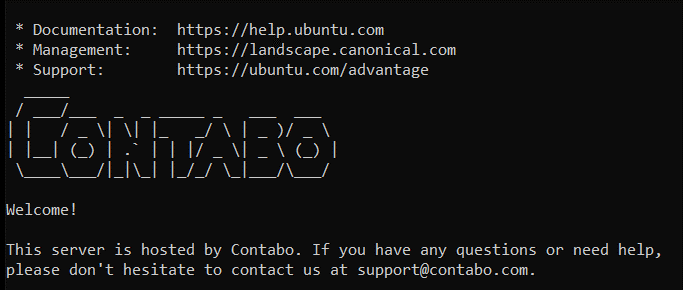
In case this is your first attempt to connect to the server, you will have to accept its SSH certificate by typing “yes”. After you successfully connect, the Contabo logo will appear on the screen:
For more detailed instructions, please follow a separate blog post:
https://contabo.com/blog/establishing-connection-server-ssh/
B) I’m Using Windows on My Local Computer
In this case you need a client to establish a remote connection via SSH to your server. We recommend PuTTY as a tool of choice. Simply install PuTTY via your Microsoft Store or download it via your browser. When launched, fill in your IP address. Port is by default 22, unless you changed it for security reasons as recommended in 6.4.
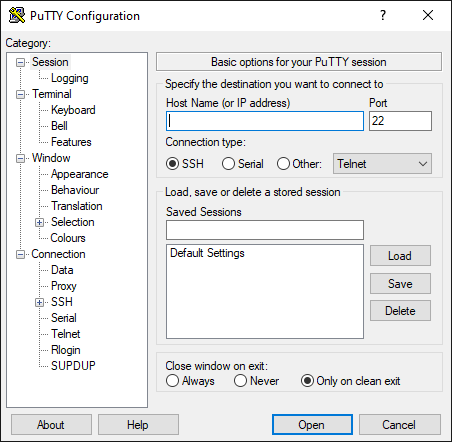
PuTTY will now open a Linux terminal directly connected to your server. The last step is to enter your login details. If you didn’t change your username, refer to the “Your login data!” email we sent you after your purchase. Also refer to this tutorial:
https://contabo.com/blog/establishing-connection-server-ssh/
I Ordered a Webspace Package
Our Webspace Package can be easily managed via admin panel. The admin panel itself does not require any kind of server administration knowledge, as it’s based on accessible cPanel software. Even beginners can use Webspace without any previous experience.
Once you place your order, we will send you an email containing your login information after the it has been created. URL to cPanel is included.
Uploading Files to Your Server
Now, let’s talk how you can transfer files to your server. The instructions depend on what operating system runs on your server at Contabo and what operating system you normally use on your local computer. Please first quickly browse through the whole chapter to find instructions that correspond best to you:
I Ordered a Windows Server, My Local Computer Runs Windows
The easiest way to transfer files to a server with Windows is to use the Remote Desktop Connection (RDC). After you properly connect RDC to your server as described in 2.1, at least one new drive will appear in your file manager. Just go to This PC and check “Devices and drives”:
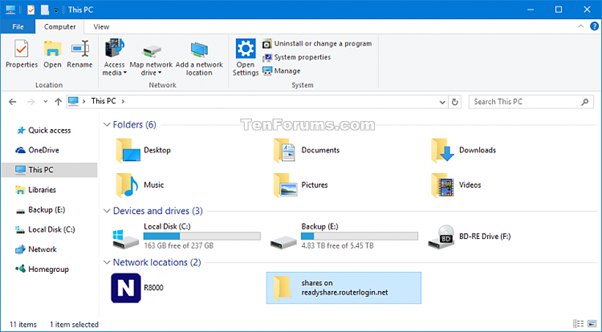
Source: https://www.tenforums.com/tutorials/55961-how-add-remove-network-location-windows-10-a.html
You can copy-paste the file to your new drive in the same manner as you normally would to your local folder.
Another option is to install an FTP application. We recommend the popular program Filezilla. In order to transfer files, first you have to install Filezilla Server on your Windows server. Then install Filezilla Client on your local computer and connect to your new FTP server:
https://filezilla-project.org/download.php?platform=win64
You can now proceed with uploading your first files to the server. Don’t forget to backup your data regularly, as there are automatic backups set on your server by default.
I Ordered a Windows Server, My Local Computer Runs Linux
In case your Linux computer is already equipped with a GUI we recommend you use Rdesktop to transfer your files. The installation of Rdesktop is explained in the section 2.1.
Alternatively, you could install an FTP Server on your Windows Server, for instance FileZilla Server. Once you install an FTP server running on your Windows Server there are several options to connect to it. The easiest ones would be using the File Manager of your GUI or using the terminal.
You can now proceed with uploading your first files to the server. Don’t forget to backup your data regularly, as there are automatic backups set on your server by default.
I Ordered a Linux Server, My Computer is Using Linux
To grand you all the necessary admin rights, always enter the command sudo -i at the beginning of each session:sudo -i
This command will grant you the rights of a power user, so you don’t have to write the command sudo at the beginning of every command line. If you’re an experienced Linux user, you may transfer your files without using any graphical interface. The easiest way is to use the command SFTP, for instance:sftp <YOUR_USERNAME>@<IP_ADDRESS>
If you change your port as we recommend in part 6, don’t forget to use your new port number:sftp -P<PORT_NUMBER><YOUR_USERNAME>@<IP_ADDRESS>
This is a good tutorial on SFTP if you need one.
Alternatively, you can use a file manager. In case you’re already using an GUI equipped with file manager (GNOME Nautilus on Ubuntu for instance), you do not need to install a separate client. Otherwise, use any FTP client that can handle SFTP connections, for instance FileZilla Client.
You can now proceed with uploading your first files to the server. Don’t forget to backup your data regularly, as there are automatic backups set on your server by default.
I Ordered a Linux server, My Local Computer Is Using Windows
The most convenient way is to use an FTP client for transferring files. Note that there is no FTP service installed or activated on your Linux server by default, but you can establish SFTP connection to your server.
We recommend FileZilla as a proven client that is easy to use. Read the instructions to understand how to connect FileZilla to your Linux server:
https://wiki.filezilla-project.org/FileZilla_FTP_Client
You can now proceed with uploading your first files to the server. Don’t forget to backup your data regularly, as there are automatic backups set on your server by default.
Configuring Admin Panel and Other Optional Software
If you ordered cPanel, Plesk or Webmin, here’s how to access and configure it. By the way, you can always order admin panel later on by contacting our support.
Don’t forget to regularly update your admin panels and other software, as Contabo does not have access to your panel to start the update.
Accessing and Configuring cPanel/WHM
This set of tools allows you to manage the entire server via web browser. By default, our cPanel/WHM is running on port 2087. The URL structure will look like this: https://<IP_ADDRESS>:2087.
You can find the IP address in the Customer Control Panel. Open Your services page and find the server you’ve equipped with cPanel. There is a link next to the “Panel” label.
Alternatively, you can check the “Your login data!” email you’ve received after placing your order. Inside you will find your login data and URL to the panel. For security reasons, we recommend to change the password and you store all credentials in a password manager.
We highly recommend turning on automatic updates for your cPanel. You can do it by logging to your cPanel and then going to: WHM > Server configuration > Update preferences
Check the official documentation here:
WHM documentation: https://docs.cpanel.net/whm/
cPanel documentation: https://docs.cpanel.net/cpanel/
Accessing and configuring Plesk
Plesk is another admin panel that can run on top of your Linux or Windows. By default, our Plesk is running on port 8443. The URL structure will look like this: https://<IP_ADDRESS>:8443. You can find IP address in the Customer Control Panel. Open Your services page, look at the server to which you ordered Plesk and look for the link next to the “Panel” label.
Alternatively, you can check the “Your login data!” email you’ve received after placing your order. Inside you will find your login data and URL to the panel. For security reasons, we recommend to change the password and you store all credentials in a password manager.
We recommend turning on automatic updates for Plesk. You can do it by logging in to Plesk and then going to: Go Tools & Settings > Update Settings. As always, we recommend exploring the documentation. There are two official tutorials that are especially helpful:
Getting Started with Plesk
https://docs.plesk.com/en-US/obsidian/quick-start-guide/getting-started-with-plesk.74372/
Create your first website with Plesk
https://docs.plesk.com/en-US/obsidian/quick-start-guide/plesk-tutorial.74376
Accessing Webmin
Webmin is a web administration interface accessible via your browser. It’s an open-source software, meaning you can order it with your server for free. The standard access to your Webmin panel is on port 10000. So the URL structure will look like this: https://<IP_ADDRESS>:10000.
As in the case of other panels offered by Contabo, we send you all necessary credentials just after your order is finished. Search for an email with “Your login data!” subject. After the initial log in please change the password and transfer all your credentials to a secure location, such as password manager.
The other access to Webmin is through the Customer Control Panel. Open Your services page, look at the server to which you ordered Webmin and look for the link next to the “Panel” label. To learn more about Webmin, go to:
https://www.webmin.com/docs.html
Accessing Software Installed from Contabo LAMP Image
LAMP stands for Linux, Apache, MySQL, and PHP. At Contabo we offer a LAMP Image with or without Webmin. For information how to access Webmin please refer to section above. The detailed configuration of Apache, MySQL and PHP is out of scope of this guide, but we want to make sure that you know how to access all pre-installed software.
phpMyAdmin
You can access phpMyAdmin via your web browser using the pattern http://<YOUR_USERNAME>@<YOUR_IP>/phpmyadmin. For example: http://[email protected]/phpMyAdmin. The login screen will appear:
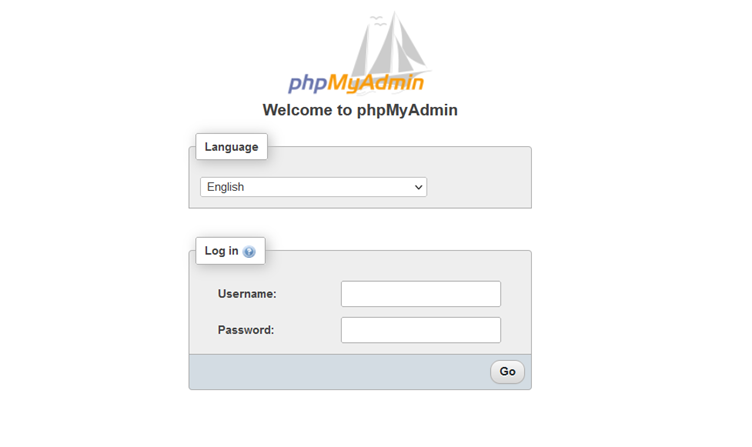
Username and password are the same as login and password to access your server described in chapter 2. For security reasons, we recommend changing the password for this interface after the first login and using different password for you phpMyAdmin and server access. Using a password manager to store this password is also recommended. You can do this by accessing “User accounts” and pressing “Edit privileges” button.
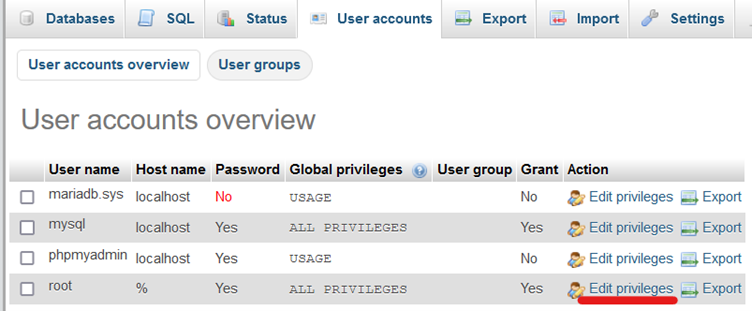
As always, it’s a good idea to learn more by reading the official documentation:
https://www.phpmyadmin.net/docs/
Apache HTTP Server
To grant you all the necessary admin rights, always enter the command sudo -i at the beginning of every session:sudo -i
This command will give you the rights of a power user, so you don’t have to write the command sudo at the beginning of every command line.
Start by verifying the correct installation by running the following command (we use Ubuntu for this example.):systemctl status apache2

You should see “active (running)”. Next, open the browser on your local computer and type in the IP of your server in the following way: http://<YOUR_SERVER_IP>

If you see this message, then the Apache is running properly on your server. As you can read in the message, Apache is already giving you a hint on how to edit your desired website. Let’s access your new website from the terminal and try out how to create your own site. The default folder for your websites is /var/www/html.
Additional Configuration
Domains and DNS
By default, your new server comes just with an IP address. If you plan to use a domain with your server, you can either bring your own existing domain to Contabo, or you can buy a new one. Basically, you have three options:
A) Transferring Your Existing Domain to Contabo
To transfer an existing domain, you need to request an Auth-Code code from your current provider first. After obtaining this information, open your Customer Control Panel and go to section Domains. Transferring your old domain is a similar process to purchasing a new domain. To do that, type in your domain name in the left blank field. Then choose the domain extension, for instance .com or .de. Finally, click on the “Order domain” button.
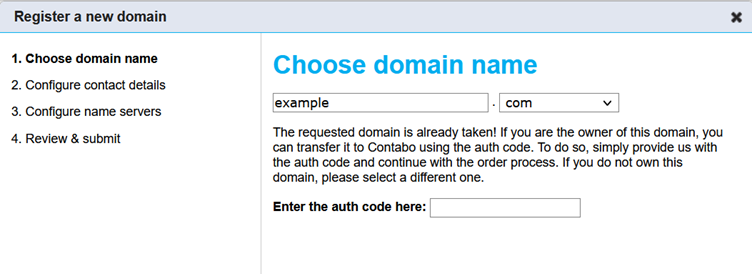
The new window will open. Type in your Auth-Code code and press next. The new window will prompt you for contact details:
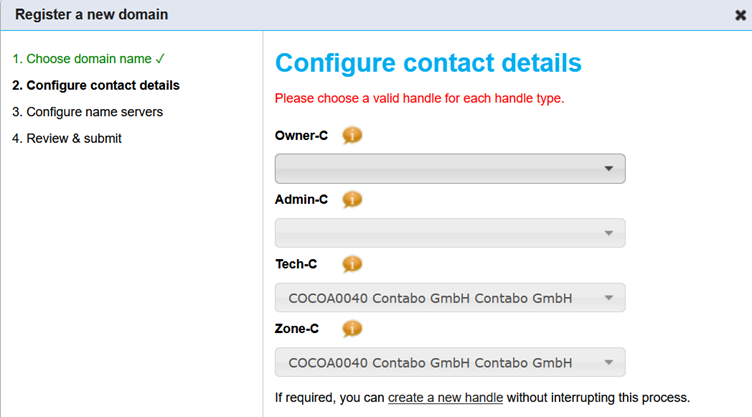
If this is your first domain installation, you have to create contact information for Owner and Admin roles. Click on the “create a new handle” hyperlink at the bottom to create a new profile. Then use these details in the top-down menu on the top.
Now it’s time to choose the IP of the instance you want to attach to this domain. Select the IP address in the top-down menu, before reviewing the whole installation in the step 4.
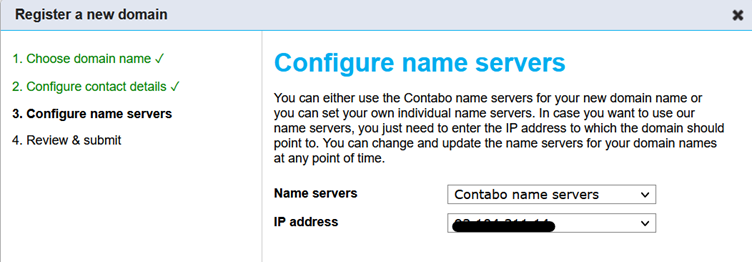
B) Keep the Current Registrar and Switch to Our Name Server (Not Recommended)
Although it’s not recommended, you can also keep the current registrar and just start using our DNS. To do that, please access DNS Zone Management page in the Customer Control Panel and create a new DNS zone. Once the DNS zone has been created, you can simply perform a name server update for your domain name and configure the following name servers as authoritative name servers for the domain:
ns1.contabo.net (79.143.182.242, 2a02:c205:0:0882::1)ns2.contabo.net (178.238.234.231, 2a02:c205:0:0891::1)ns3.contabo.net (5.189.191.29, 2a02:c207:0:0842::1)
In case that you are not sure how to perform a name server update for a third-party domain, we would recommend you get in touch with your domain registrar.
C) Keep Your Own Name Servers (Not Recommended)
Last but not least, you keep the current name servers of your domain (either managed by your domain provider or on your own). In that case, you have to update the A-Record (and / or the AAAA-Record for the IPv6 address) of the domain name within the authoritative DNS zone to point to the IP address of your server at Contabo. This configuration is highly individual and not in the scope of this guide.
Configuring Additional IP Address
If you ordered additional IP addresses, you have to configure them. We don’t configure additional IP addresses automatically because we don’t know your specific needs. Please follow this detailed walkthrough on how to configure an IPv4 address on all operating systems:
https://contabo.com/blog/configuring-additional-ip-addresses/
Every additional IPv4 address is tied to a specific server by default. In case you want to use your IP on a different server, it is necessary to change the IP assignment within the Contabo Customer Control Panel in the section “IP Management”.
Activate IPv6 Connectivity on Your Virtual Server
Every server at Contabo comes up with a complete /64 IPv6 network. On Dedicated Servers, the IPv6 address is not only already configured but also activated by default. For VDS and VPS, the IPv6 is also configured, but the connectivity needs to be first activated.
Activating the IPv6 connectivity takes just a few commands. Read our detailed walkthrough:
https://contabo.com/blog/adding-ipv6-connectivity-to-your-server/
Configuring Additional Drives
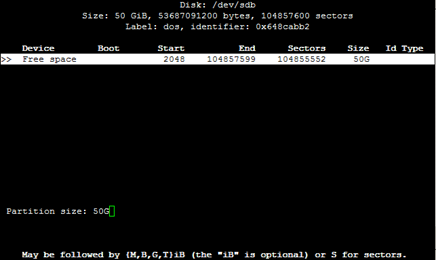
To give you the flexibility to set up your storage exactly how you need it, your Contabo server comes only with the primary disk being mounted. If you have ordered additional drives for your Dedicated Server or Virtual Dedicated Server, you have to create partitions and mount them. Check out the tutorials for Linux and Windows:
Linux
https://contabo.com/blog/mounting-additional-hard-disks-linux/
Windows
https://contabo.com/blog/mounting-additional-hard-drives-windows/
Hardening Server Security
Every user has the responsibility to protect the server against cyber threats. In this chapter, we present several essential security measures that we recommend implementing as soon as possible.
Change Your Password
As mentioned in chapter 1, you should change the password for your Customer Control Panel as soon as you log in for the first time. The same should apply to the password of your server itself as well as other tools like control panel and others.
A) My Server Runs on Windows
Press the Windows button + R to open the Run window. Typecmd
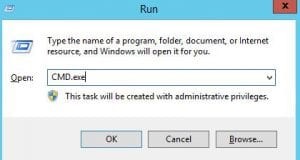
The command line terminal should now appear. Type a command in the following format:net user<username of the account you want to change the password><new password>
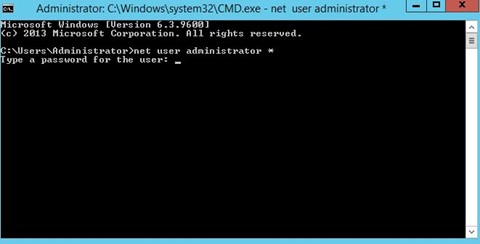
For examples and tips on security, visit:
https://contabo.com/blog/changing-windows-administrator-password-easy/
B) My Server Runs on Linux
To grant you all the necessary admin rights, always enter the command sudo -i at the beginning of every session:sudo -i
This command will give you the rights of a power user, so you don’t have to write the command sudo at the beginning of every command line.
Connect to your server via SSH as described in chapter 2. Then type in this command:<YOUR_USERNAME>@server:~#passwd
The system will prompt you a new password.
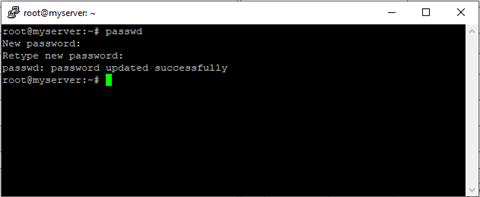
Install Antivirus Software and Configure a Firewall
Don’t underestimate virus protection, especially if there are any non-admin users with access to your server. For commercial websites and applications, the antivirus is crucial. Based on our previous experience, we can recommend the following software:
Bitdefender GravityZone, Comodo, Kaspersky, ESET
Double-check your firewall settings and follow the best practices for your Windows or Linux server.
Change Your SSH Port
The default SSH port is 22. We recommend changing these settings as soon as possible, because the default port makes you vulnerable to primitive brute force attacks.
Remember, all security measures described here are done on your server, not on your local computer. Therefore, instructions in this section already assume you’re connected to your server, as described in chapter 2.
A) Change Your Port in Linux
To grand you all the necessary admin rights, always enter the command sudo -i at the beginning of every session:sudo -i
This command will grant you the rights of a power user, so you don’t have to write the command sudo at the beginning of every command line. To change your SSH Port, follow the instructions:
Connect to your Contabo server as instructed in chapter 2.2.
Now you have to access and edit sshd_config file. Let’s use the vi text editor in this case:vi /etc/ssh/sshd_config
Find the line containing Port 22.
Replace the number with any value from 1024 to 65536 (command “I” in the vi editor). If there is a hashtag symbol next to “Port”, erase it.
Save and exit the sshd_config file (type command “:wq” in the vi editor).
Restart the SSH service using:systemctl restart ssh
Don’t forget to adjust your firewall depending on your Linux version. For instance, in case you use Debian or Ubuntu with a default UFW firewall, type:ufw allow <PORT_NUMBER>/tcp
Find instructions for different distributions here.
B) Change Your Port in Windows
Launch the Registry editor by typing in the Windows search box:regedit
The registry editor that has just opened should look like this picture:
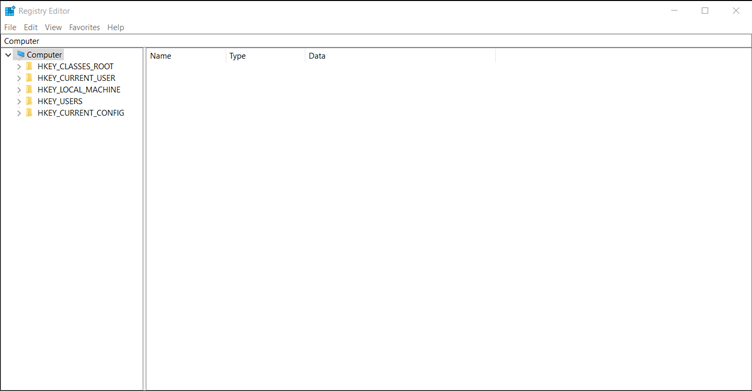
Navigate to the following registry subkey: HKEY_LOCAL_MACHINE\System\CurrentControlSet\Control\Terminal Server\WinStations\RDP-Tcp
Find PortNumber entry.
Click Edit > Modify, and then click Decimal.
Type the new port number, and then click OK.
Close the registry editor and restart your computer.
Important: Don’t forget to allow the new port in your Windows Firewall. To access the port settings, open your firewall settings and go to: Inbounds rules > New Rule > Port
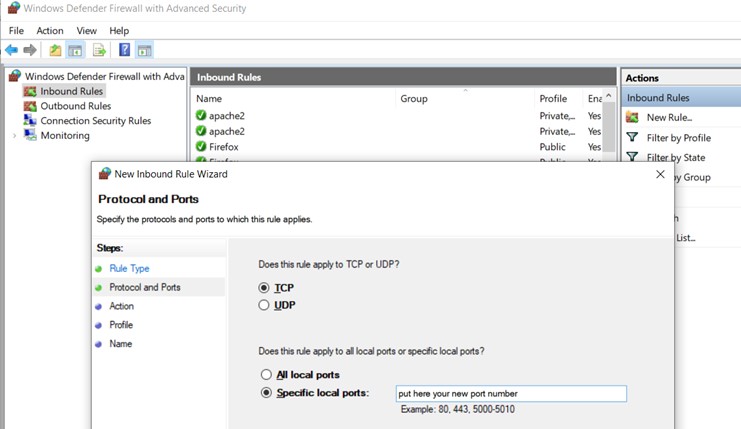
Follow official documentation for detailed information, including PowerShell commands.
Once you want to establish a RDC connection (as described in chapter 2.x) to the server using non-standard port it is necessary to specify the port which should be used. This can simply be done by adding a colon and the new port. For example: 73.xxx.xxx.xxx:4567 (To connect Port 4567).
Use SSH Key Authentication
A) Linux
Linux servers are by default secured by a password. This type of authentication is not ideal from a security standpoint, and we recommend using SSH key authentication instead. Start by opening the command line on your personal computer. At this stage, you’re not connected to your server. Run this command:ssh-keygen -t rsa
Depending on your version of Linux, your system either automatically creates a new file or asks you to name the new file. Linux will ask you to enter optional passhrase for additional security. We recommend using this option. Linux will now generate so-called random art picture that looks like:
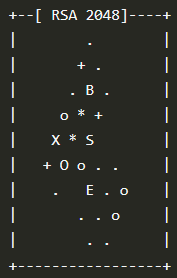
Source: https://newbedev.com/what-s-the-purpose-of-the-randomart-image-for-user-not-host-ssh-keys
Notice that a pair of keys was generated:
Your private key has been saved in <FILE_NAME>
Your public key has been saved in <FILE_NAME>.pub.
Your public key needs to be uploaded to your server while the private key stays on your computer. You can upload the same public key on multiple servers. Let’s move the public key to your server:ssh-copy-id<YOUR_USERNAME>@<YOUR_IP>
In case you already change your port as described in 5.4, use the option -p<YOUR_PORT_NUMBER>:ssh-copy-id -p<YOUR_PORT_NUMBER><YOUR_USERNAME>@<YOUR_IP>
Now you can connect to your server in a much safer way!
Read our in-depth SSH Keys tutorial to learn how to disable traditional passwords altogether, how to transfer your keys via FTP or how to properly test the connection.
That’s it! Note that in case you’re about to reinstall your operating system using Customer Control Panel, you can easily set-up the SSH key before installation:

B) Windows
In case your local computer runs on Windows, an easy solution is using PuTTY (see chapter 2.1) in combination with PuTTYgen. Follow instructions for PuTTYgen from the official website:
Once you install the PuTTY on your machine, you can easily run PuTTYgen. Go to Windows -> Start Menu -> All Programs -> PuTTY -> PuTTYgen
PuTTY key generator dialog box will appear on your screen:
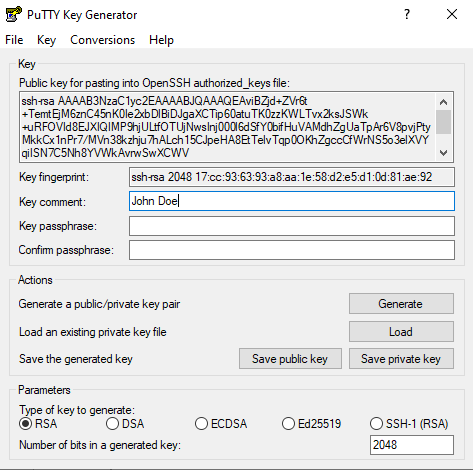
- You will find a “Generate” button in that dialog. Clicking on it will lead to generating the keys for you. We recommend you to set a unique “Key Comment” to be able to identify the Key later.
- Now you will need to add a unique key passphrase in the Key passphrase and Confirm passphrase field. It is important that you can remember the passphrase at a later point in time since it is required to load the private key (equal to a password.
- Click on the “Save Public Key” and “Save Private Key” buttons to save your public and private keys at safe location.
- You will see the text starting with ssh-RSA in the Public key for pasting into OpenSSH authorized keys file field which is located at the top of the window. Copy that entire text to your clipboard by pressing ctrl+c since you need to upload the Public Key to your server.
- Connect to your server via SSH (as explained in Chapter 2)
- Check if the directory ~/ssh is already present. If this is not the case, create it by executing the following command:
mkdir ~/.ssh - Open a text editor like vi to open the text file with:
vi ~/.ssh/authorized_keys - Paste the public key which you have copied to your clipboard (6) into the file and save the file.
Now, you can use newly created SSH keys to log in with PuTTY (chapter 2.2). ). To set-up your keys in Putty, go to the settings and continue to Connection > SSH > Auth. Notice the last field on the bottom “Private key file for authentication”:
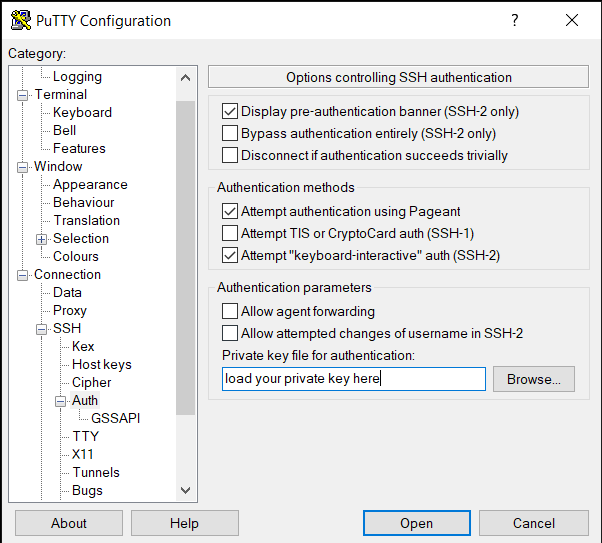
Everything is now ready for you to use PuTTY in a more secure way.
Read our in-depth SSH Keys tutorial to learn how to disable traditional passwords altogether, how to transfer your keys via FTP or how to properly test the connection.
That’s it! Note that in case you’re about to reinstall your operating system using Customer Control Panel, you can easily set-up the SSH key before installation:

Perform frequent updates and backups
Updating your system regularly will prevent attackers from using flaws in your operating system. Don’t forget to check if the new version is compatible with your custom software, so the functionality of your current tools remain intact.
A) Linux
Open your Terminal and run this command to update package index files:sudo apt-get update
Then upgrade your version of the operating system using this command:sudo apt-get upgrade
B) Windows
Open the start menu.
Click on the settings icon.
Click on ‘Update & Security‘
Click the ‘Check for updates‘ button.
Back up your system regularly
Every customer should regularly backup the data saved on the server for security reasons. Note that Contabo is not performing backups of your files as we don’t have access to your data in the first place.
Be particularly careful before executing any major changes, such as reinstalling your operating system via Customer Control Panel – similar actions will erase all data on your drive.
Payments and Billing
Your accounts can be billed either in USD or in EUR depending on the currency you have chosen for your first order. Each account has a balance displaying the available funds. Each time the payment is due, the amount is deducted automatically from the balance. You can learn more about this by checking the General information on our billing and payment system placed in the Billing section of your Customer Control Panel.
Billing Periods
Each server is usually charged once a month, although there are subscriptions billed yearly, for instance Webspace packages. If you have chosen a prepayment period while ordering an instance the monthly billing will only start after the prepayment period is over.
By default, each server has its own billing cycle. For example, if you have 2 VPS subscriptions they will most likely renew on different days of the month. You can change that and get your billing periods unified by reaching out to our support.
Don’t forget to top up your payments
If you choose a manual payment method for your account, please don’t forget to top up your account in advance every month. In case your account doesn’t have sufficient balance to renew your subscription, we will send you a reminder via email some days ahead of subscription renewal. The warning will be displayed on your Customer Control Panel as well.
If you won’t top up your account in Contabo and your balance becomes negative, your gets suspended and reactivation fees might be charged.
Switching to Automated Recurring Payments
To avoid the necessity to remember about topping up your account, we strongly recommend using automated payments via Credit Card or PayPal. To that, simply access the Payment Method page in your Customer Control Panel and switch to automatic payments:

Follow instructions to set up your automatic payment for a credit card, PayPal or other method.
Setting a different invoicing address (Optional)
In case you need a specific data on your invoice, use the Invoice address field in the Customers details section:

Upgrading instances and ordering additional Add-Ons
Upgrading VPS
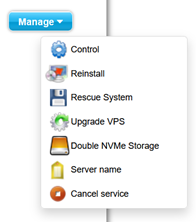
You can upgrade your VPS server conveniently via you Your services page in the Customer Control Panel. Just hover over the “Manage” blue button and click on “Upgrade VPS”.
It’s possible to upgrade to a model with more CPU, RAM and storage as well as switch to a different storage type.
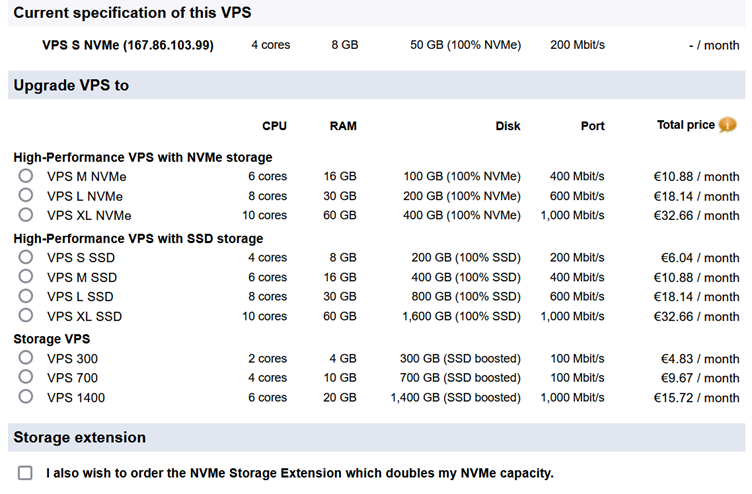
Upgrade can be done either as Live Migration where your data is transferred safely to your upgraded server or as a fresh installation with no data transfer.
Upgrading VDS or Dedicated Servers
This type of server cannot be upgraded via Customer Control Panel, please send your order via email to [email protected].
Ordering additional Add-On to your existing server
Add-Ons can be ordered by contacting our customer support at: [email protected].
Popular Add-Ons includes:
• Control Panels (Plesk, cPanel, Webmin)
• Windows or RDC CAL licenses
• Additional Storage
• FTP Space for Backups
• Additional IP addresses
Next Steps
By now, you should be able to set up and operate your instance without much assistance. But remember, this guide covered just the first steps. We recommend you to dig deeper by studying our tutorials:
https://contabo.com/blog/tutorials/
Listed tutorials will teach you how to operate control panels, set up email servers, understand SSL certificates, choose the right storage for you project, schedule backups and so much more!
Contacting Support
We offer unmanaged servers, which means that you are responsible to manage your instance by yourself. But if you find yourself stuck at any point on your journey, our customer support will gladly provide assistance. Here are a few tips what to include in your inquiry to improve the get help faster:
• Please always provide your customer ID for quicker identification. You can find it in the welcome email from us or in Customer Control Panel.
• Write email from authorized email address listed in your Contabo account.
• Don’t use Twitter or Facebook, as we can’t provide an assistance via social networks for security reasons.