What are Partitions?
Imagine a laptop with a 500 GB disk and Windows as the operating system. By default, Windows is installed on the 500 GB disk. But what if you want to have both Windows and Linux? That’s where partitions come in. For example, you can create a 400 GB partition and a 100 GB partition on your 500 GB disk. Now your physical disk acts like two separate disks which means you can install Windows on one partition and Linux on the other.
In other words, partitions are logically separated parts on a hard drive that are treated as if they were separate hard drives. That means, each partition can have its own file system on it and they can also be encrypted.
And Why Do I Need to Partition My Server?
Typically when you receive your server, you’ll get the default partition layout and OS installed. That’s enough for many users, but there are situations where you may need to edit this setup.
Here are some reasons why you might want to customize the partition layout:
- Security: When your file system is full, this usually leads to a server failure. To prevent the whole server from failing, you can create a separate partition for your /home directory. That way, even if your /home partition is completely full, it doesn’t affect your OS partition.
- Encryption: The default partition where the OS is on cannot be subsequently encrypted. To encrypt your data, you can create a separate partition for your /home directory and then encrypt this new partition.
- Backups: Some backup tools require a whole partition as destination, so you have to create custom partitions in order for them to work. But keep in mind that although partitions are logically separated, they are still on the same hard drive. You should always store your backups on a different hard drive so that you don’t lose your data in case of a drive failure.
- Changes of virtual machine storage size: Depending on your hosting provider, your server might not use all the available disk space after an upgrade. In this case, you need to manually extend the existing partition to also use the new space available. If you’re a Contabo customer and you’re using cloud-init, this is automatically done for you.
In this guide, you’ll learn how to get an overview of your current partition layout, how to extend existing partitions, and also how to create new ones.
Please be advised to perform a backup of all important data before proceeding! Changes to the partition table always bear the risk of a complete data loss!
Linux
Expand the Existing Partition
If you upgraded your virtual machine so that it has more storage, the most typical way to go is to expand the existing partition to use all the available space. For Debian and Ubuntu users, this can be done using the cloud-utils package:
sudo apt install cloud-utils -yNow the cloud-utils are installed, we need to know the name of the existing partition. use the following command to search for a partition mounted to “/”:
mount | grep ' / 'Example output:
/dev/sda1 on / type ext4 (rw,relatime,discard,errors=remount-ro)Remember the first part (“/dev/sda1” in the example above). To expand the partition, use the following commands:
sudo growpart /dev/sda 1sudo resize2fs /dev/sda1And that’s all it takes to expand your existing partition on Debian and Ubuntu.
Customize the Partition Layout
For these changes the server needs to be in the rescue system, so boot your server into that system before proceeding. If you’re a Contabo customer, navigate to your services in the Customer Control Panel, click on “Manage” next to your server and select “Rescue System”. Choose a password and your server will boot into the rescue system.
Now connect to your server through VNC and login as “root” and the password you’ve set for the rescue system. If you’re not familiar with VNC, head over to this guide.
Once you are connected with VNC, use the command startxfce4 to start the GUI (graphical user interface).
The software we’ll use to make changes to the partition layout is “GParted”. Open it up by clicking “Applications” on the top left and then select “Run program”. Type “GParted” and hit “Launch”.
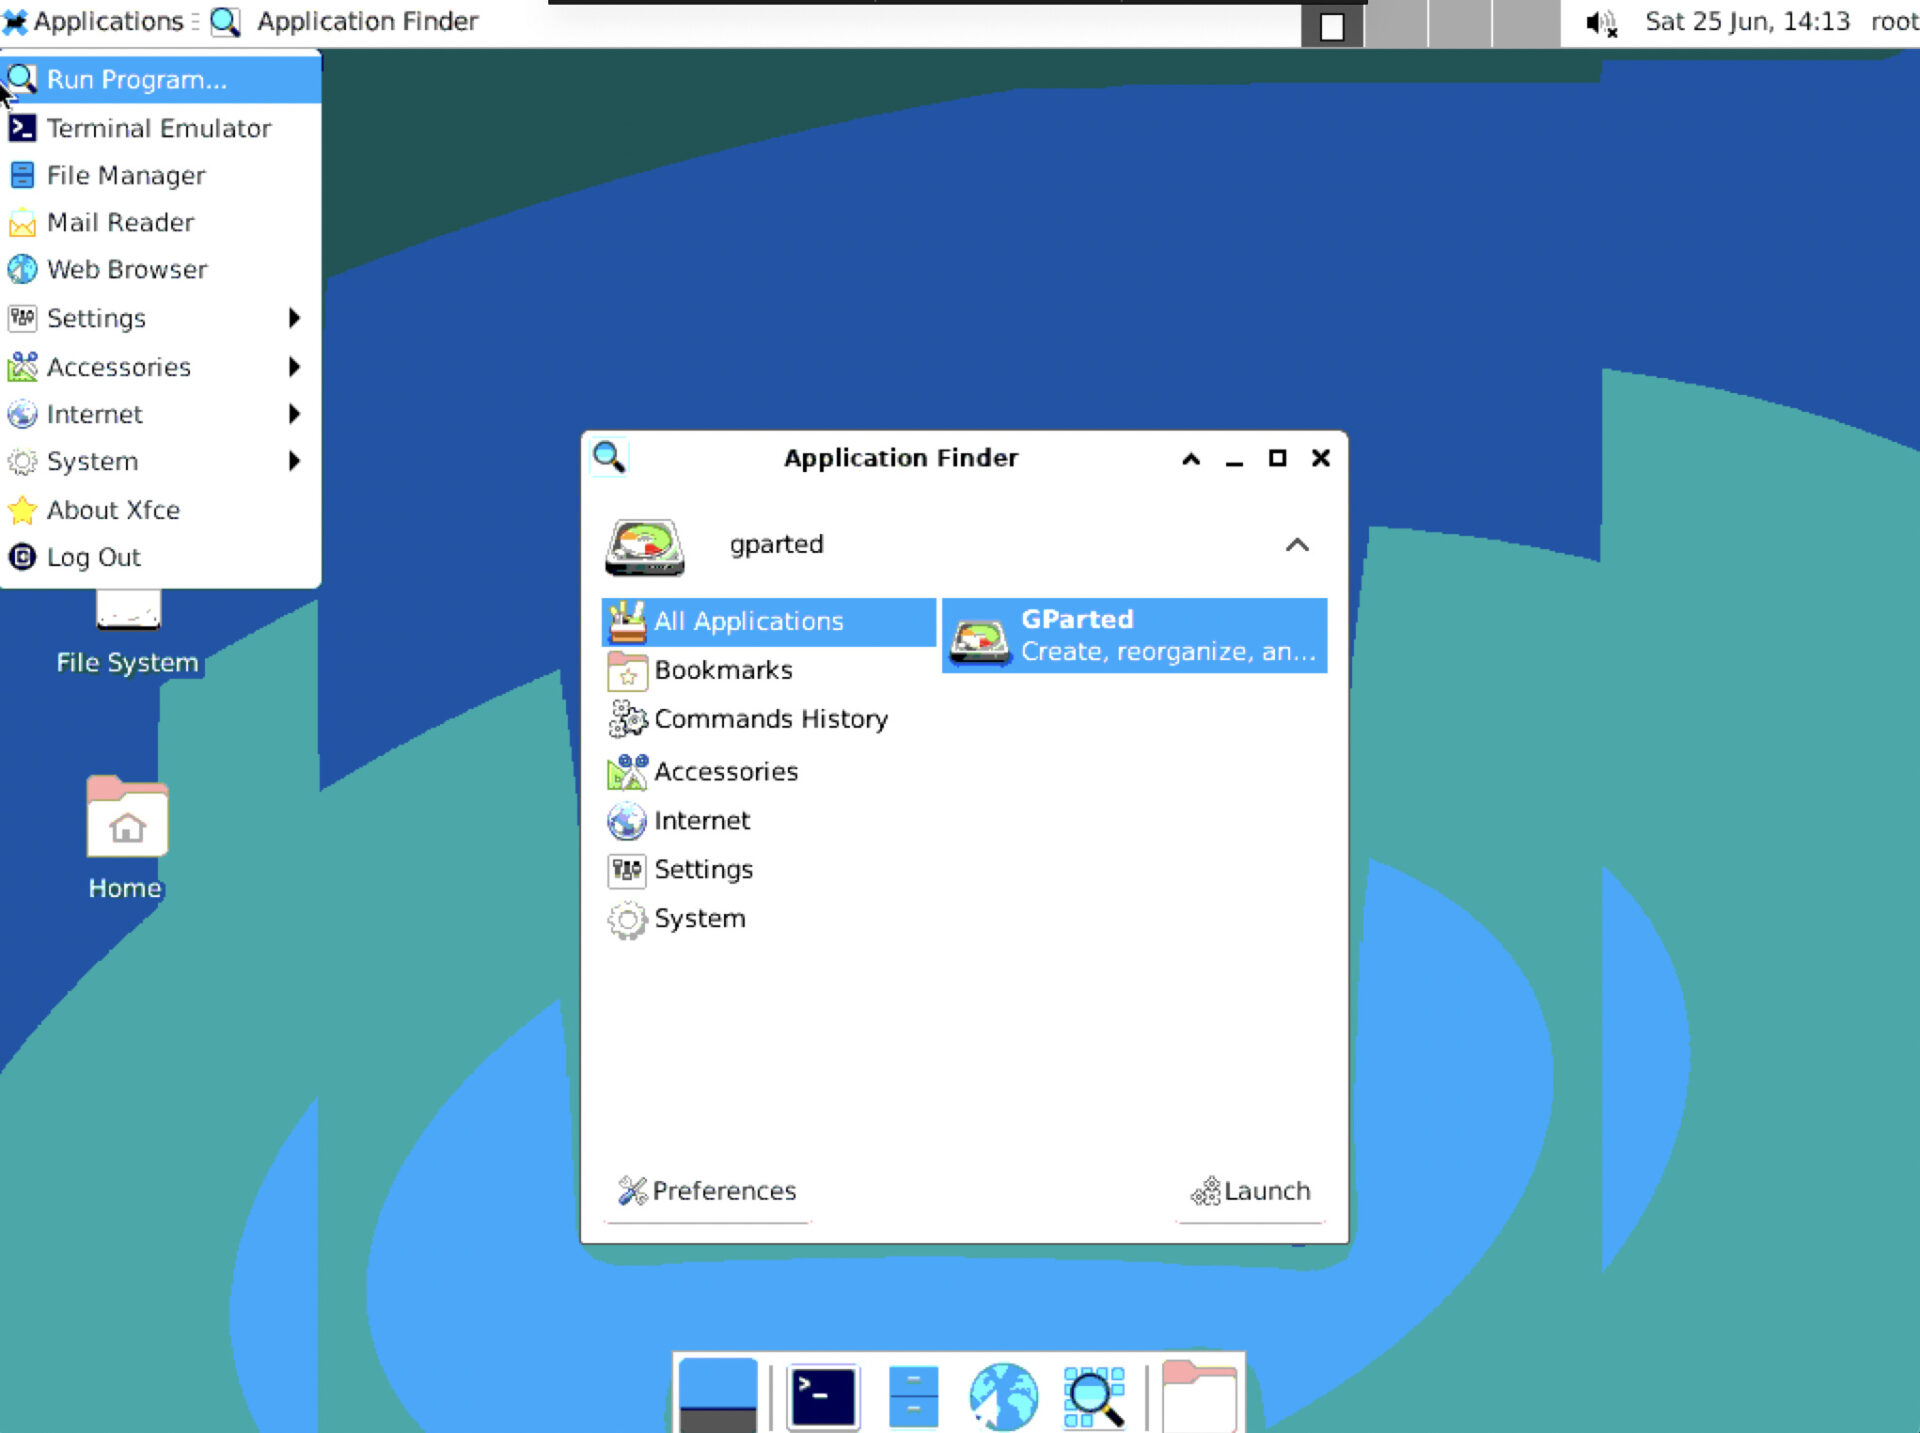
Here you can see an overview of all partitions on the server. In this case, there is no space left, so we have to shrink a partition first. Note that LVM partitions (which are used with CentOS by default) cannot be shrunk.
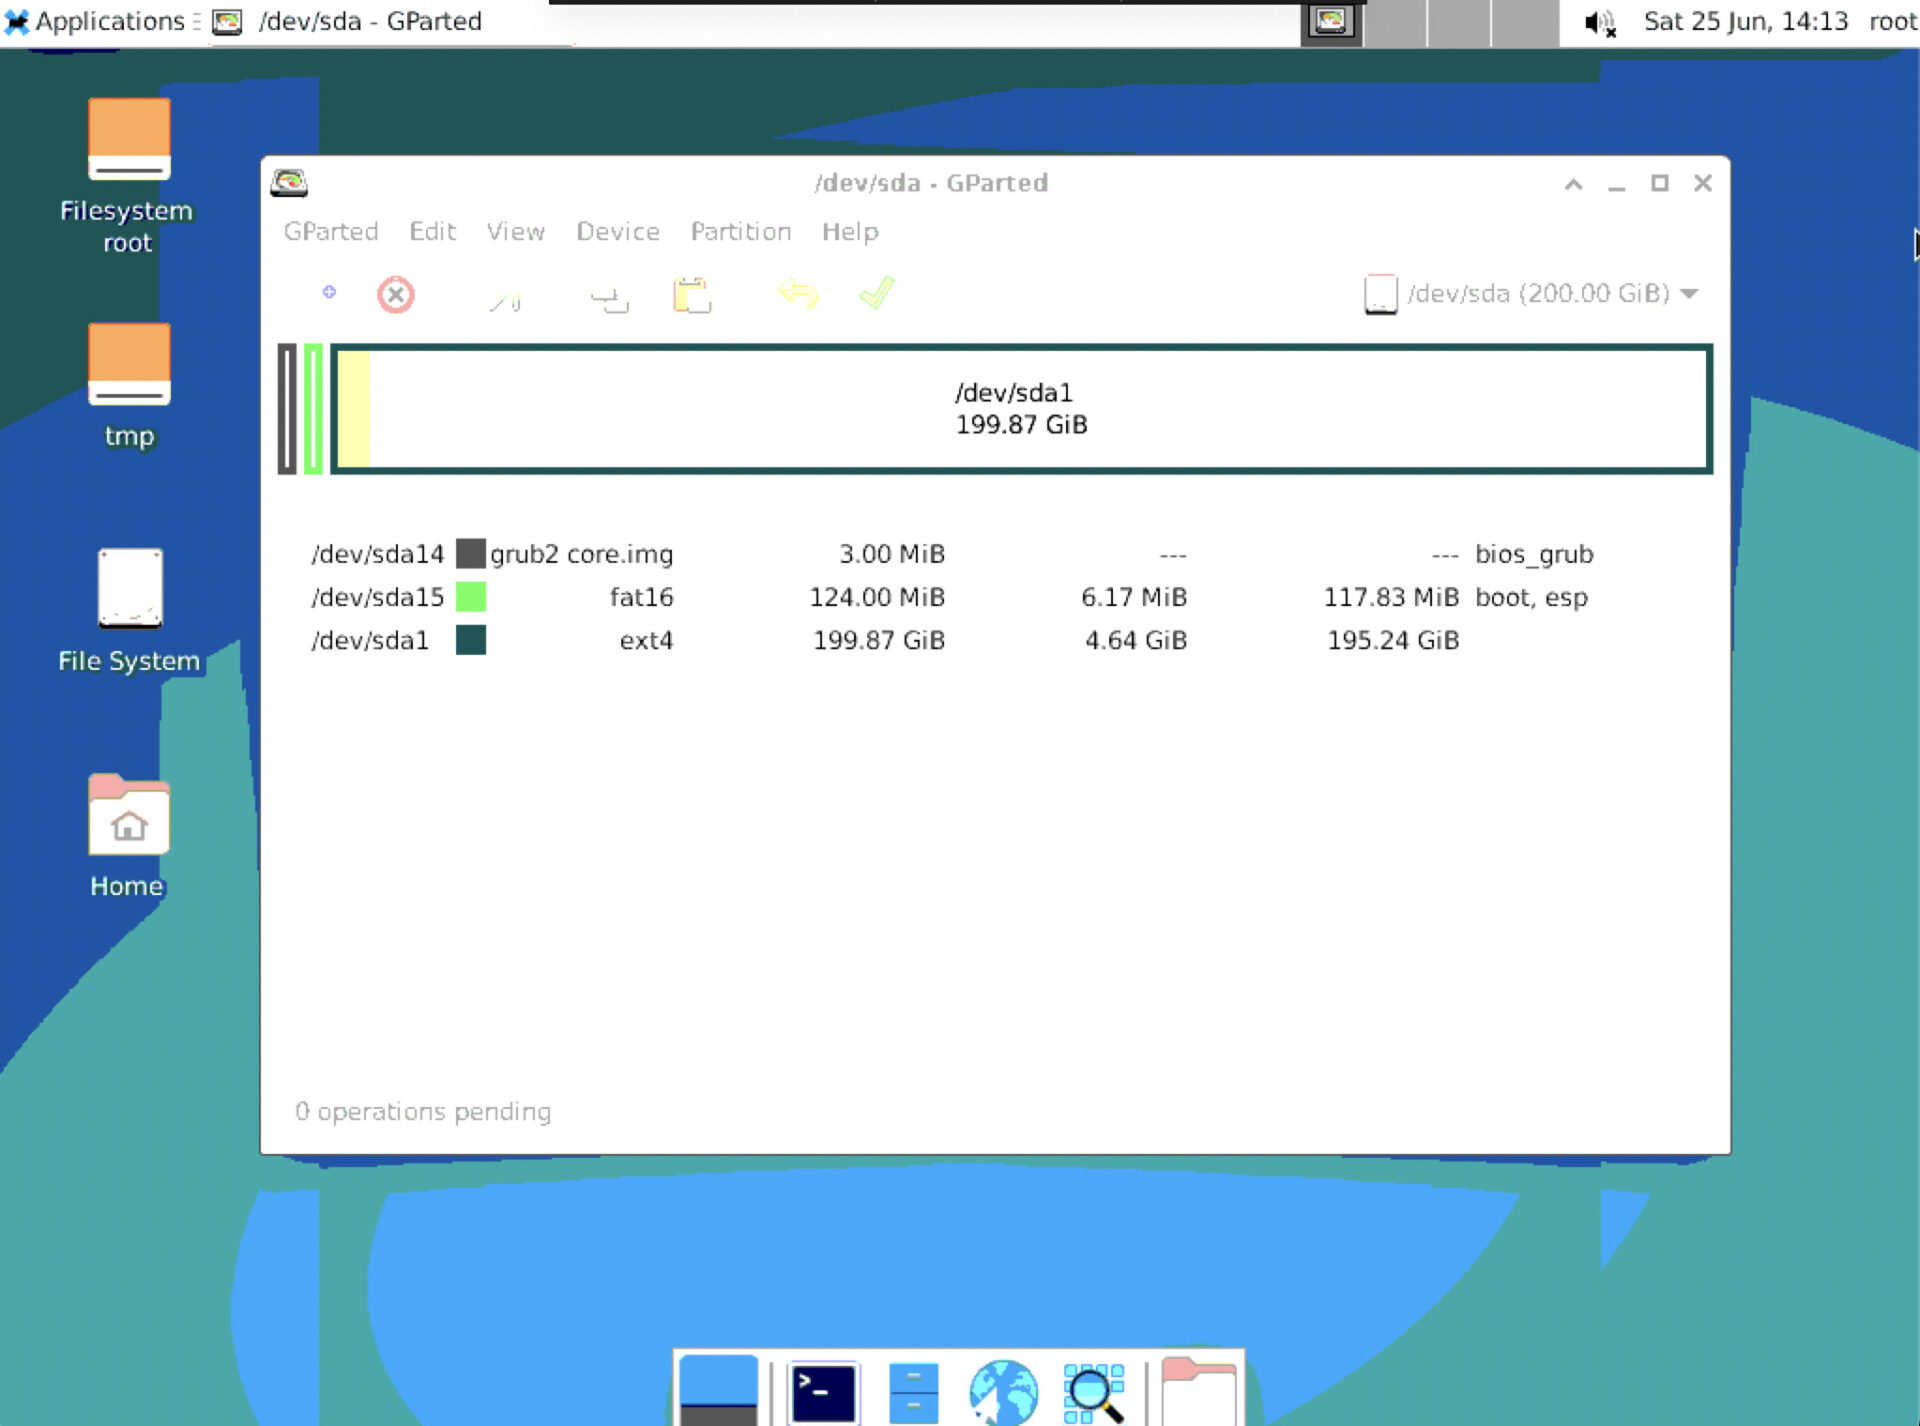
Select the partition you want to shrink, right click and select “Resize/Move”.
A new window appears where you can specify the size of the partition. For example, we can shrink the size so we have 20 GB of space available to create a new partition.
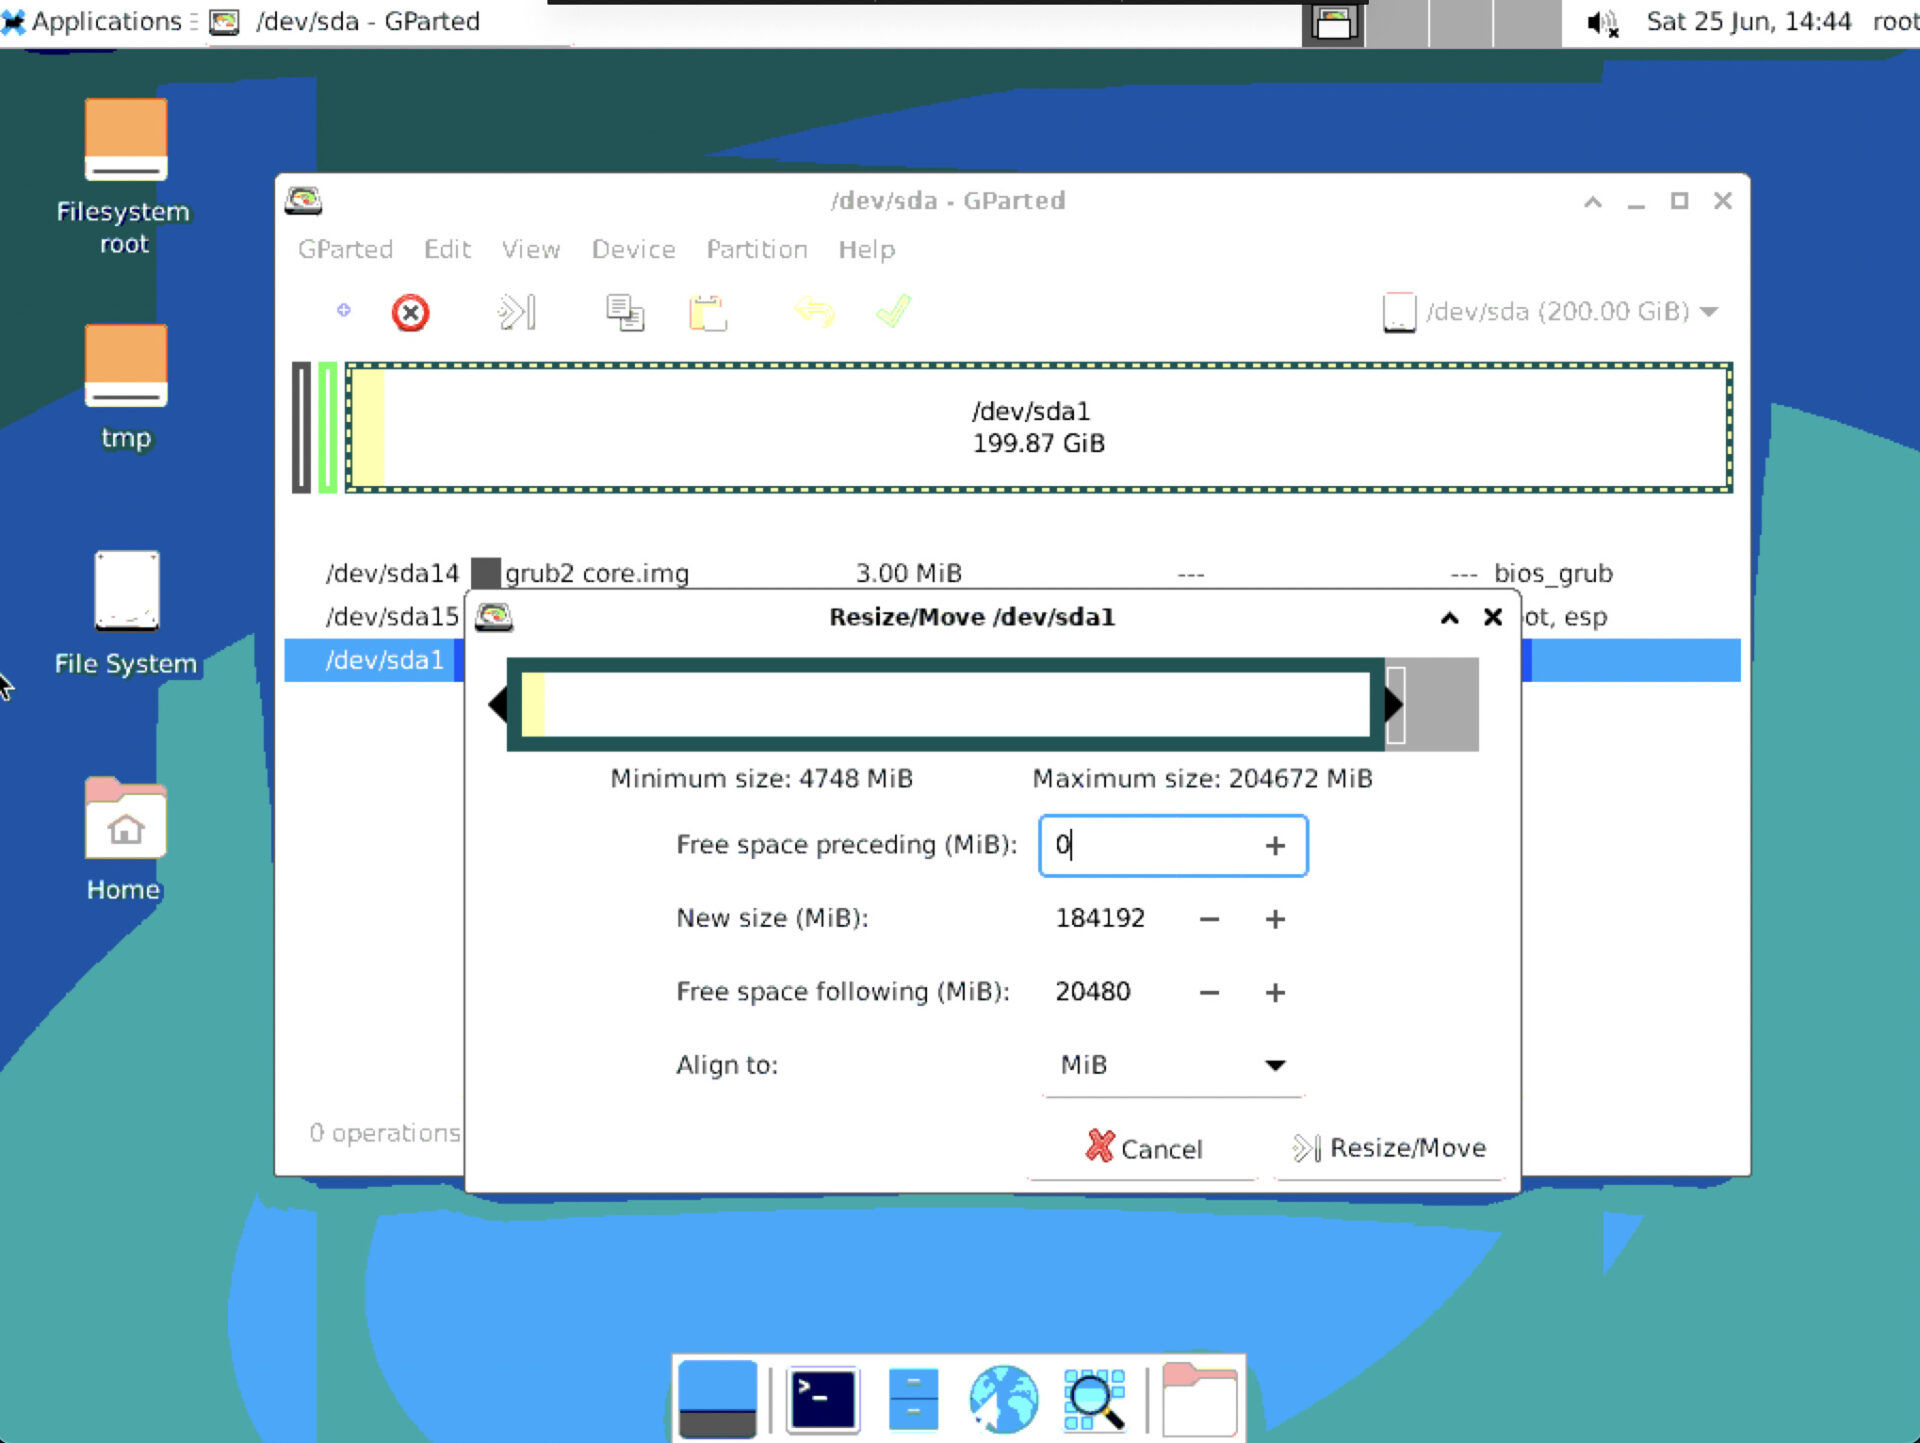
To confirm the changes, click “Resize/Move” and now you can see that we have 20 GB of unallocated disk space available.
Rightlick the unallocated disk space and select “New” to create a new partition. Now you should have another partition in the list:
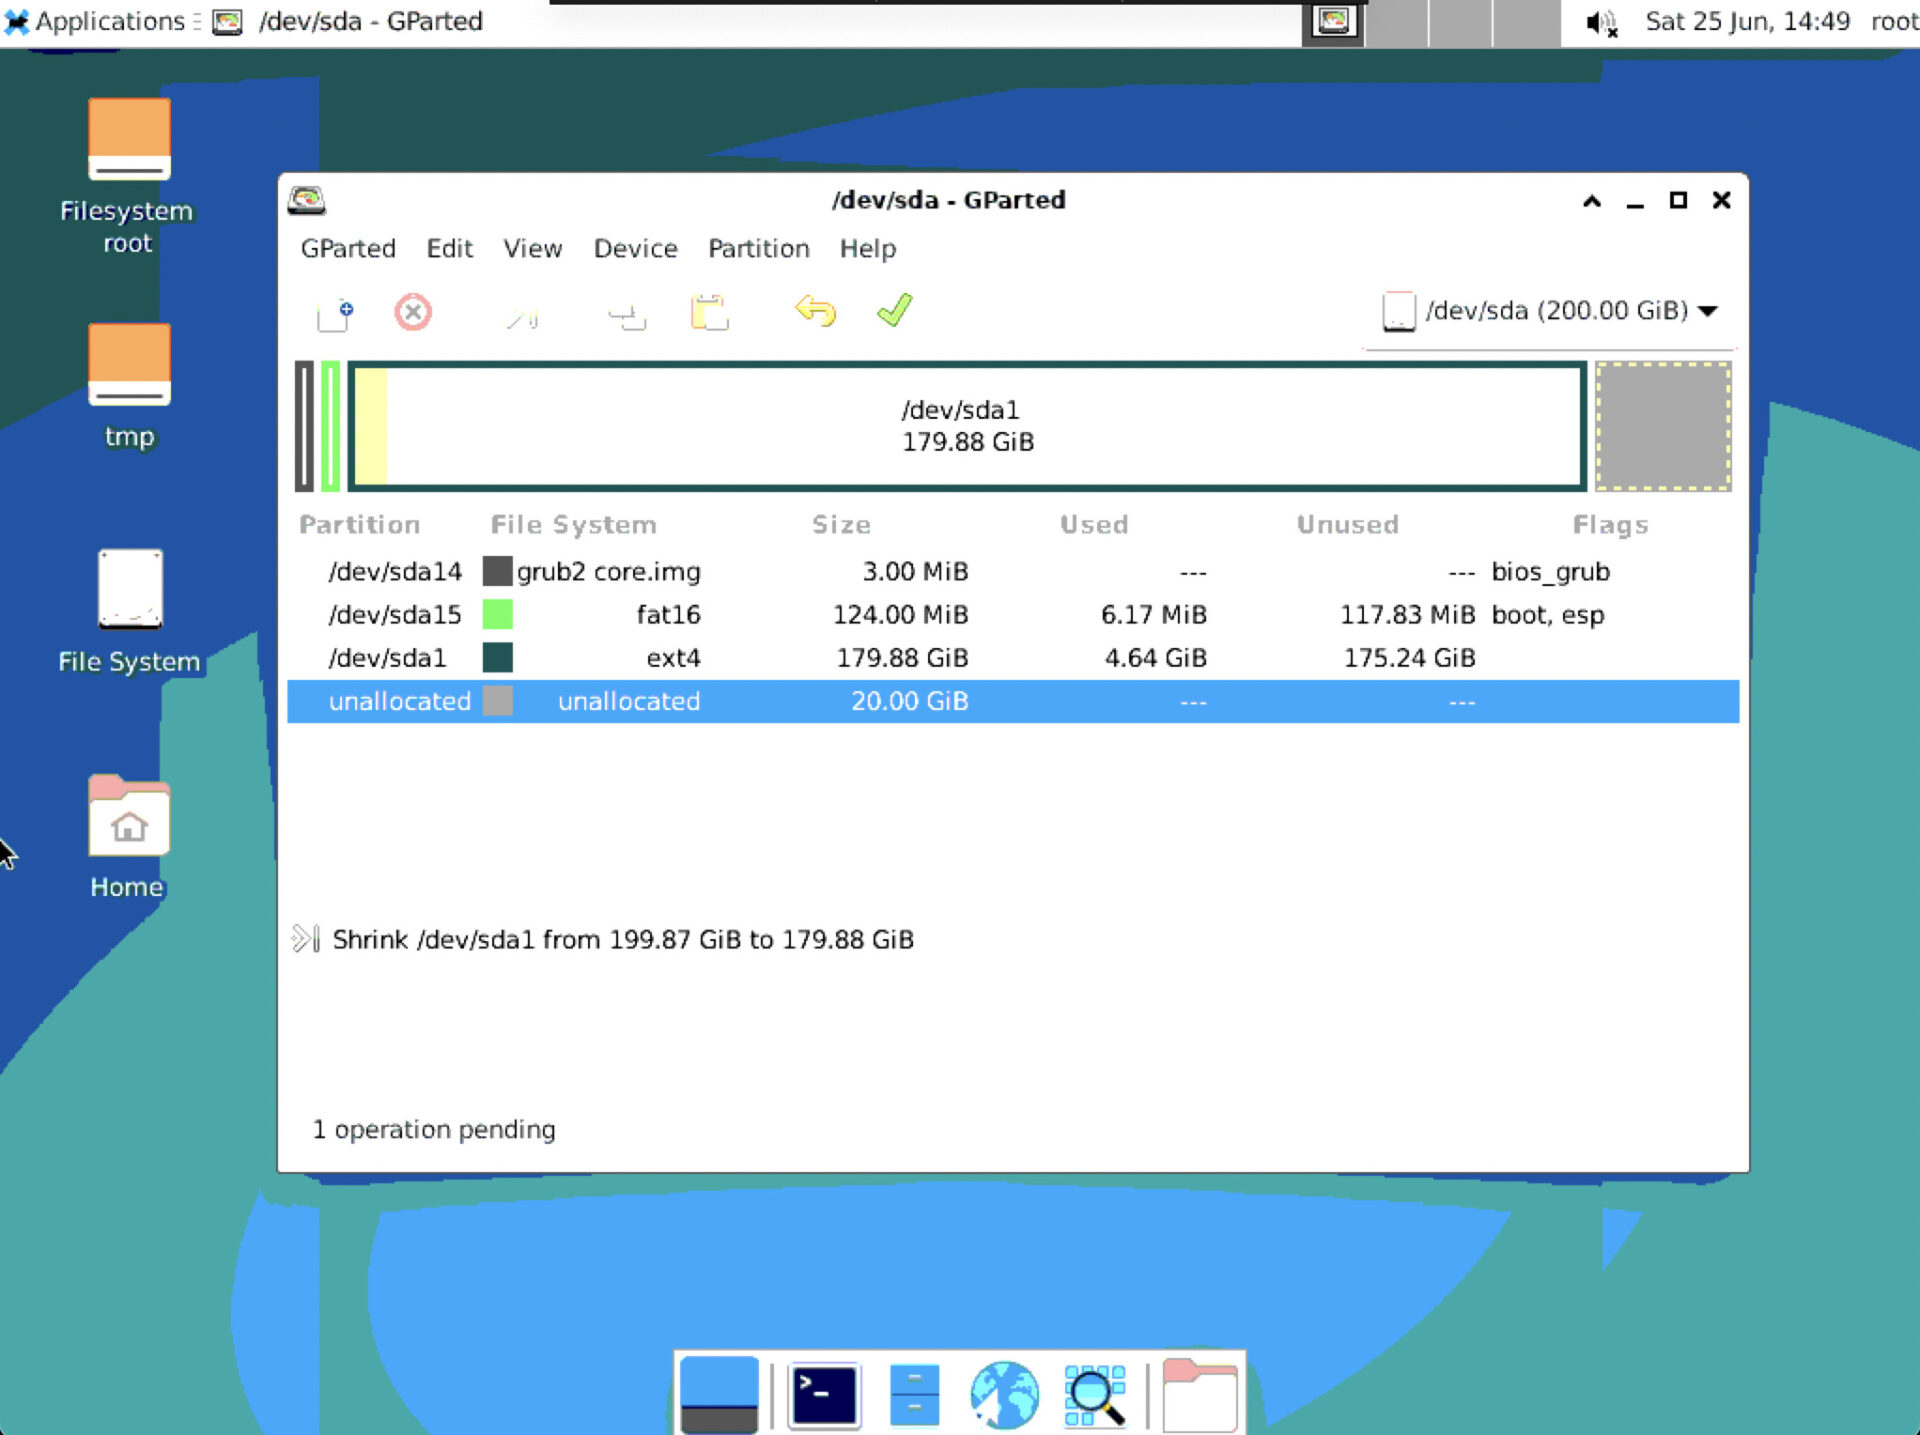
So far, no changes have been made to your hard drive. In order to apply the changes, hit the green tick symbol. A confirmation window appears warning you that you can lose your data when performing this action. As mentioned before, changes to the partition layout can always result in a complete data loss. Make sure you have a full backup of all your data.
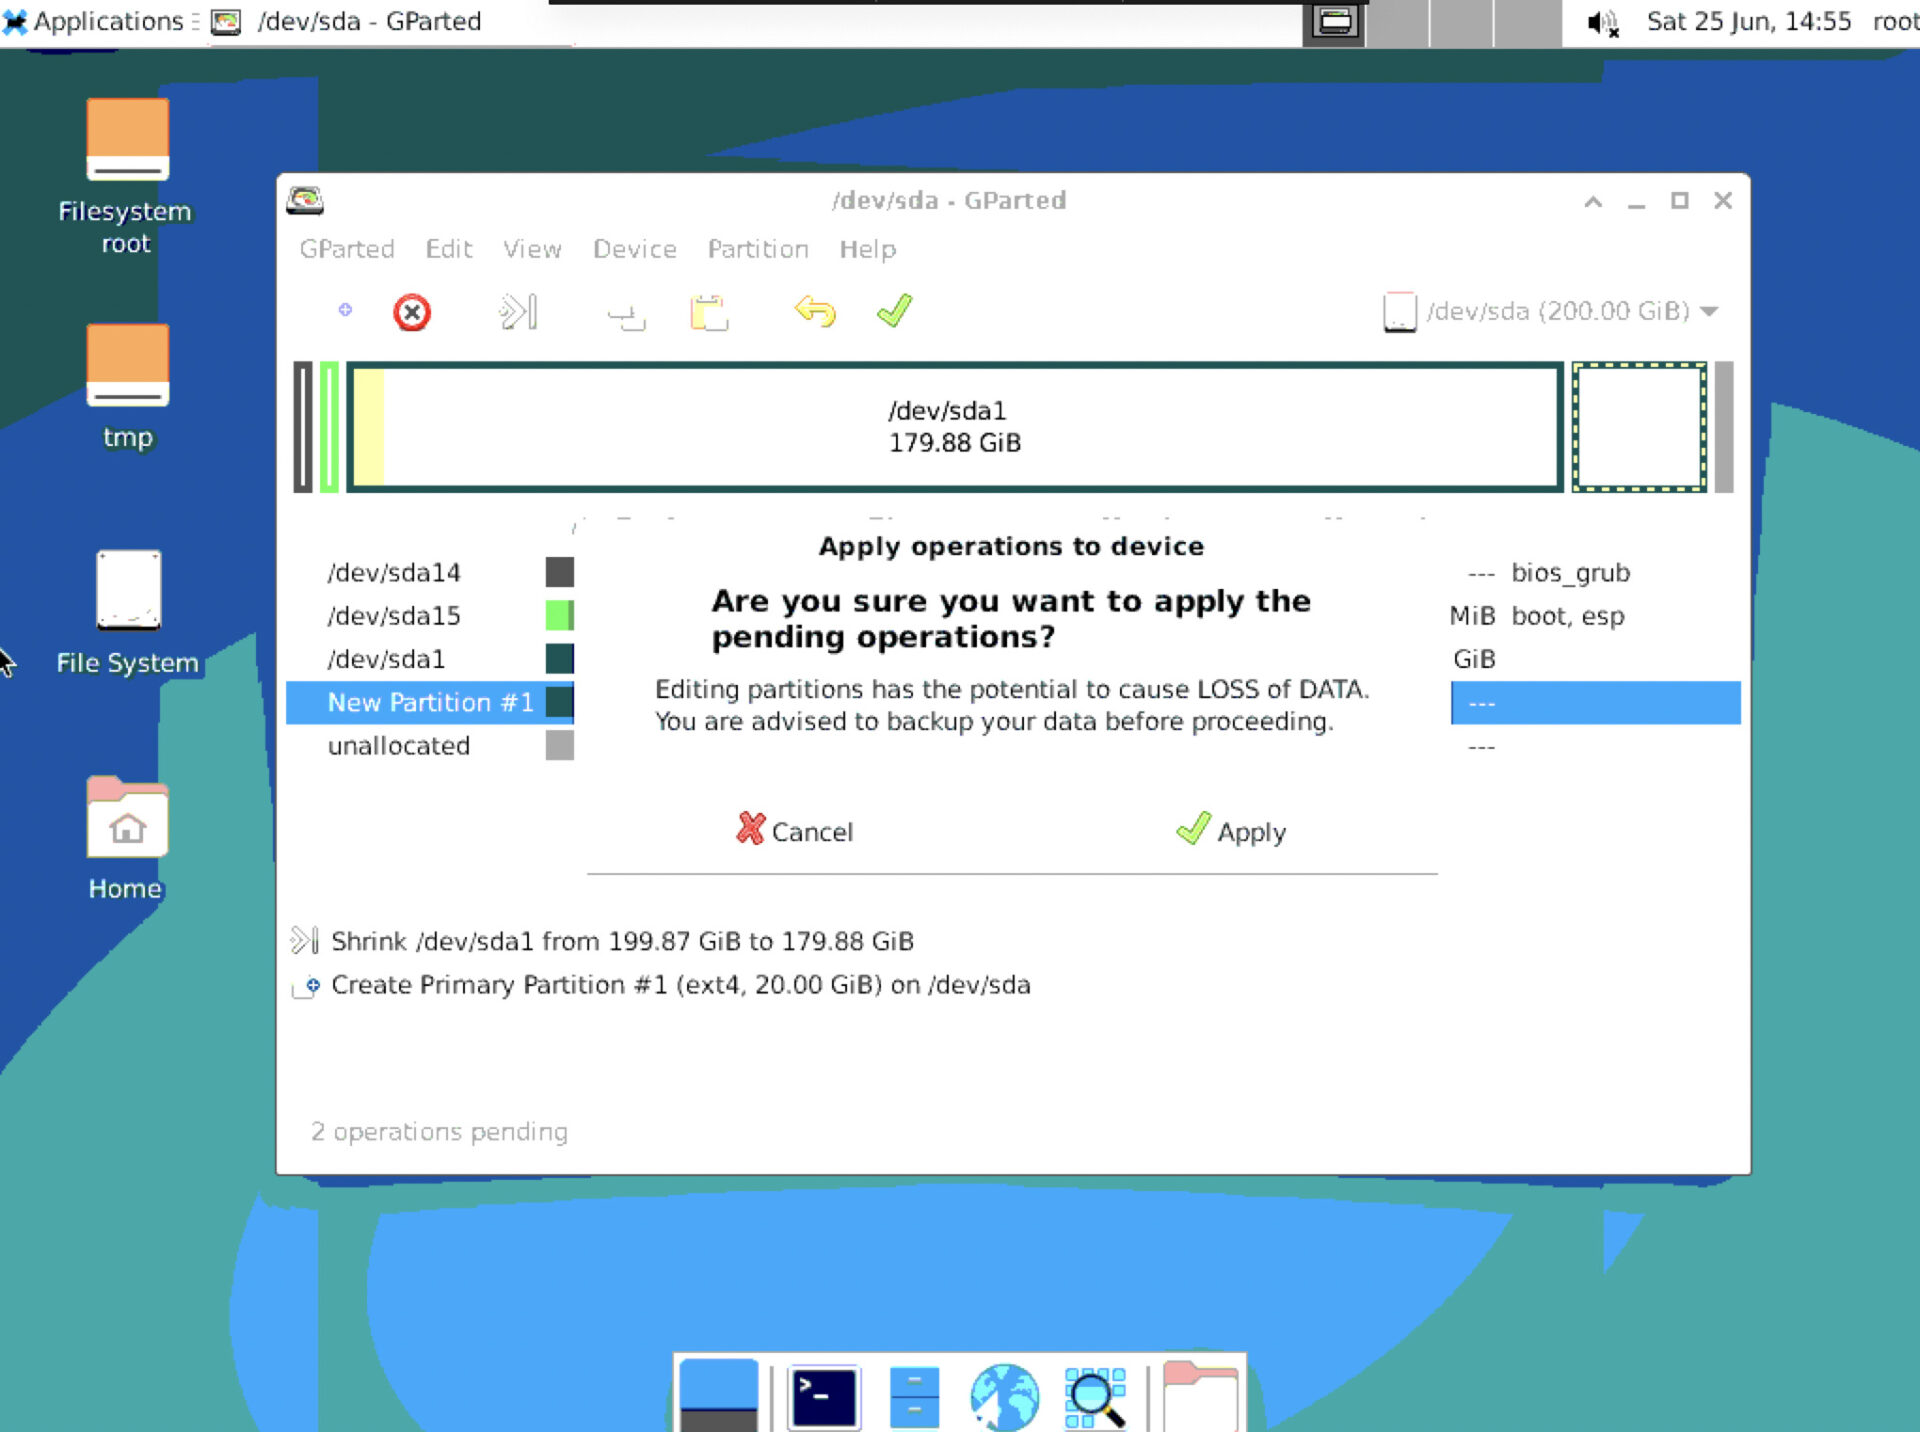
If you’re ready, click “Apply” and the changes will be applied to your hard drive. Depending on the amount of data stored on your server, this action may take some time.
Once the changes are applied, you can restart your server. Use the following command to list all block devices, including the newly created partition:
sudo lsblkNAME MAJ:MIN RM SIZE RO TYPE MOUNTPOINT
sda 8:0 0 200G 0 disk
|-sda1 8:1 0 179.9G 0 part /
|-sda2 8:2 0 20G 0 part
|-sda14 8:14 0 3M 0 part
`-sda15 8:15 0 124M 0 part /boot/efi
Here you can see the partition “sda2” we just created with a size of 20 GB.
Additional Steps for LVM
If you’re managing your partitions with Logical Volume Management (LVM), you need to not only extend the size of the partition itself, but also of the Logical Volume (LV).
First, make sure to activate the volume:
sudo lvchange -a y <LV_Name>
You can check the available space with the following command:
sudo vgsExample result:
VG #PV #LV #SN Attr VSize VFree
testgroup 1 1 0 wz--n- <20.00g <8.00g
In this example, there are 8 GB of free storage capacity in the Volume Group (VG) “testgroup”, becuase the LV currently uses 12 GB, but there are 20 GB available. Let’s extend it to use all the available space:
sudo lvextend -l +100%FREE <LV_NAME>This will extend your volume to use all the available storage space. If you run sudo vgs again, you can see that there is no space left (because the LV takes up all the available space):
VG        #PV #LV #SN Attr   VSize   VFree
testgroup   1   1   0 wz--n- <20.00g    0
Once finished with the LV configuration, resize the filesystem to the size of the LV we’ve just extended:
sudo resize2fs <LV_Name>And that’s all there is if you’re using LVM.
Learn more about mounting additional drives on Linux here.
Windows
If your server is running Windows, connect to your server with RDP.
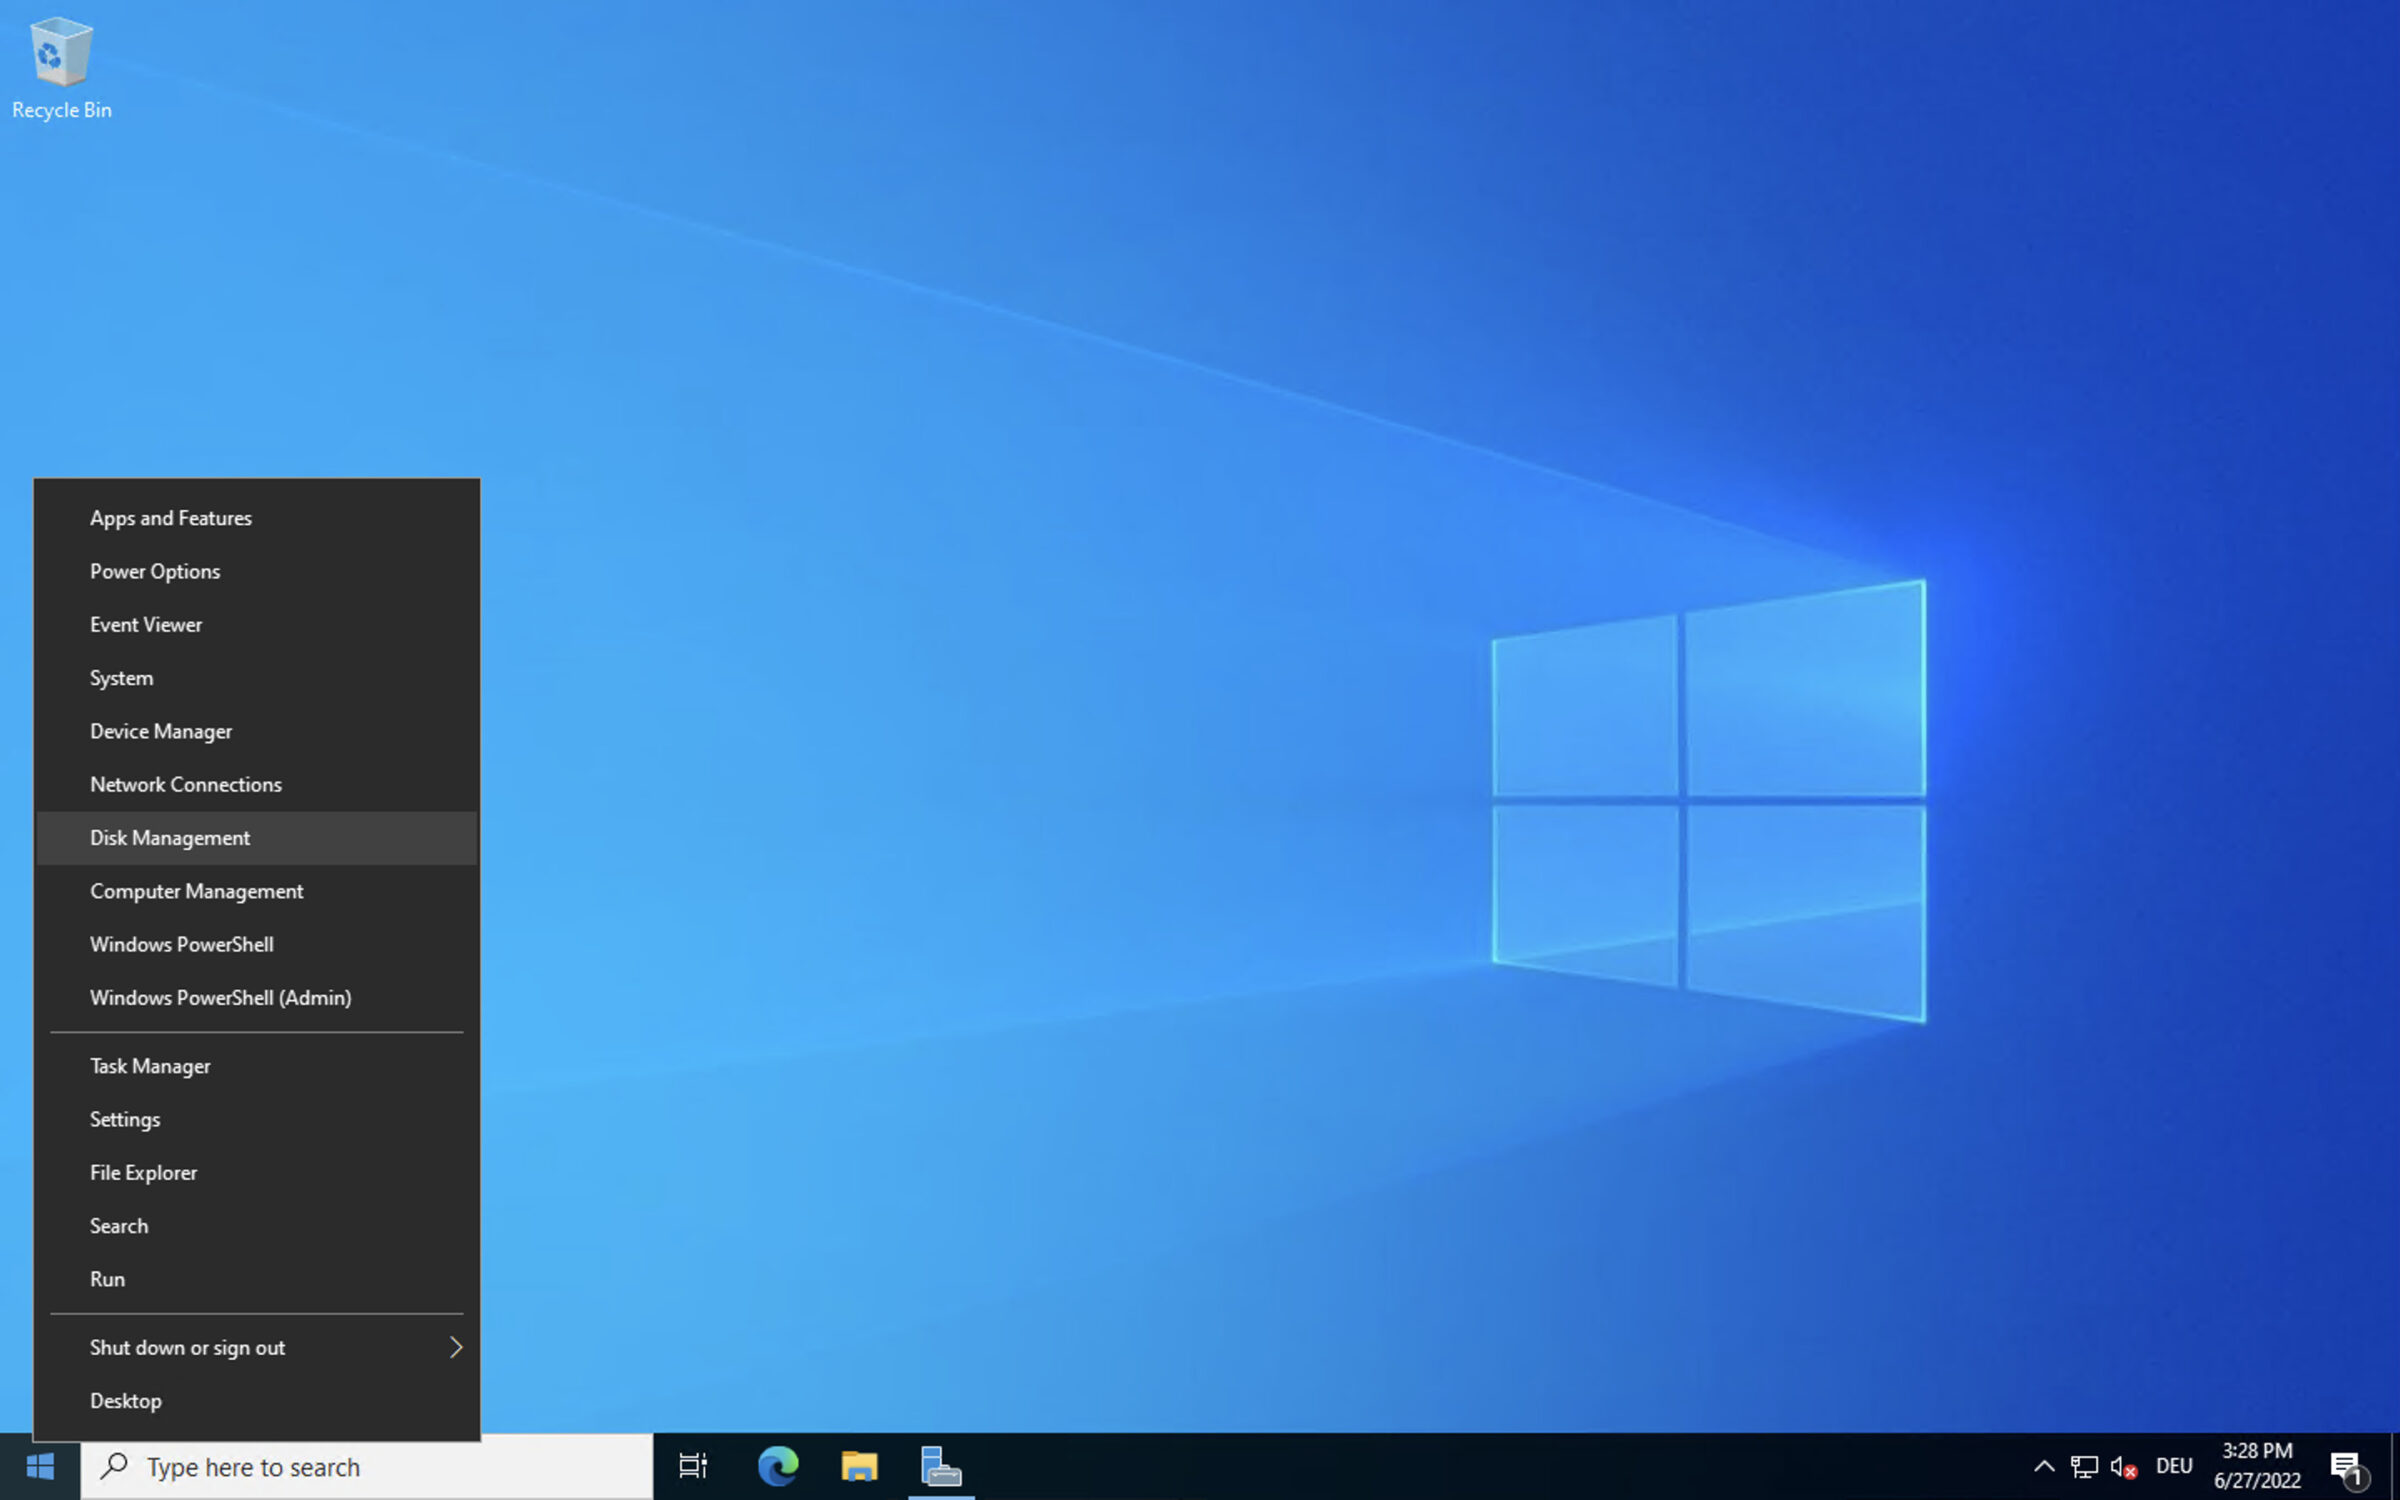
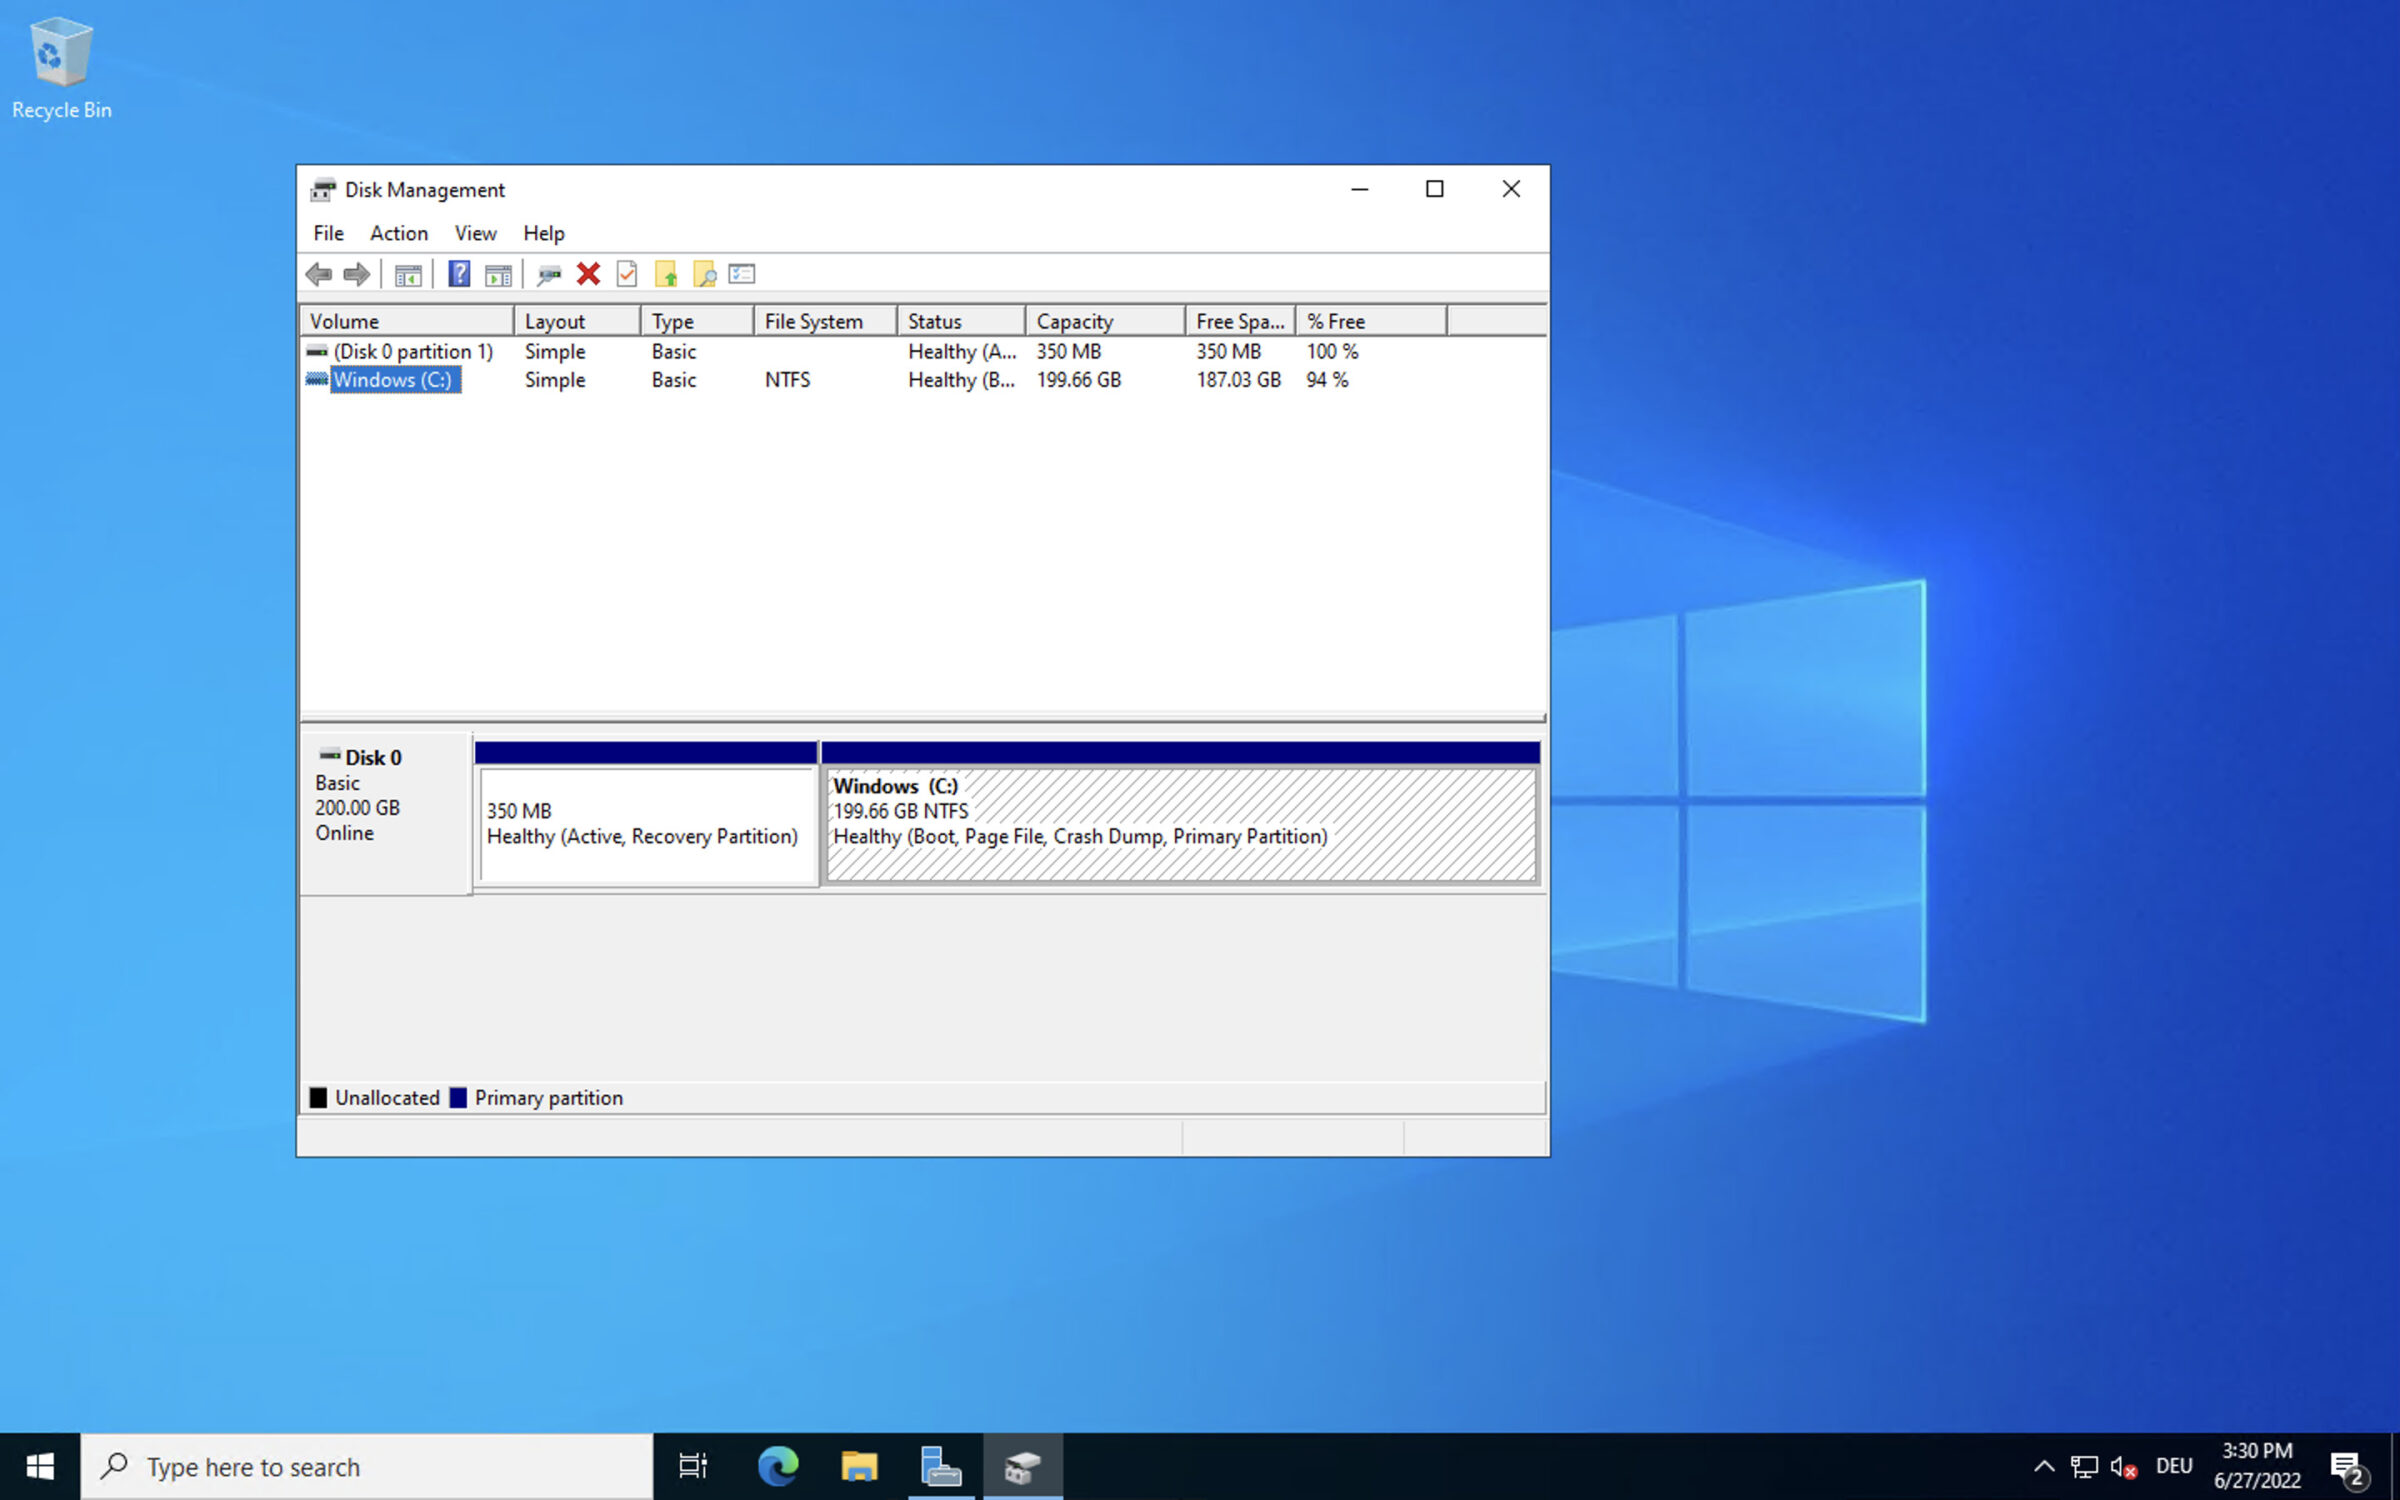
Right click the Windows logo in the bottom left corner and select “Disk Management”. Here you can see all existing partitions and hard drives. In this case, there is only one 200 GB hard drive connected, which is usual for a VPS. On a dedicated server you may have multiple hard drives connected to your server.
Expand Existing Partitions
First, right click the partition you want to expand and select “Extend Volume”. If you haven’t changed the partition layout and just upgraded the storage, the default partition on Windows is usually “Windows (C:)”.
Here, select the disk on which you want to expand your partition. In this example, there is only one disk with 50 GB of unallocated space and that’s what the existing partition should use, so we’ll select that.
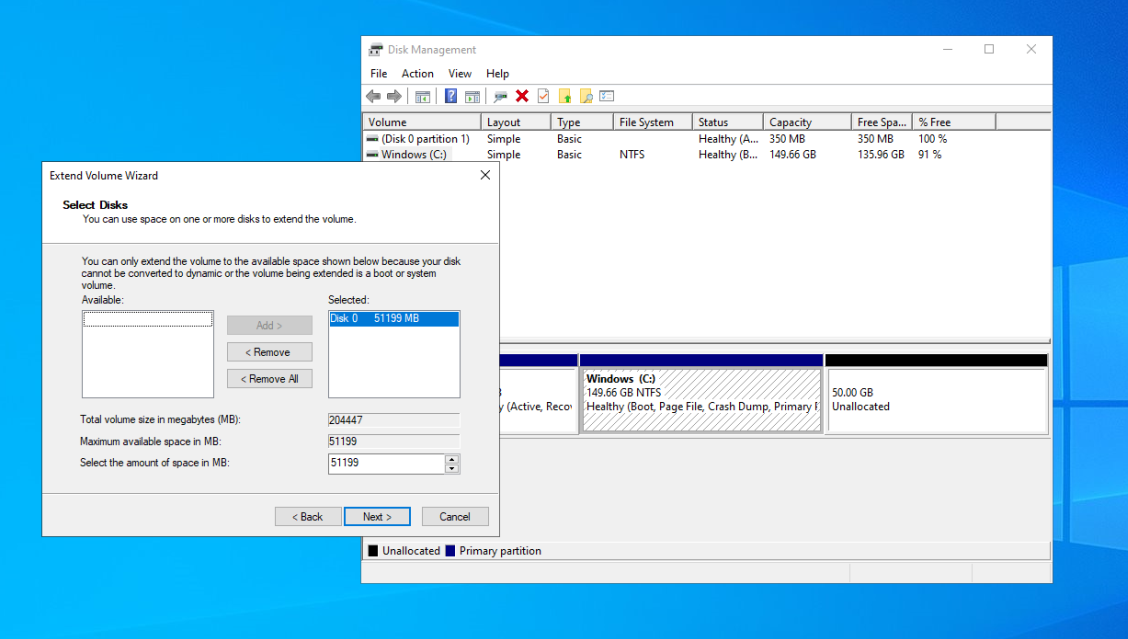
You can also change the amount of MB you want to add to the partition, by default that’s all the available space.
Press “Next” and then “Finish” to complete. In Disk Management you can now see that the unallocated space is gone and the partition has more space allocated to it.
Modify Existing Partitions
To change the partition layout, right click the partition you want to change. For this example, we’ll first shrink the existing partition and then create a new one. Select “Shrink Volume” and in a new window you can choose how much space you want to free up.
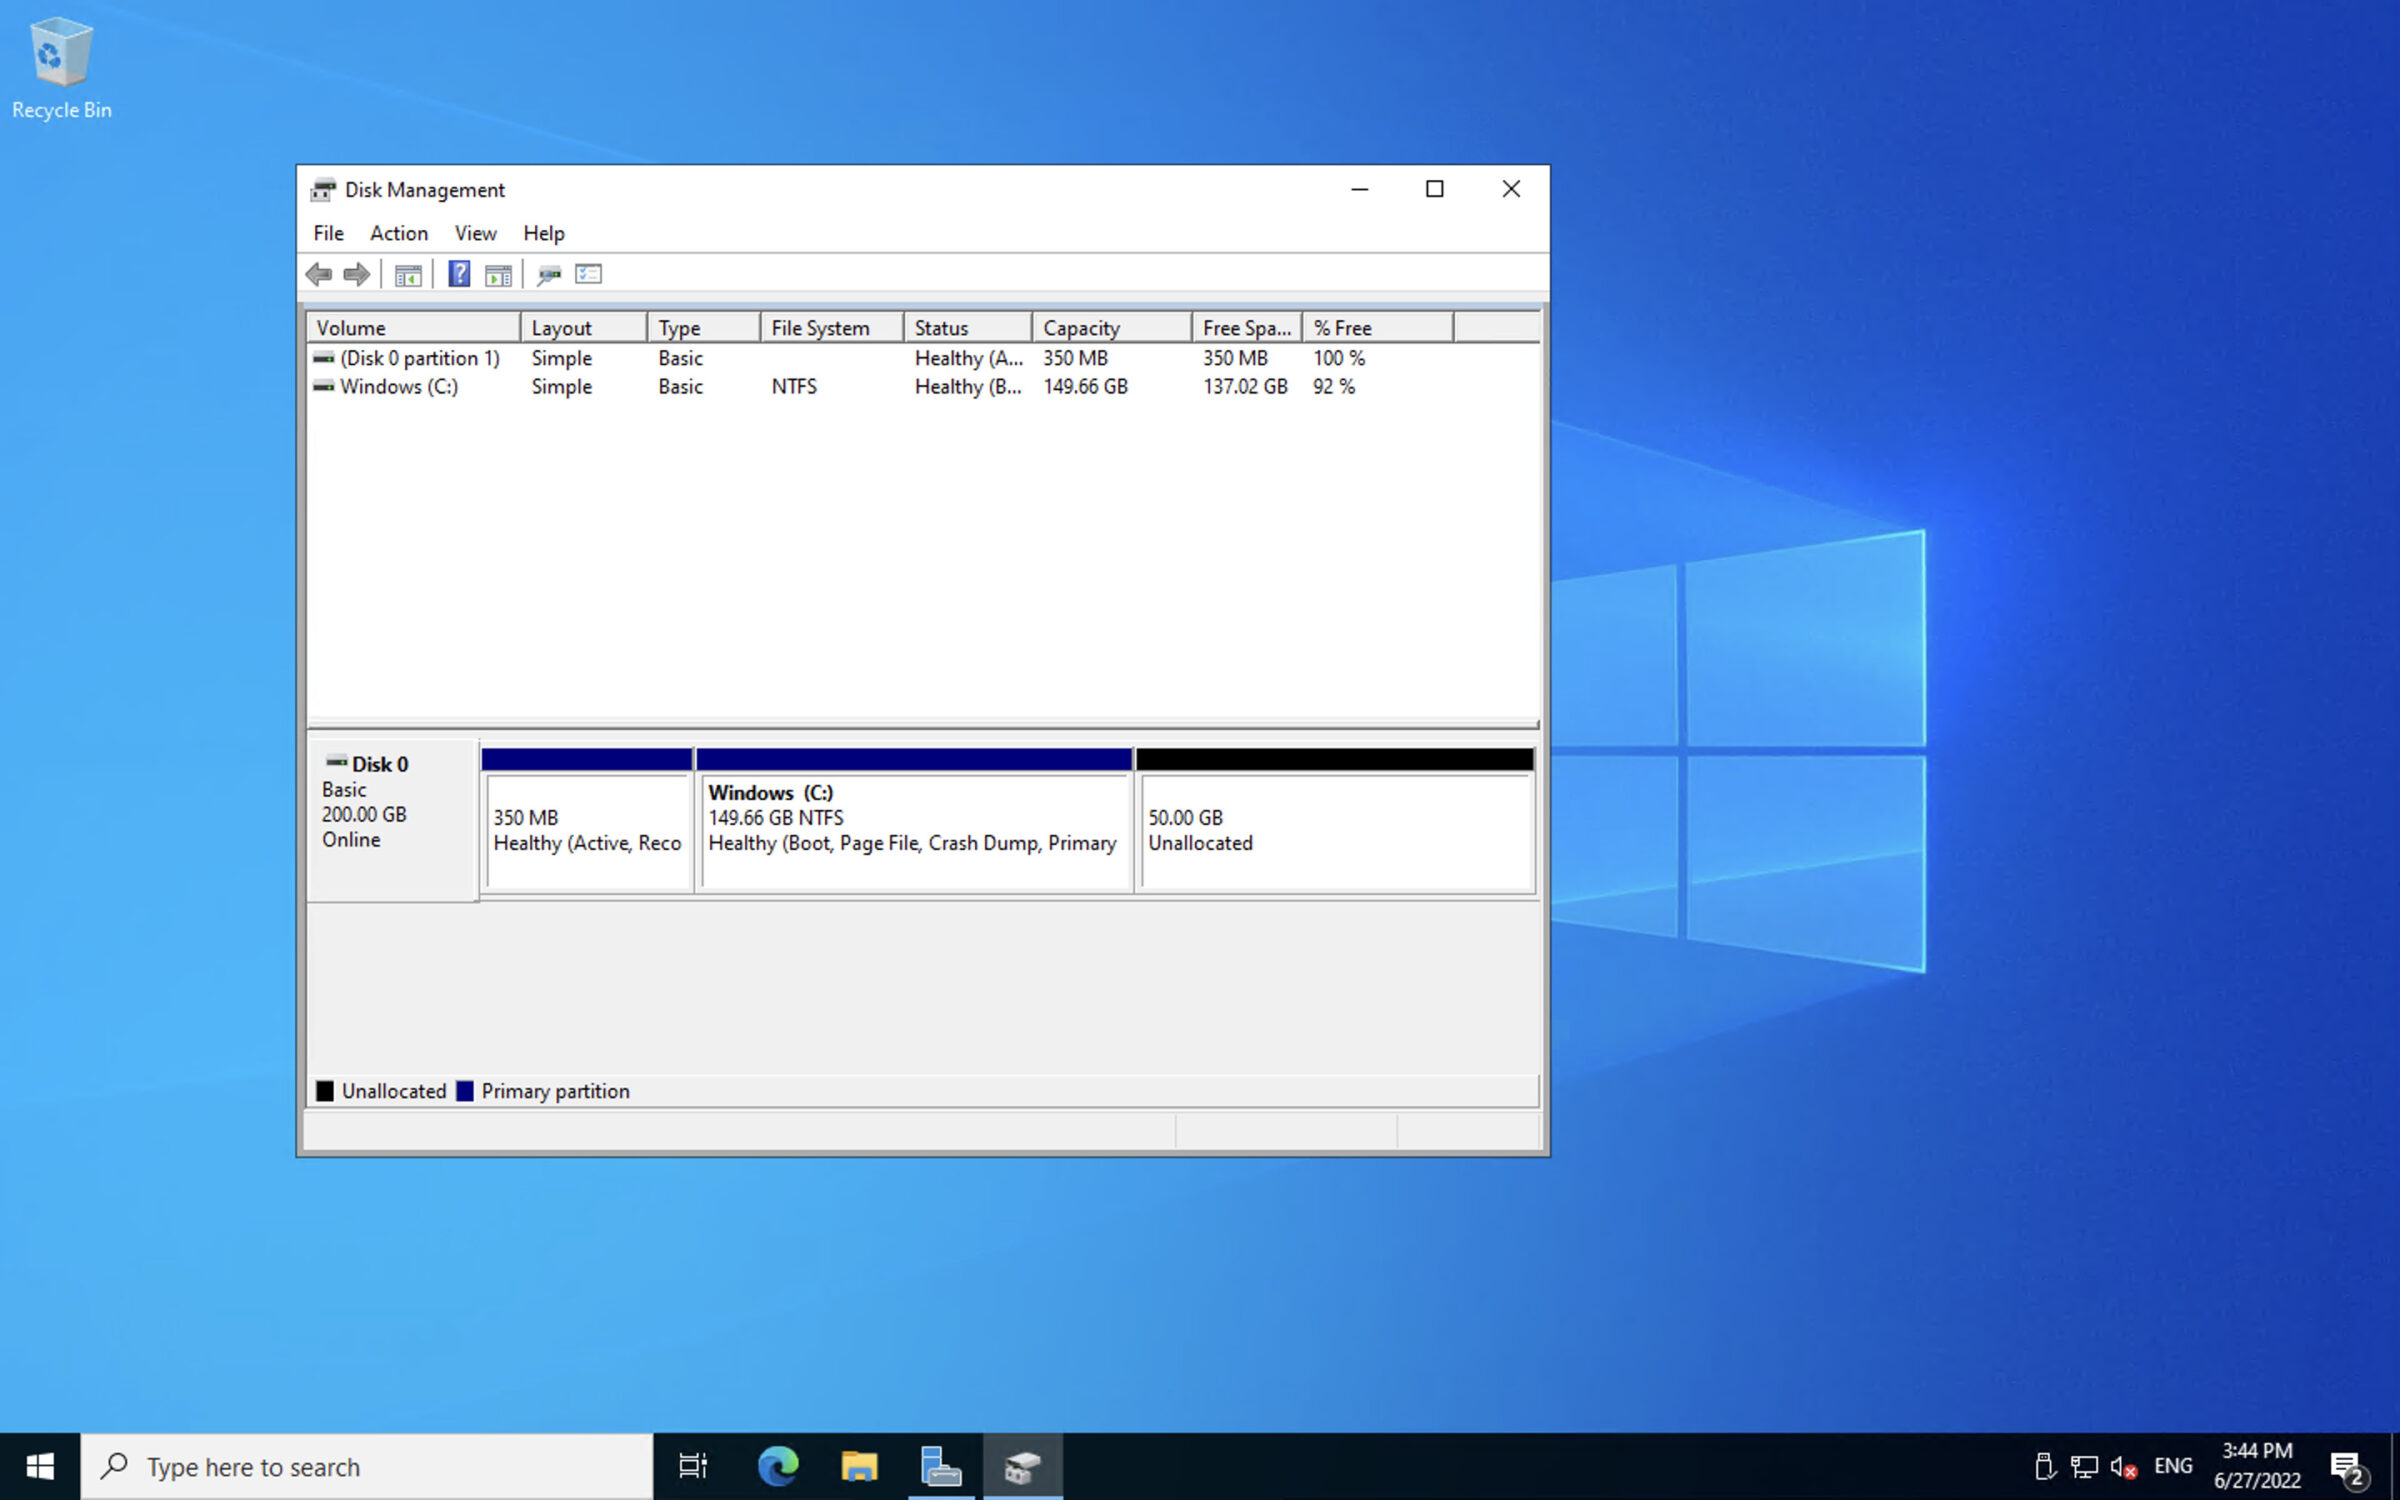
In this example, we’ll free up 50 GB of space which means that we have 50 GB unallocated space on our hard drive after this operation.
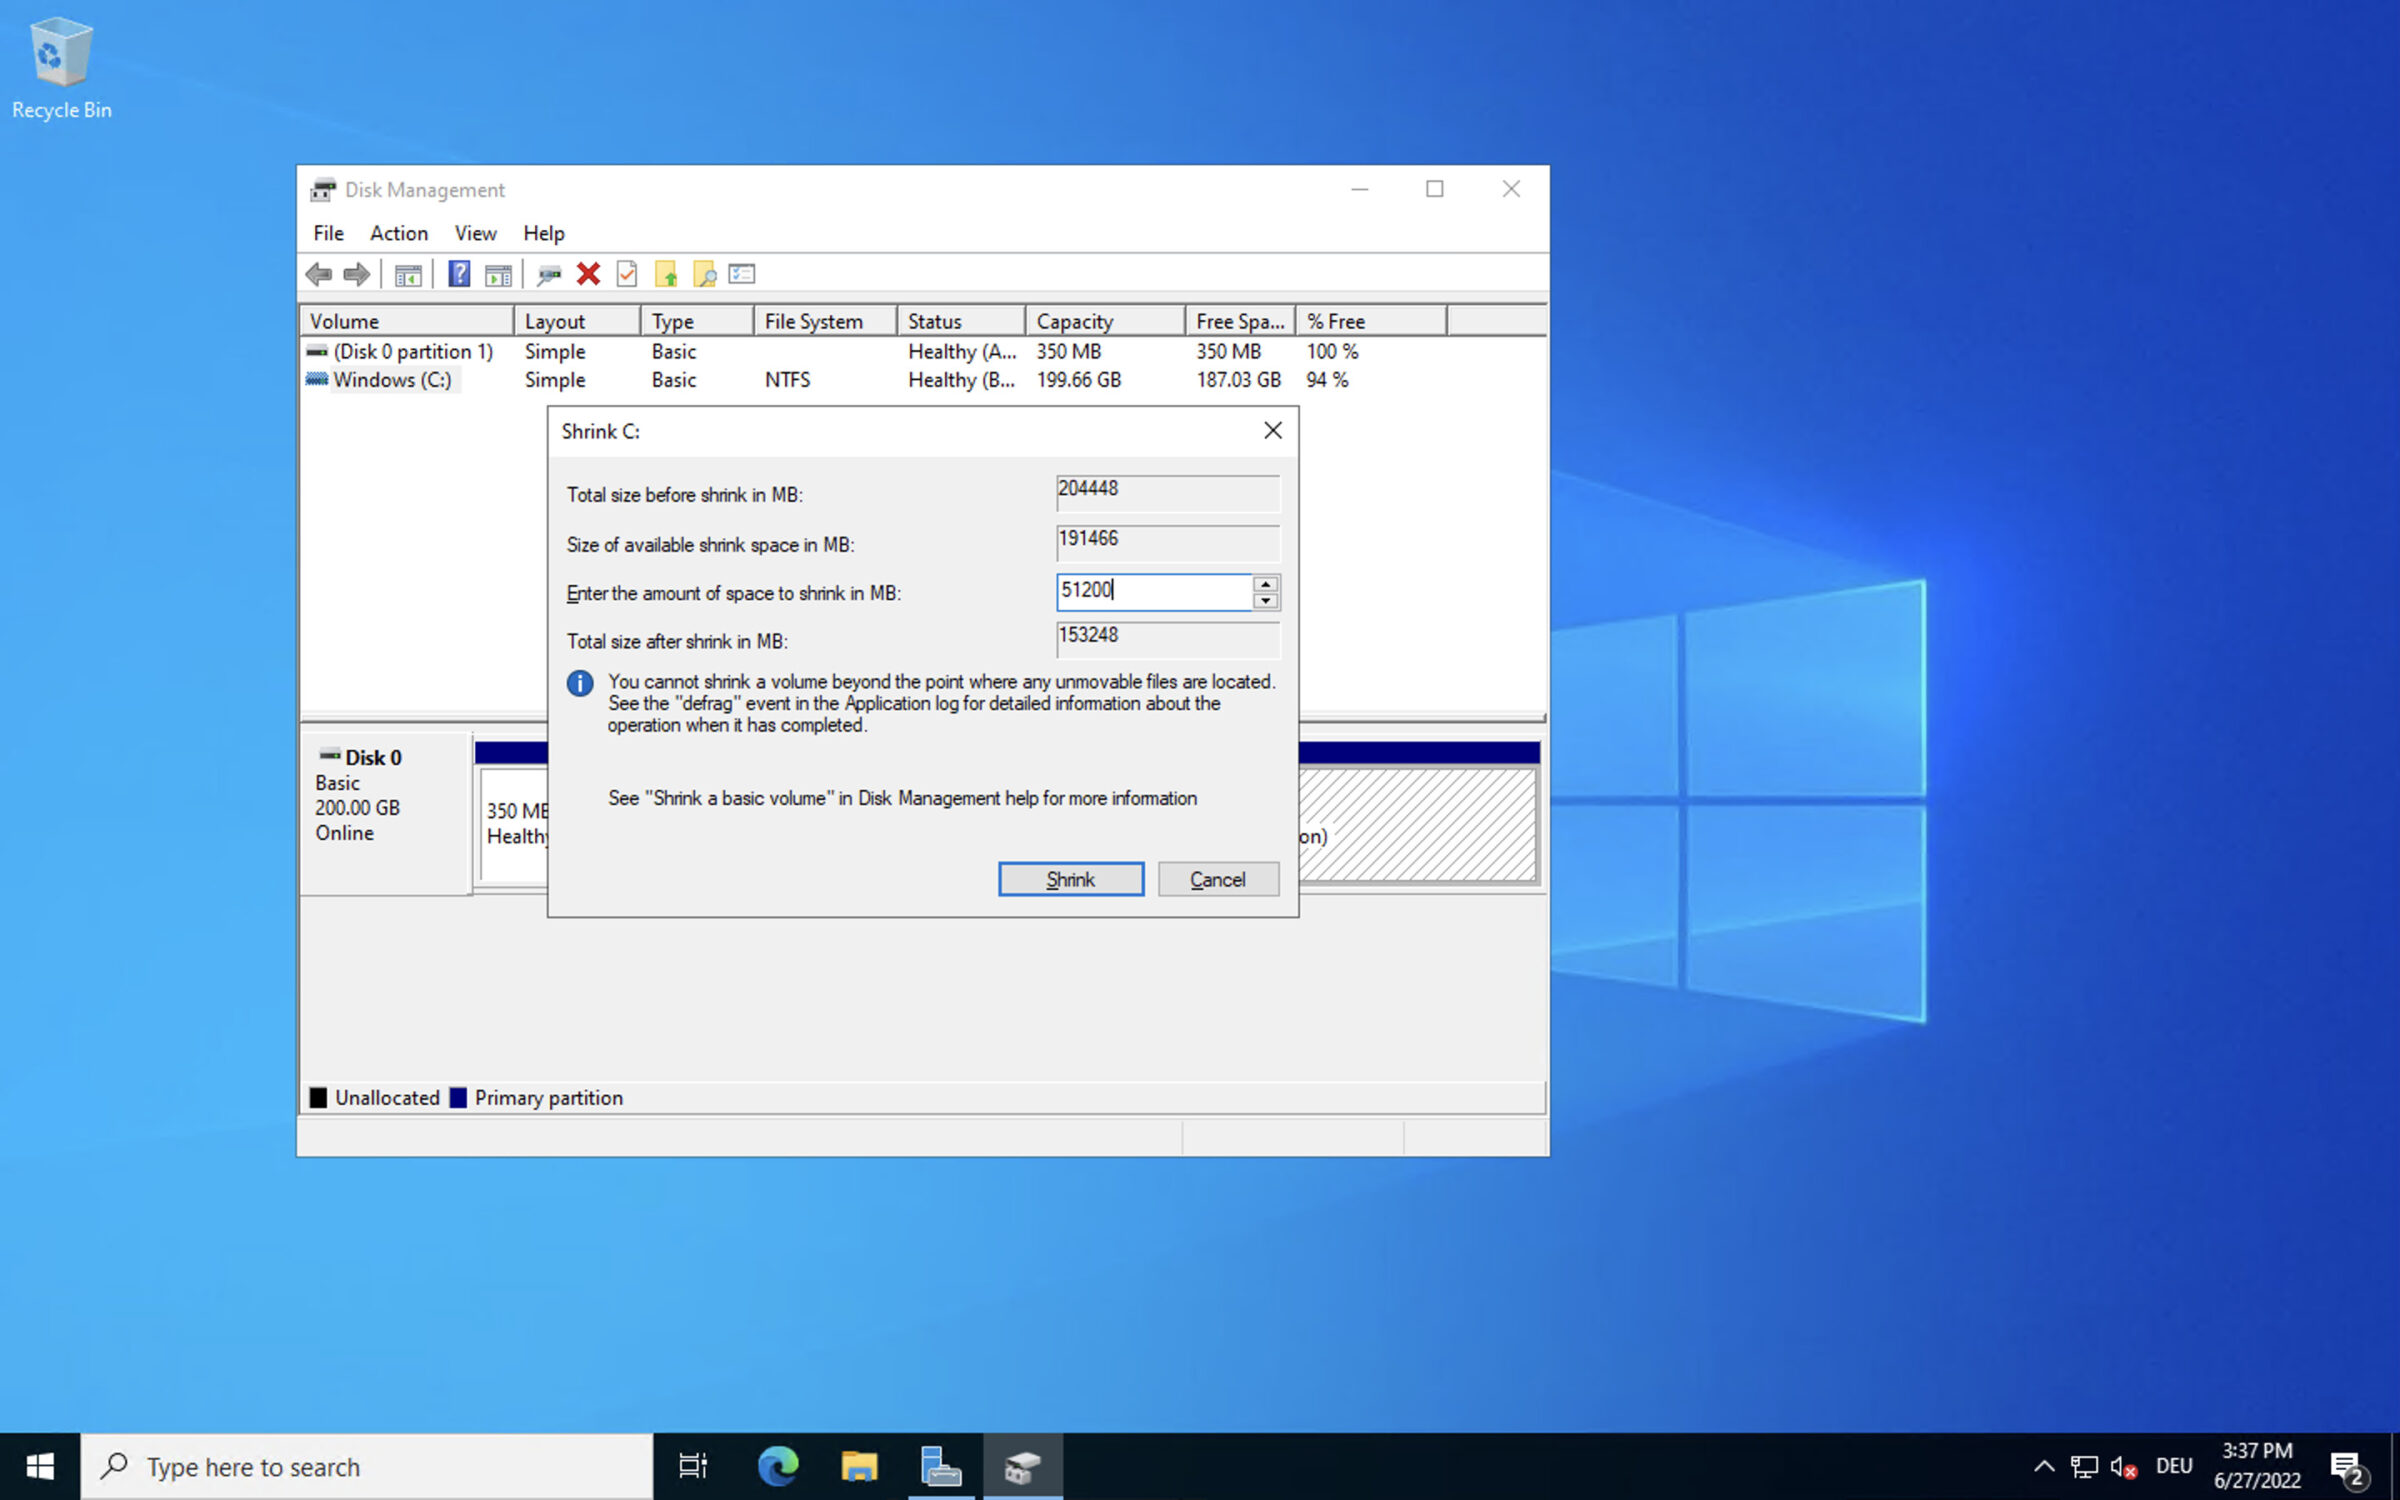
Click “Shrink” to confirm the changes.
You can now see the 50 GB of unallocated space on the hard drive.
Creating New Partitions
To create a new partition, right click the unallocated space in the disk overview and select “New Simple Volume”.
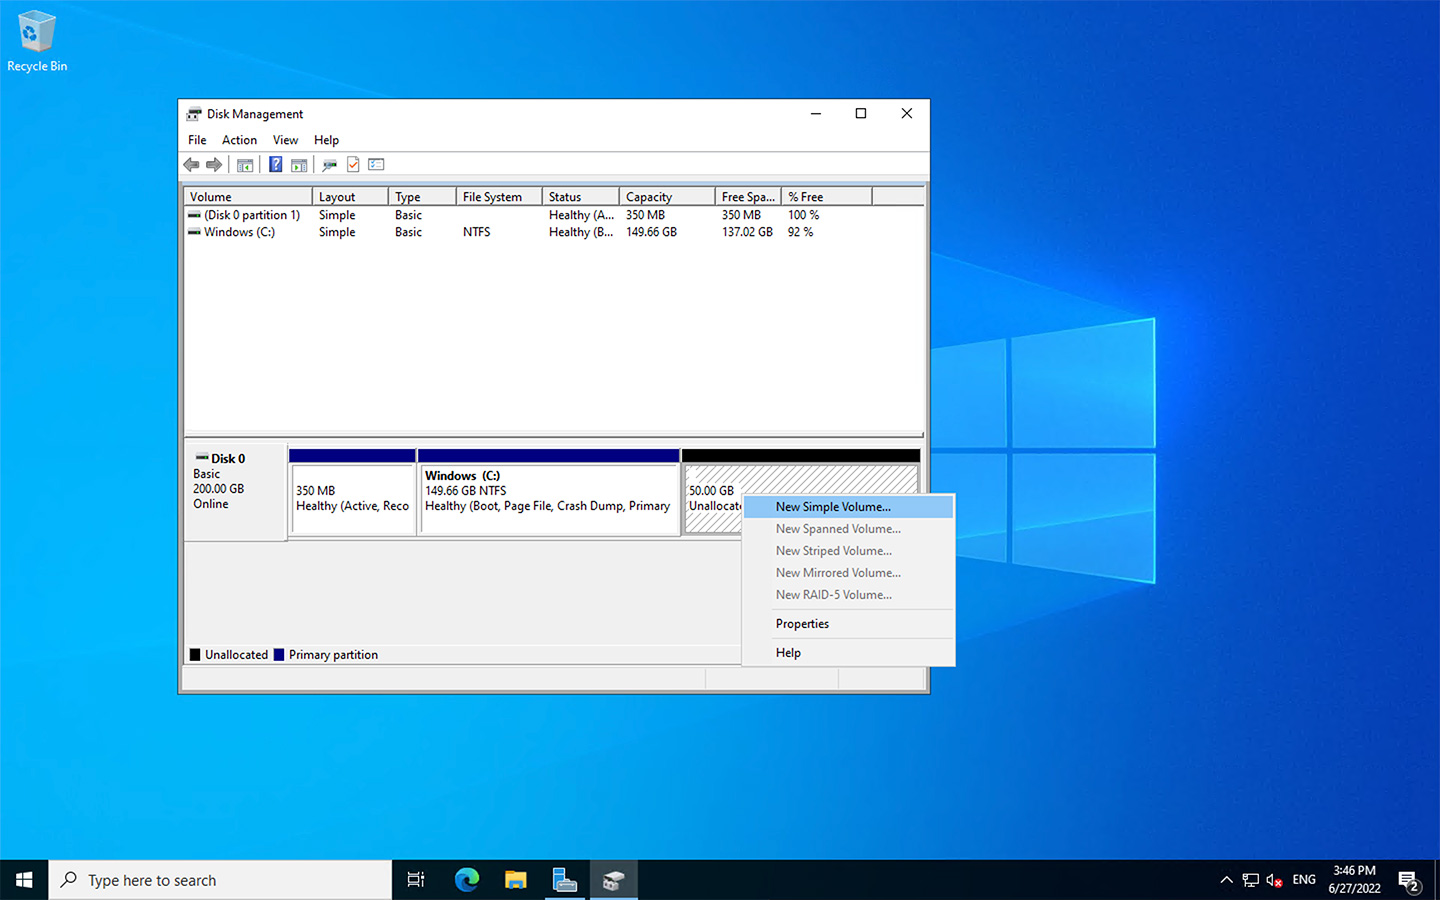
You’ll be asked how much space you want to allocate, in this case we’ll just use all the available space (50 GB).
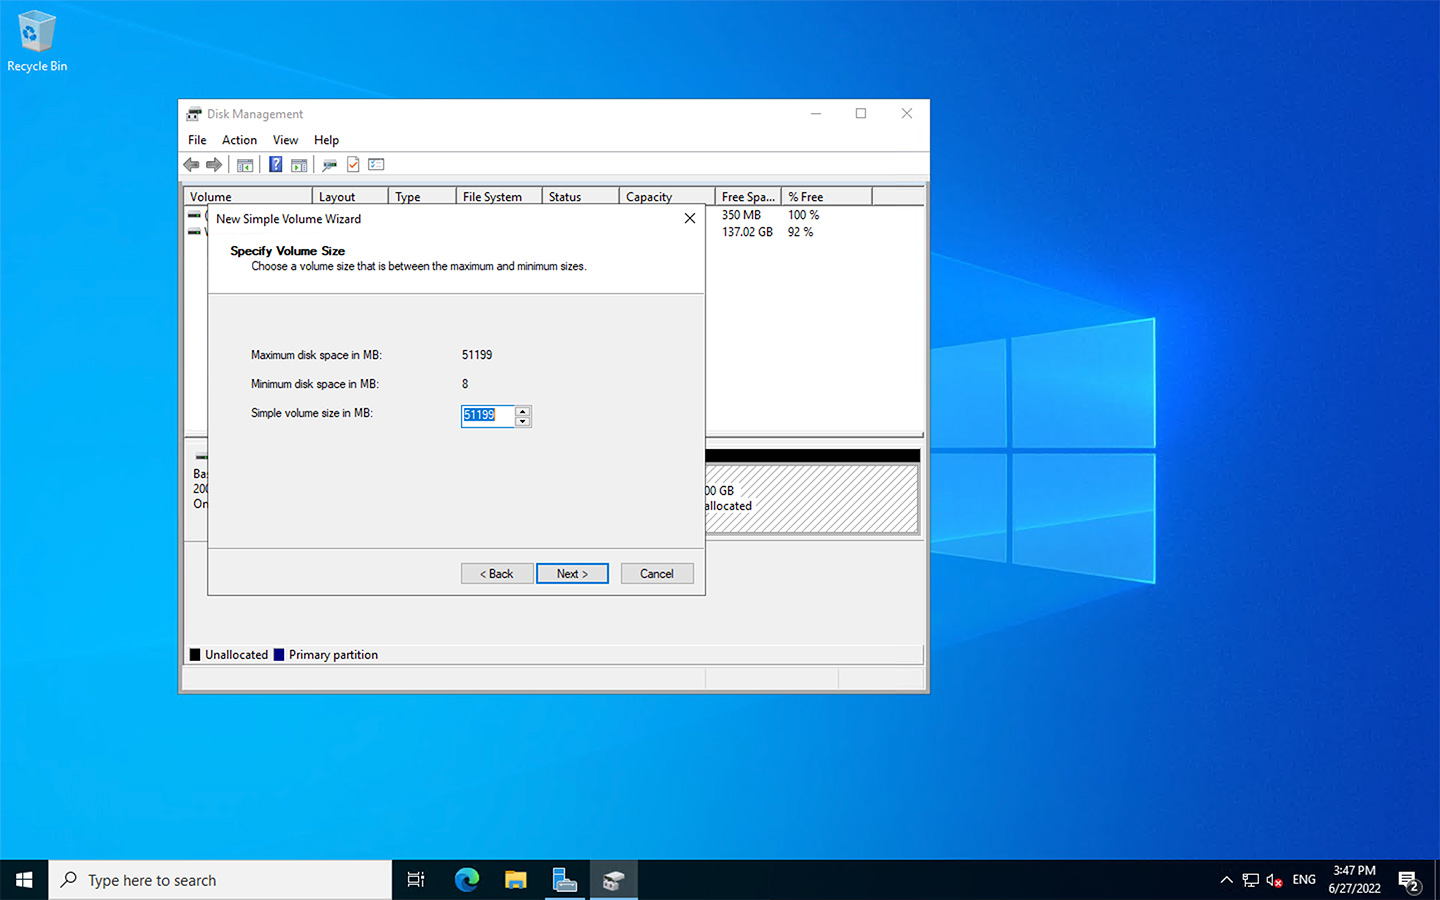
You can customize the new partition in the following windows. After the Setup Wizard, the new partition is visible in the Disk Manager:
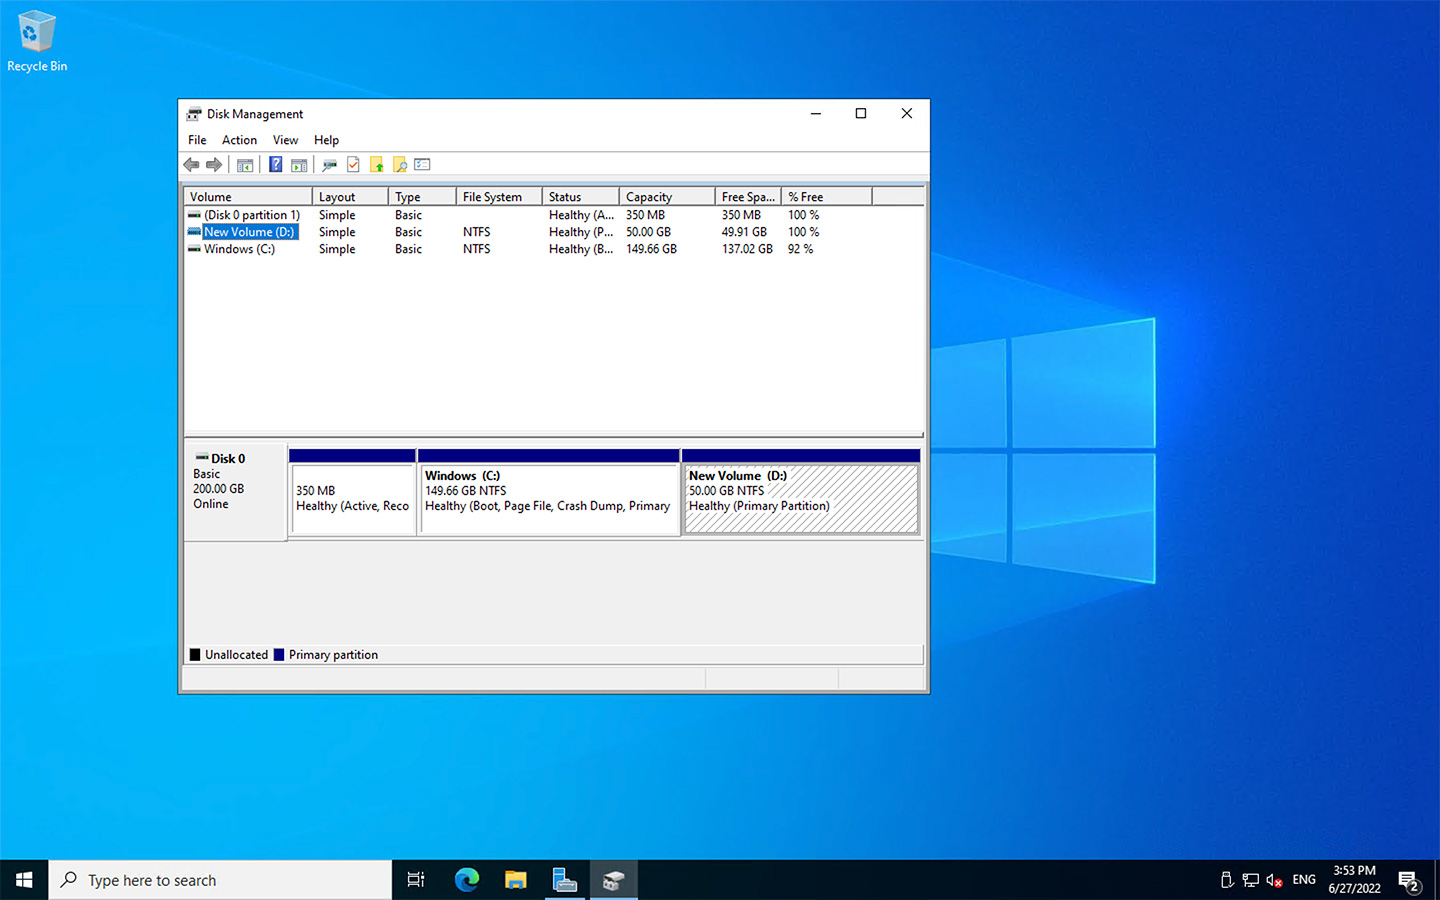
Learn more about mounting drives on Windows here.