Given how frequent data breaches occur, it’s no surprise that Bitwarden self-hosting has become more popular among the DIY community (especially given that Bitwarden is open source). Note that it’s free to self-host Bitwarden, but there are some features that need to be unlocked with a registered Bitwarden license file. In this tutorial, we’ll show you how to self-host Bitwarden using a virtual private server (VPS).
Which option should I use: Vaultwarden or Bitwarden?
For most individuals, families, and teams up to around 20 users, Vaultwarden is the recommended path in 2026. It uses a fraction of the resources, deploys in minutes from a single Docker container, and is fully compatible with every official Bitwarden client (browser extensions, desktop apps, mobile). Official Bitwarden is the right choice for organisations that need enterprise SSO, advanced compliance logging, or want a vendor-supported server. The steps below cover both.
| Feature | Vaultwarden Recommended | Official Bitwarden |
|---|---|---|
| RAM required | ~256 MB | ~2+ GB |
| Setup time | ~10 minutes | ~30–60 minutes |
| License | Open-source (AGPLv3) | Open-source (server); some features require license |
| Premium features (TOTP, attachments, orgs) | Included free | Require license key |
| Best for | Individuals, families, teams up to ~20 users | Larger orgs, enterprise SSO, compliance needs |
| Bitwarden client compatible | All official clients work unchanged | Yes |
This guide covers both installation paths. Start with Vaultwarden (the lighter option) if you are self-hosting for personal or team use — it is faster to set up and does not require a Bitwarden license key. Use the Official Bitwarden Server section if you need enterprise features or vendor support.
And before you set up your Bitwarden instance, you’ll need to consider whether you’re running it only on a virtual machine (VM) or for other purposes (we cover both installation methods in this guide):
- Running self-hosted Bitwarden on a VM: Choose the Bitwarden standalone variant.
- Running Bitwarden for a different purpose: Choose Vaultwarden fka bitwarden_rs, an unofficial Bitwarden-compatible server.
Installing Bitwarden Server (Standalone)
The ready-made installation script makes installation relatively easy.
Requirements
- A Linux operating system-based server.
- Root access to the server.
- A subdomain connected to the server.
Step 1: Install Docker and cURL
Before you can run the installation script, you’ll need to first install a Docker container to run Bitwarden in. And, you’ll need to install other smaller packages like cURL.
Use this command to install both Docker and cUrl:
apt install docker.io docker-compose curl -yStep 2: Download the Installation Script
Downloading the script is quite simple and done with one command (the script is executable.) Use the following command:
curl -s -o bitwarden.sh \

https://raw.githubusercontent.com/bitwarden/server/master/scripts/bitwarden.sh \

&& chmod +x bitwarden.sh
Step 3: Run the Installation Script
To start the installation, run the installation script with the following command:
./bitwarden.sh installAnd then you’ll need to enter your (sub)domain:
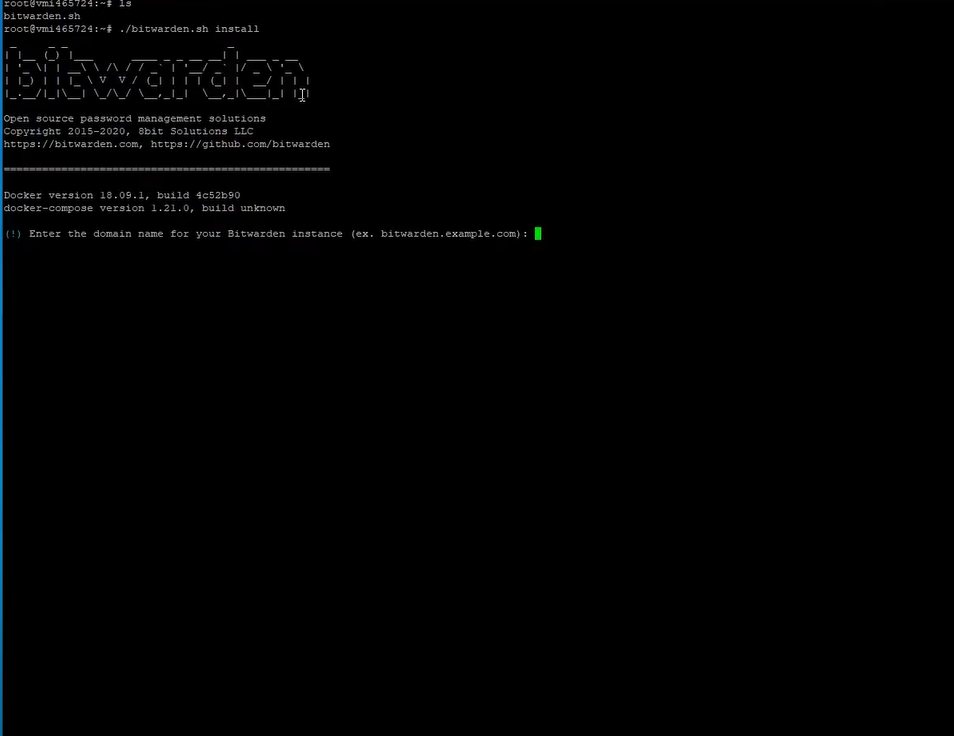
Step 3A: Install SSL Certificate (optional)
This next step of installing a free SSL certificate from Let’s Encrypt is optional, but since it’ll be a storage location for your passwords later on, we strongly recommend installing a SSL certificate (the certificate doesn’t have to be from Let’s Encrypt):
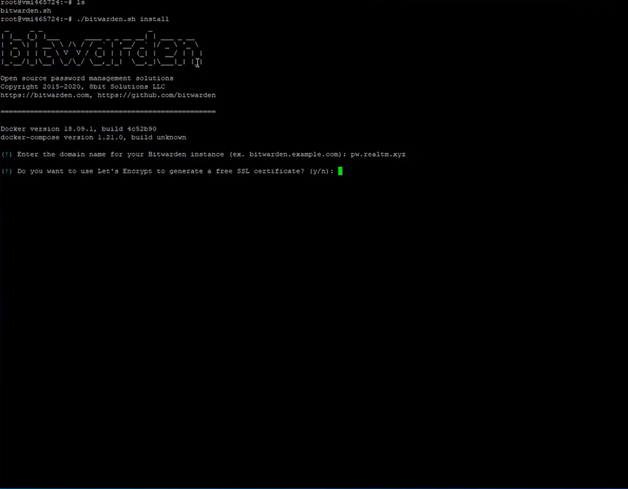
If you decide to install a SSL certificate, then you’ll need to enter your email address to request a private Installation ID and Installation Key for self-hosting Bitwarden in the next step.
Step 3B: Getting an Installation ID and Key
Enter the email address that you’d like to be admin to get your ID and Key.
You’ll then enter your Installation ID and Installation Key into the console.
The console will prompt you for your ID first:

Then your Key:

After you’ve entered both, the script installs the rest and your Bitwarden self-hosted instance is active.
Now call your (sub)domain in the browser, and create an account there.
And voila! You can now use your instance of Bitwarden.
If you want to run more than just Bitwarden on your server, then read the following sections.
Install Vaultwarden Server (Bitwarden)
If you want to run other things on your server in addition to your Bitwarden instance, then this variant is much more suitable for you.
Vaultwarden is an implementation of the Bitwarden API in a Rust program that also runs in a Docker container.
2026 Method: Vaultwarden with Docker Compose and Caddy (Recommended)
The following is the current standard deployment as of 2026. It uses Docker Compose for Vaultwarden and Caddy as an automatic HTTPS reverse proxy. This approach is simpler and more maintainable than the Apache2 method shown further below — Caddy handles SSL certificate issuance and renewal automatically with no extra steps.
Requirements:
- A VPS running Ubuntu 22.04 or Debian 12 — Contabo Cloud VPS 4 (4 vCPU / 8 GB, €4.50/mo) is well-suited; Vaultwarden itself uses ~256 MB RAM.
- Docker and Docker Compose installed.
- A domain or subdomain pointing to your server’s IP address (required for HTTPS).
- Ports 80 and 443 open in your firewall.
Step 1: Install Docker
curl -fsSL https://get.docker.com | shStep 2: Create the Docker Compose file
Create a directory and open the Compose file:
mkdir -p ~/vaultwarden && nano ~/vaultwarden/docker-compose.ymlPaste the following content — replace vault.yourdomain.com with your actual domain:
services:
vaultwarden:
image: vaultwarden/server:latest
container_name: vaultwarden
restart: unless-stopped
environment:
DOMAIN: "https://vault.yourdomain.com"
SIGNUPS_ALLOWED: "true" # set to false after creating your accounts
ADMIN_TOKEN: "your-long-random-token-min-64-chars"
volumes:
- ./vw-data:/data
ports:
- "127.0.0.1:8080:80"
caddy:
image: caddy:2-alpine
restart: unless-stopped
ports:
- "80:80"
- "443:443"
volumes:
- ./Caddyfile:/etc/caddy/Caddyfile
- caddy_data:/data
volumes:
caddy_data:
Step 3: Create the Caddyfile
nano ~/vaultwarden/CaddyfilePaste — replacing vault.yourdomain.com with your domain:
vault.yourdomain.com {

    reverse_proxy vaultwarden:80

}
Step 4: Start the stack
cd ~/vaultwarden && docker compose up -dCaddy automatically obtains a Let’s Encrypt certificate for your domain. Visit https://vault.yourdomain.com in your browser and create your account.
Step 5: Disable public signups (important)
Once your accounts are created, open docker-compose.yml and change SIGNUPS_ALLOWED to false, then restart: docker compose up -d. This prevents anyone who finds your URL from creating an account on your instance.
Step 6: Connect the Bitwarden app
Install any official Bitwarden client (browser extension, desktop app, or mobile app). On the login screen, tap the gear icon or ‘Self-hosted’ option and enter your server URL (e.g. https://vault.yourdomain.com). Your account credentials work exactly as with the cloud version.
Backups
The entire Vaultwarden database lives in the ./vw-data directory. Back this folder up regularly — if you lose it, passwords are unrecoverable. A simple daily cron job copying vw-data to Contabo Object Storage is the recommended approach for VPS deployments.
Prefer a 1-Click Option? Contabo does not yet offer a dedicated 1-click Vaultwarden image, but the Contabo Cloud VPS 4 (€4.50/mo, 4 vCPU / 8 GB RAM) is well-suited to running this stack — Vaultwarden uses only ~256 MB RAM, leaving the rest available for other self-hosted apps like Nextcloud or n8n.
Requirements
- Linux-based virtual server.
- Root access to the server.
- A (sub)domain already connected to the server.
Step 1: Install Docker and Other Needed Prorams
Before we can start installing Vaultwarden, we need to install programs like Docker in this variant.
You can install the following programs with this command:
apt install apache2 docker.io docker-compose curl git wget sudo certbot python3-certbot-apache -y Step 2: Create a Virtual Host
To tell the web server which port Vaultwarden is running on, we first need to insert a Virtual Host. We create this with the following command:
nano /etc/apache2/sites-available/bitwarden.confAnd paste in the following content:
<VirtualHost *:80>

    ServerName <Your(Sub)Domain>

    ProxyPreserveHost On

    <Proxy *>

        Order allow,deny

        Allow from all

    </Proxy>

    ProxyPass / http://localhost:8081/

    ProxyPassReverse / http://localhost:8081/

</VirtualHost>
Important: Replace <your(sub)domain> with your (sub)domain under which the Bitwarden instance should be accessible. The brackets (i.e. “<” and “>”) must be removed.
Now, activate the virtual host with this command:
a2ensite bitwarden.confStep 3: Activate the Required Modules
Enable required modules with this command (the server needs these modules to work properly):
a2enmod ssl proxy proxy_http proxy_balancer lbmethod_byrequestYou’ll need to restart the server afterward in order for the changes to take effect. Use this command to restart your server:
systemctl restart apache2Step 4: Install SSL certificate
Unlike the first variant, you’ll need to manually install the SSL certificate.
Fortunately, it’s a simple step. All you need to start the certification process is enter in this command:
certbot --apache The rest of the SSL certification process is straightforward, so we won’t go into details here.
Step 5 (Last Step): Download and Run Vaultwarden
After all the preparations are complete, you can download the Vaultwarden image with this command:
docker pull vaultwarden/server:latestAnd then start the container with this command:
docker run -d --name vaultwarden -v /vw-data/:/data/ -p 8081:80 vaultwarden/server:latest Now, go to your (sub)domain in the browser and create an account there.
Once you’ve created an account, your Vaultwarden (or Bitwarden instance) install is complete and ready to use. Thanks for following with us on this tutorial!
Feel free to check out more tutorials, or explore our VPS plans for self-hosting. Customers typically use our VPS for a variety of applications and projects (like self-hosting Bitwarden or Nextcloud) because we have the “best price-to-performance ratio” (where else can you get truckloads of RAM and traffic (32 TB!), lightning-fast NVMe SSDs, and AMD EPYC™ processors for cheap?).
FAQ: Self-Hosting Bitwarden or Vaultwarden on a VPS
Vaultwarden is widely used in the self-hosting community and is actively maintained. It implements the Bitwarden API protocol so all encryption happens on the client side using the official Bitwarden apps — Vaultwarden itself never sees your master password or decrypted vault data. The main risk in any self-hosted deployment is your own server security: use HTTPS (mandatory — Bitwarden clients refuse to connect over HTTP), keep the server patched, disable public signups after setup, and maintain regular backups of the vw-data directory.
Vaultwarden runs on approximately 256 MB of RAM in normal operation — far less than the official Bitwarden server which requires 2+ GB. This means it runs comfortably alongside other apps on a single VPS. A Contabo Cloud VPS 4 (4 vCPU / 8 GB RAM, €4.50/month) can run Vaultwarden, Nextcloud, and several other self-hosted apps simultaneously.
Yes. All official Bitwarden clients — browser extensions, desktop apps for Windows, macOS, and Linux, and mobile apps for iOS and Android — work with Vaultwarden. On the login screen, select ‘Self-hosted’ and enter your server URL. Everything else works exactly as with the Bitwarden cloud service.
Bitwarden is the official open-source password manager with a server maintained by Bitwarden, Inc. Vaultwarden is a community-maintained reimplementation of the Bitwarden server API written in Rust — it is compatible with all official Bitwarden clients but uses far fewer resources and includes premium features (TOTP, file attachments, organisations) without a license key. For most individuals and small teams, Vaultwarden is the recommended choice.
Vaultwarden is extremely lightweight — it runs on any VPS with at least 512 MB RAM and a domain name. Contabo’s Cloud VPS 4 (4 vCPU / 8 GB RAM / 100 GB SSD, €4.50/month) is more than sufficient and leaves ample headroom to run additional self-hosted apps on the same server. Unlimited traffic is included on all Contabo plans, so syncing vault data across all your devices has no bandwidth cost.
Disclaimer: Product specifications, features, and prices mentioned in this article are subject to change and may vary by region, billing term, and active promotions. Please check each provider’s or brand’s official website for current figures, pricing, and local currency rates.