WireGuard performance and security don’t have to compete. This guide shows how to harden a WireGuard VPS – understanding what the protocol secures (and what it doesn’t), locking down the host, adding a pre-shared key, preventing private-key leaks, and enforcing practical, interface-aware firewall rules – all while preserving speed. Each step is minimal, measured, and easy to verify so your tunnels stay fast and safe.
Understanding WireGuard’s Inherent Security
WireGuard security is strong by design: a small, opinionated protocol that fixes its cryptography and minimizes complexity. Instead of configurable cipher suites, WireGuard uses a modern, audited cryptographic stack – a Noise-based handshake with Curve25519, ChaCha20-Poly1305, BLAKE2s, SipHash24 and HKDF. On Linux, it runs in kernel space, keeping the data path efficient and predictable.
What WireGuard Protects by Default
- Strong peer authentication: Each peer is identified by a public key. Packets from unknown keys are dropped immediately – no usernames, certificate chains, or complex negotiations.
- Complete data protection: All traffic is encrypted and authenticated using modern AEAD cryptography. Tampered or corrupted packets never reach your applications.
- Perfect forward secrecy: Session keys rotate automatically during brief handshakes, limiting damage if a session key is later compromised. Past communications remain secure even if current keys leak.
- Network mobility support: Endpoints can change IP addresses (mobile networks, failover scenarios) without reconfiguring peers. The cryptographic identity remains constant while network details adapt.
- Minimal attack surface: Approximately 4,000 lines of code reduce parsing complexity, configuration errors, and edge cases that attackers typically exploit.
What WireGuard Cannot Solve Alone
- Traffic pattern visibility: WireGuard doesn’t hide its traffic characteristics. Network monitors can identify WireGuard connections by their UDP packet patterns and timing analysis.
- Identity exposure in handshakes: While data packets have forward secrecy, handshakes can reveal connection initiators if private keys are later compromised along with traffic logs.
- Host-level security: If your server or client is compromised, the tunnel security is also compromised. Operating system hardening and proper key management remain essential.
- Post-quantum cryptography: WireGuard’s current cryptography isn’t quantum-resistant by default, though pre-shared keys can provide additional post-quantum protection.
For additional technical limitations and potential mitigations, see the official WireGuard known limitations documentation.
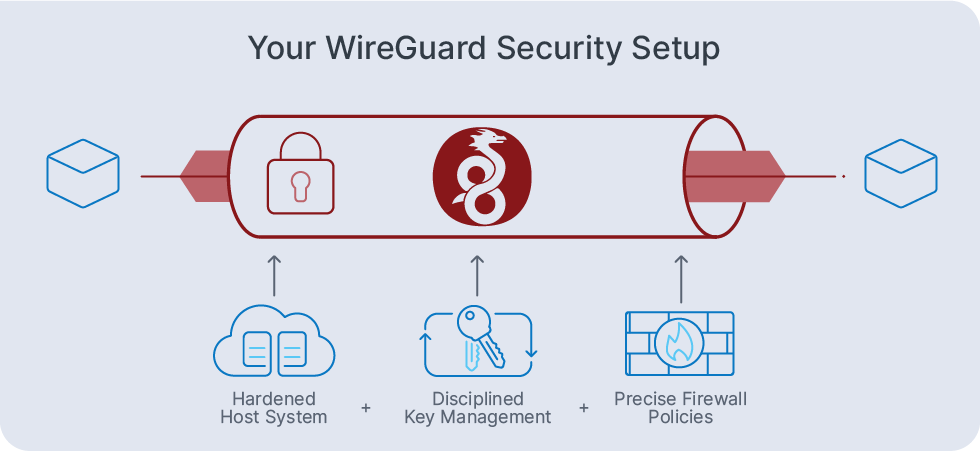
In general, you can think of WireGuard as a secure tunnel guard: it authenticates peers and protects packets with modern cryptography while remaining simple enough for thorough security auditing. Your responsibility is pairing it with a hardened host system, disciplined key management practices, and precise firewall policies. This combination preserves WireGuard’s performance advantages while closing the practical security gaps that real-world attackers actually exploit.
The Crucial Step: Securing Your WireGuard VPS Host
To secure WireGuard effectively, start with the underlying host system. Even the strongest VPN protocol fails if the server itself is compromised.
Essential System Security
Keep your system updated and minimal:
sudo apt update && sudo apt upgrade -y

sudo apt autoremove -y

sudo apt install unattended-upgrades -y  # Enables automatic security updates
SSH Hardening
Secure your primary attack surface before installing WireGuard:
# Backup the initial SSH configuration
sudo cp /etc/ssh/sshd_config /etc/ssh/sshd_config.backup

# Edit the SSH configuration
Sudo nano /etc/ssh/sshd_config

# Disable root login, password authentication (use keys only) and change default port
PermitRootLogin no
PasswordAuthentication no
PubkeyAuthentication yes
ChallengeResponseAuthentication no

# Limit the users who can access the SSH
AllowUsers yourusername

# Test SSH configuration syntax
sudo sshd -t

# If no errors, restart SSH
sudo systemctl restart sshd
WireGuard Key Security
Generate keys with proper permissions:
umask 077

wg genkey | sudo tee /etc/wireguard/privatekey | wg pubkey | sudo tee /etc/wireguard/publickey

sudo chmod 600 /etc/wireguard/privatekey
Critical: Never store private keys in repositories or share via insecure channels.
Basic Firewall Protection
Recommended (portable, iptables)
Add allows first; set default-deny last. Always have a second SSH session open when configuring firewall rules to avod complete lockout from your server. If you make a mistake, you can use the backup session to fix the rules.
# Allow loopback + established:

sudo iptables -A INPUT -i lo -j ACCEPT
sudo iptables -A INPUT -m conntrack --ctstate ESTABLISHED,RELATED -j ACCEPT

# Allow SSH and WireGuard:

sudo iptables -A INPUT -p tcp --dport 2222 -m conntrack --ctstate NEW -j ACCEPT
sudo iptables -A INPUT -p udp --dport 51820 -m conntrack --ctstate NEW -j ACCEPT
Note: Using port 2222 for SSH instead of the default port 22 significantly reduces log noise from automated scanning attacks, making it easier to identify legitimate security events in your logs.
# Default policies
sudo iptables -P INPUT DROP
sudo iptables -P FORWARD DROP
sudo iptables -P OUTPUT ACCEPT
IPv6: repeat with ip6tables if IPv6 is enabled.
Debian/Ubuntu persistence:
sudo apt install -y iptables-persistent && sudo netfilter-persistent save Easy (Ubuntu / UFW)
UFW is Ubuntu-centric and designed for ease of use. Other distributions would need to install and enable UFW or use the more portable iptables approach above.
sudo apt update && sudo apt install -y ufw

sudo ufw default deny incoming

sudo ufw default allow outgoing

sudo ufw allow 2222/tcp

sudo ufw allow 51820/udp

sudo ufw enable
Remember: Changing SSH to port 2222 reduces automated attack attempts and keeps your authentication logs cleaner, though it’s not a substitute for proper SSH hardening practices.
Automated Protection
Use SSH keys only and keep a second SSH session open while changing settings to avoid lockout.
# Enforce keys-only auth (OpenSSH with sshd_config.d/)
sudo tee /etc/ssh/sshd_config.d/99-keys-only.conf >/dev/null <<'EOF'
PermitRootLogin no
PasswordAuthentication no
PubkeyAuthentication yes
EOF

# Reload without dropping current sessions (service name varies by distro)
sudo systemctl reload ssh || sudo systemctl reload sshd

# Quick test from another terminal (adjust user/host/port)
ssh -p 2222 [email protected] -- true
Adding an Extra Layer: WireGuard Pre-Shared Key (PSK)
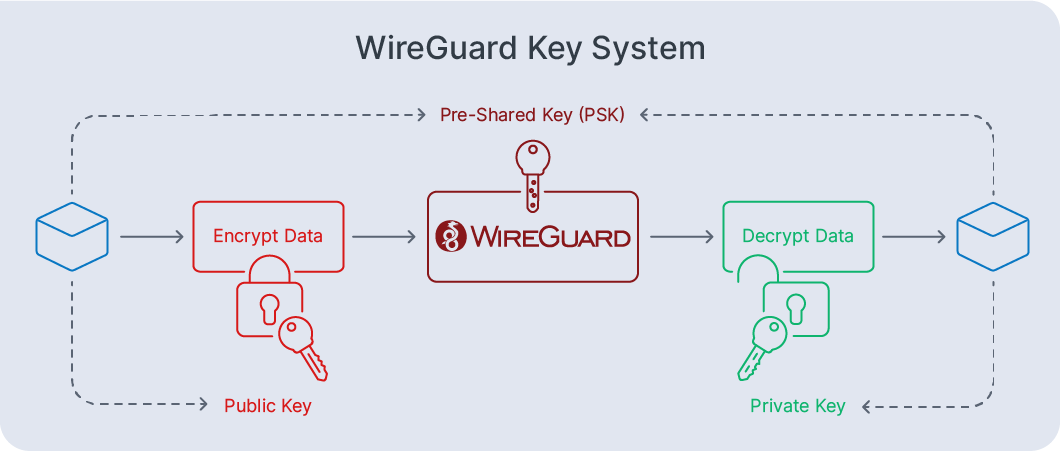
A WireGuard pre-shared key (PSK) is an optional symmetric secret mixed into the standard public key handshake. It adds defense-in-depth: even if an attacker later obtained a private key or recorded traffic, the PSK raises the cryptographic barrier significantly.
When to Use PSKs: Use PSKs for site-to-site links or environments with compliance requirements. The official WireGuard documentation states PSKs provide “post-quantum resistance” against future quantum computer attacks.
Setup and Configuration
Generate unique PSKs per server-client pair:
# Generate and store PSK with proper permissions

wg genpsk | pass insert –e wireguard/psk-client1
sudo chmod 600 /etc/wireguard/psk-client1

# Add to both peers' [Peer] sections

PresharedKey = <contents of /etc/wireguard/psk-client1>
Security Best Practices
- Use unique PSKs per connection – never share one PSK across multiple peers.
- Rotate PSKs periodically during planned maintenance windows.
- Store securely – never commit PSKs to repositories or share via insecure channels.
Verification
After configuration, run wg show. You should see pre-shared key: (hidden) under each peer, confirming the PSK is active.
WireGuard’s pre-shared keys provide substantial security enhancement with minimal operational overhead – a small change that significantly strengthens your WireGuard deployment against both current and future cryptographic threats.
Preventing WireGuard Private Key Leaks
The WireGuard private key is the single most sensitive item in your setup. Treat it like a root password: never transmit it, never paste it into chats or tickets, and keep it readable only by root. Leaks, not cryptography, are the most common real-world failure.
1) Generate Locally & Lock It Down
- Create keys on the host that will use them and store under
/etc/wireguard/. Usesudoeditfor config changes so secrets don’t land in shell history. - Set strict ownership and permissions before/after key creation.
# Create directory with correct perms (if needed)
sudo install -d -m 700 -o root -g root /etc/wireguard

# Generate keys without printing them to the terminal
umask 077
wg genkey | sudo tee /etc/wireguard/privatekey >/dev/null
sudo wg pubkey < /etc/wireguard/privatekey | sudo tee /etc/wireguard/publickey >/dev/null

# Enforce ownership & permissions
sudo chown root:root /etc/wireguard /etc/wireguard/*key
sudo chmod 700 /etc/wireguard
sudo chmod 600 /etc/wireguard/*key
2) Eliminate Side Channels
- No CLI args/screenshots/tickets/chats for private keys; they can surface in
ps, logs, scrollback, or clipboards. - Disable editor swap/backup files when touching key material (avoid
*.swp,*~). - Never commit private keys to Git – even private repos. If using config management, keep secrets in a proper secrets manager and template only public keys.
- Backups: either exclude
/etc/wireguard/*keyfrom plaintext backups or encrypt backups at rest. On restore, preserve owners/permissions; many leaks happen during sloppy restores.
3) Rotation & Lightweight Monitoring
Minimal-downtime rotation:
- On the rotating peer, generate a new keypair and update the local
PrivateKey(edit withsudoedit). - On the remote peer, update the matching
[Peer] PublicKey. - Restart both interfaces and verify a fresh handshake:
sudo systemctl restart wg-quick@wg0
wg show # check latest handshake + counters - Delete old private keys and any temporary files; rotate snapshots that captured old keys.
Optional defense-in-depth: add a per-peer PSK and rotate periodically.
Optional monitoring: add simple file-integrity/audit rules to watch /etc/wireguard/*key for unexpected reads/writes.
Advanced Firewall Hardening
A good WireGuard firewall lets only the traffic you intend, supports roaming clients, and won’t tank performance. Keep rules stateful, interface-aware, and placed in the right plane (cloud security group first, then OS firewall). Avoid mixing frameworks – choose UFW, nftables, or iptables and stick to it.
Principles that won’t slow you down: Use default-deny on INPUT with an explicit allow for your WireGuard UDP port (51820 by default) and ESTABLISHED,RELATED traffic. Scope rules to interfaces when possible (match iif wg0 / oif wg0) to keep policies readable. If your server is a gateway (it routes a subnet through the tunnel), you must open FORWARD and add NAT (MASQUERADE) on the WAN interface; for a host-only tunnel, leave FORWARD closed.
nftables (compact, OS firewall):
# INPUT (stateful allow + WireGuard UDP)
nft add table inet filter
nft add chain inet filter input '{ type filter hook input priority 0; policy drop; }'
nft add rule  inet filter input ct state established,related accept
nft add rule  inet filter input udp dport 51820 ct state new accept
iptables (gateway additions):
# FORWARD and NAT if the server routes a subnet
iptables -A FORWARD -i wg0 -o <WAN_IFACE> -j ACCEPT
iptables -A FORWARD -i <WAN_IFACE> -o wg0 -m conntrack --ctstate ESTABLISHED,RELATED -j ACCEPT
iptables -t nat -A POSTROUTING -o <WAN_IFACE> -j MASQUERADE
MSS and PMTU: When routing subnets, clamp TCP MSS so packets don’t exceed path MTU and get dropped mid-path:
iptables -t mangle -A FORWARD -o wg0 -p tcp --tcp-flags SYN,RST SYN -j TCPMSS --clamp-mss-to-pmtu (For host-to-host tunnels that don’t forward subnets, this is usually unnecessary.)
Rate limiting without self-sabotage: You can add gentle UDP rate limits or bursts to blunt scan noise, but keep them conservative – over-tight limits will cap peak throughput or break handshakes on busy links. Test after any limiter.
“iptables as a VPN”: Forwarding and NAT can bridge networks and “feel like a VPN,” but they don’t encrypt or authenticate traffic. Use the firewall for policy and routing, and WireGuard for identity and encryption. Together they form a real, secure site-to-site link.
Troubleshooting fast-path.
- No handshake: UDP/51820 blocked in the cloud security group or OS firewall; confirm the listener with ss -uapn | grep 51820.
- Handshake OK, no traffic: FORWARD or MASQUERADE missing on a gateway. Add the rules above and re-test.
- Works one way only: reverse path rules missing. Run iperf3 -R through the tunnel and fix the opposite direction.
- Stalls/frag needed: enable MSS clamping (when routing) and verify MTU choices.
Keep rules minimal, measured, and documented. A small, stateful, interface-aware policy gives you reliable security and preserves WireGuard’s performance edge.
WireGuard Security FAQ
What is WireGuard? How does the WireGuard VPN protocol work?
WireGuard is a modern, open-source VPN protocol that creates encrypted tunnels between peers using public keys. On Linux it runs in-kernel for speed; peers allow traffic via AllowedIPs and communicate over UDP.
Is WireGuard secure?
Yes. Its fixed, audited crypto (Noise framework: Curve25519, ChaCha20-Poly1305, BLAKE2s, HKDF) and small codebase reduce attack surface. Real security still depends on host hardening, correct firewalling, and strict private-key hygiene.
Is WireGuard free to use?
Yes. WireGuard is free and open source (GPLv2 in Linux; permissive userspace ports exist). There are no licensing fees to deploy it on your VPS or devices.
What security vulnerabilities does WireGuard have?
No widely exploited protocol flaws are known. Risks are operational: private-key leaks, weak host security, metadata exposure (UDP, timing), and non-PQC primitives. Handshakes can reveal initiators if keys and logs are later compromised.
What WireGuard firewall rules should I use?
Allow your UDP port (51820 by default) and ESTABLISHED/RELATED traffic. If acting as a gateway, add FORWARD accepts and NAT (MASQUERADE) on the WAN interface; when routing subnets, clamp TCP MSS to PMTU.
What is the best port to use for WireGuard?
Any UDP port works. 51820/udp is standard. For stealth, choose a high random UDP port. If networks block UDP broadly, expect issues – tunneling over TCP/HTTPS is possible but hurts performance.
